|
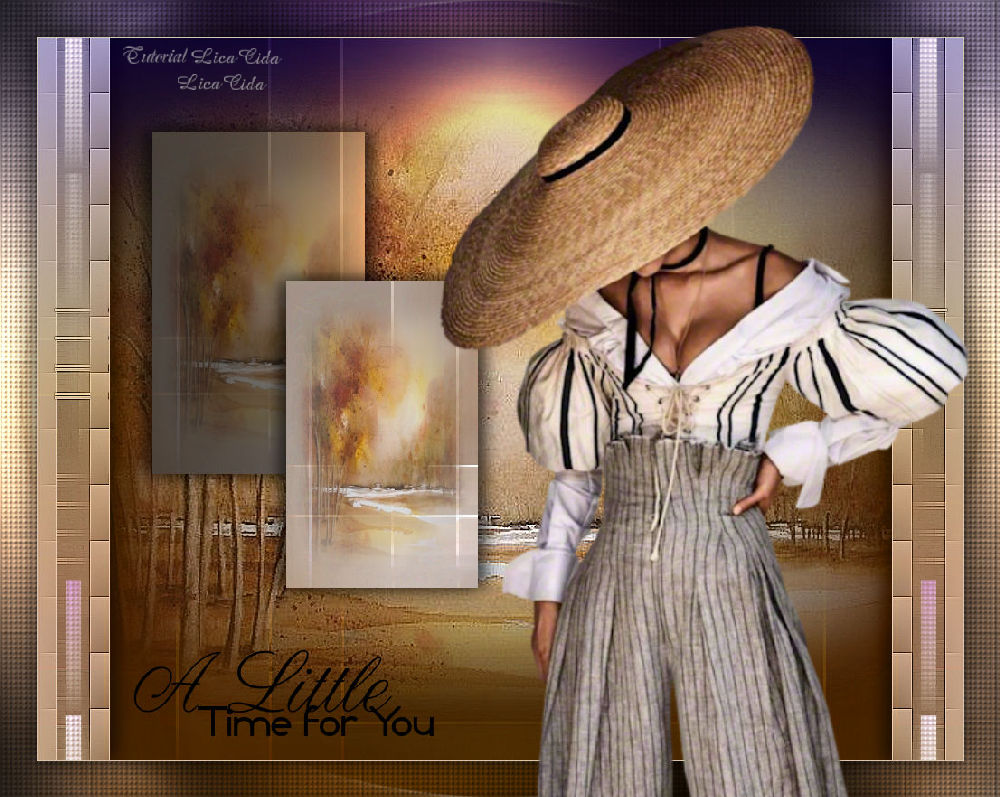
A Little Time For You
TRADUÇÕES

MATERIAL

Seleções: imagem alphachannelll — Seleção #1 e Seleção #2
(guardadas no canal alfa da imagem).
Preset: Illumination → Lights → Preset_Lights_Lens_of_love --
Salvar na pasta Presets do PSP.
Texture: Texture_Corel_15_005
Deco: deco1lc
Tubes: SvB (1024) Beauty
Paysage automne jewel 002
Texto: texto-arquivo net
Marca-d'água.
Efeitos do PSP.
Versão usada: PSP X8.
PLUGINS
Plugin Mehdi → Sorting Tiles
Plugin Toadies → What Are You?
Plugin Toadies → BitchesCrystal
Plugin FunHouse → Loom
Plugin Nik Software → Color Efex Pro 3.0 → Bi-Color User Defined
Plugin Graphics Plus → Cross Shadow
TUTORIAL
|
Esta seta marca sua linha
Clique e arraste para movê-la
|
|
Configure: Foreground: #9e8775 — Background: #d4c7b7.
1_.
Abra o arquivo alphachannelll, duplique (Shift + D) e feche (minimize) a original.
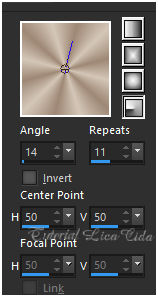
Pinte com o gradiente formado pelas cores acima.
Configure: Style: Radial — Angle: 14 — Repeats: 11 — Invert desmarcado — Center Point: H: 50 / V: 50.
2_.
Selections → Select All.
Edit → Copy no tube SvB (1024) Beauty
Edit → Paste Into Selection.
Selections → Select None.
3_.
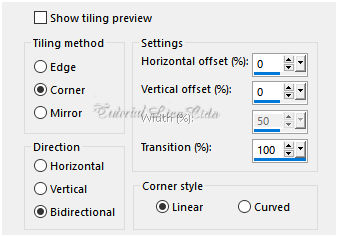
Effects → Image Effects → Seamless Tiling.
4_.
Adjust → Blur → Radial Blur.
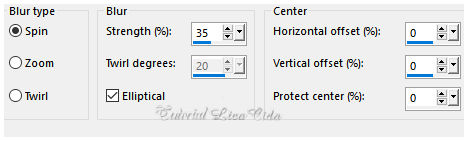
5_.
Plugin Mehdi → Sorting Tiles.
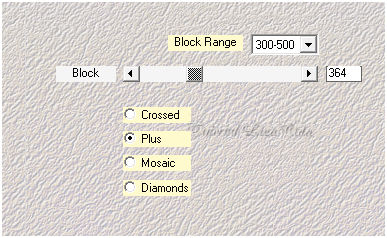
6_.
Plugin Toadies → What Are You? — Default (20 / 20).
Effects → Edge Effects → Dilate.
Effects → Edge Effects → Enhance More.
Effects → Edge Effects → Dilate.
7_.
Effects → Reflection Effects → Rotating Mirror — Horizontal Offset: 0 — Rotation Angle: 0 — Repeat.
8_.
Selections → Load/Save Selection → Load Selection From Alpha Channel → Seleção #1.
Selections → Promote Selection to Layer.
9_.
Edit → Copy no tube Paysage automne jewel 002
Edit → Paste Into Selection.
Selections → Select None.
Effects → 3D Effects → Drop Shadow: -1 / 10 / 60 / 25,00 — Color: #000000.
Effects → 3D Effects → Drop Shadow: 1 / -10 / 60 / 25,00 — Color: #000000.
10_.
Layers → Duplicate.
Image → Resize: 90% — Resize all layers desmarcado.
Effects → Image Effects → Offset: H: 110 / V: -135 — Custom e Transparent marcados.
Não una as layers.
11_.
Ative a Raster 1.
Selections → Load/Save Selection → Load Selection From Alpha Channel → Seleção #2.
Selections → Promote Selection to Layer.
Selections → Select None.
12_.
Plugin FunHouse → Loom — Default.
13_.
Plugin Toadies → BitchesCrystal: 20 / 20.
Effects → Edge Effects → Dilate.
Effects → Edge Effects → Enhance More.
14_.
Effects → Reflection Effects → Rotating Mirror — Horizontal Offset: 0 — Rotation Angle: 180 — Repeat.
Blend Mode: Luminance (L) — Opacity a gosto (opcional).
Effects → 3D Effects → Drop Shadow: -1 / 10 / 60 / 25,00 — Color: #000000.
Effects → 3D Effects → Drop Shadow: 1 / -10 / 60 / 25,00 — Color: #000000.
15_.
Ative novamente a Raster 1.
Layers → New Raster Layer.
Selections → Select All.
Edit → Copy no tube Paysage automne jewel 002
Edit → Paste Into Selection.
Selections → Select None.
Adjust → Sharpness → Sharpen More.
16_.
Ative novamente a Raster 1.
Effects → Illumination Effects → Lights → Preset_Lights_Lens_of_love.
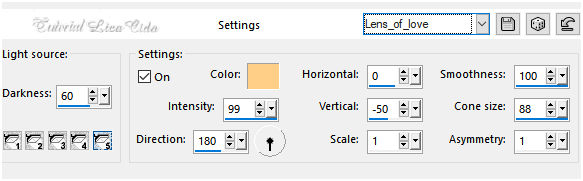
17_.
Plugin Nik Software → Color Efex Pro 3.0 → Bi-Color User Defined.
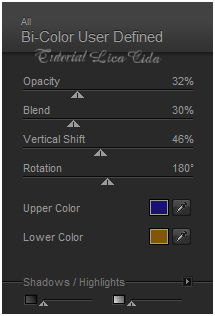
18_.
Aplique também na layer Promoted Selection:
Effects → Illumination Effects → Lights → Preset_Lights_Lens_of_love (veja o print acima).
Altere os Blend Modes e a Opacity das layers.
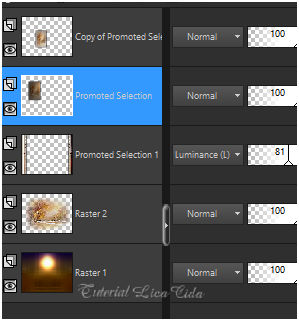
Ative a layer superior.
19_.
Edit → Copy no deco1lc
Edit → Paste As New Layer.
Blend Mode: Screen (ou a gosto).
20_.
Image → Add Borders: 1 px, Symmetric marcado — Color: #d4c7b7 (clara).
Edit → Copy.
Image → Add Borders: 40 px, Symmetric marcado — Color: #ffffff.
Selecione a borda.
Edit → Paste Into Selection.
Adjust → Blur → Radial Blur (print do item 4).
Effects → Texture Effects → Texture: Texture_Corel_15_005.
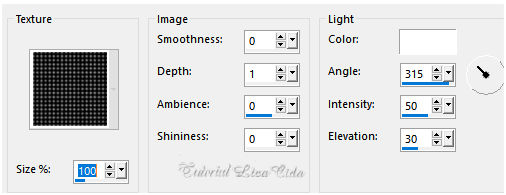
Plugin Graphics Plus → Cross Shadow — Default.
Selections → Invert.
Effects → 3D Effects → Drop Shadow: 0 / 0 / 80 / 40,00 — Color: #000000.
Selections → Select None.
21_.
Edit → Copy no tube SvB (1024) Beauty
Edit → Paste As New Layer.
Posicione o tube a gosto.
22_.
Edit → Copy no texto-arquivo net
Edit → Paste As New Layer.
Posicione.
Image → Resize — Width: 1000 px.
Aplique a marca-d'água.
Assine e salve.
Espero que gostem.
Aparecida / LicaCida, janeiro de 2018.
Rio de Janeiro - Brasil.

VOLTAR
Copyright ©2026 - Web Design - Naise Minas
|


