|
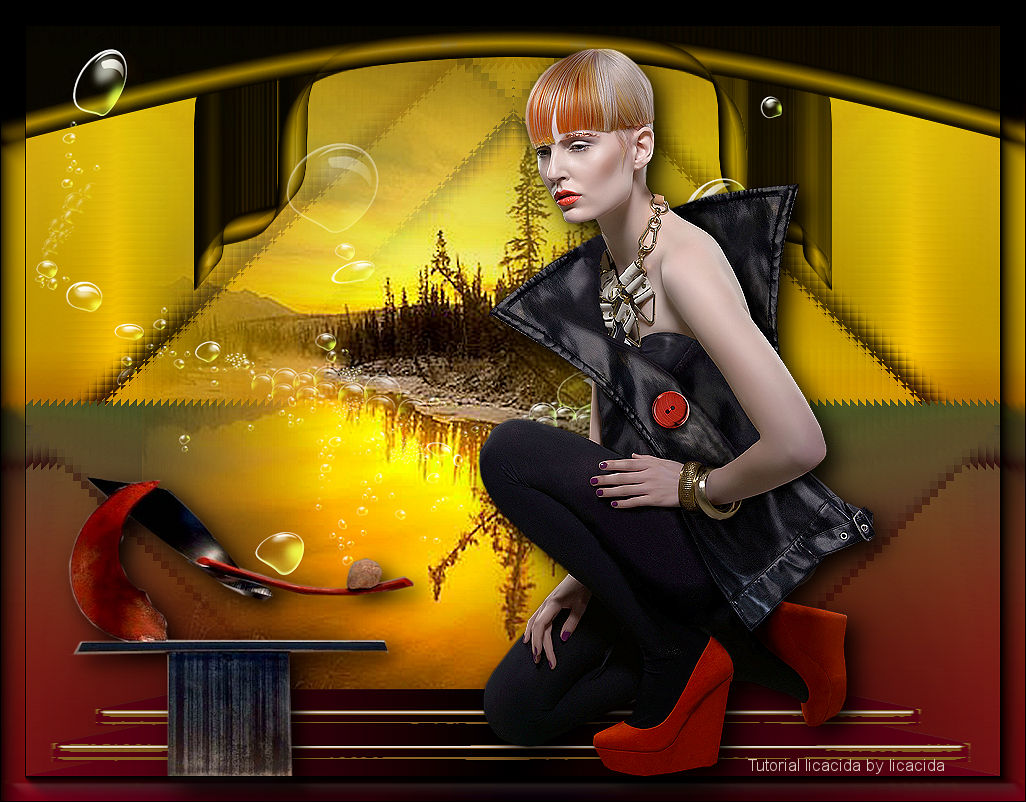
Acaso
TRADUÇÕES

MATERIAL

Preset: avbrospresetmara
Tubes: CalGuisAdreanna11112013
SuizaBella_Ref_AG-001124
Decos: Callitubes-11diversos
escadas_Maria José
Elemento: elemento arquivo net
Mask: gradientedworisch
Marca-d'água.
Efeitos do PSP.
Versão usada: PSP X9.
PLUGINS
Plugin AV Bros → Page Curl 2.1
Plugin Distort → Shear
Plugin Alien Skin Eye Candy 5: Impact → Extrude
Plugin Alien Skin Eye Candy 5: Impact → Perspective Shadow
Plugin Simple → Blintz
Plugin Nik Software → Color Efex Pro 3.0 → Bi-Color Filters
Plugin MuRa's Seamless → Duplicate
Plugin 'v' Kiwi's Oelfilter → Zig-Zack
Plugin AAA Frames → Foto Frame
TUTORIAL
|
Esta seta marca sua linha
Clique e arraste para movê-la
|
|
Configure: Foreground: #000000 — Background: #d2ae12.
1_.
Abra uma nova imagem transparente de 1024 x 700 px.
Com as cores escolhidas, configure o gradiente: Style: Linear — Angle: 0 — Repeats: 1 — Invert desmarcado.
Pinte a layer.
2_.
Effects → Geometric Effects → Perspective - Horizontal: 97 — Transparent.
Image → Mirror → Mirror Horizontal.
Repita o item 2.
3_.
Plugin AV Bros → Page Curl 2.1.
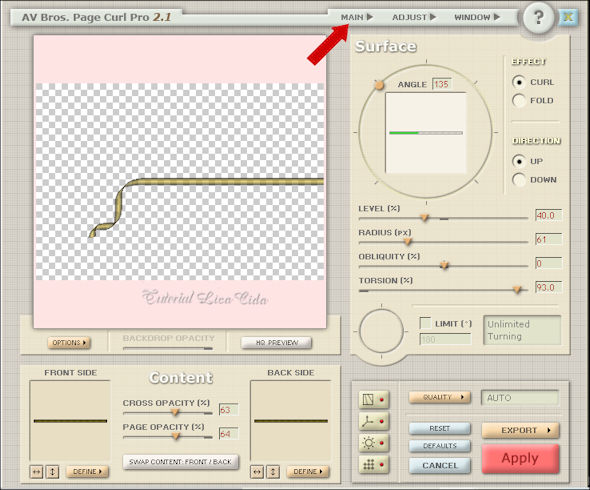
Clique em Main (observe a seta acima).
Aparecerá a janela como no print. Clique onde indico e procure o preset avbrospresetmara.
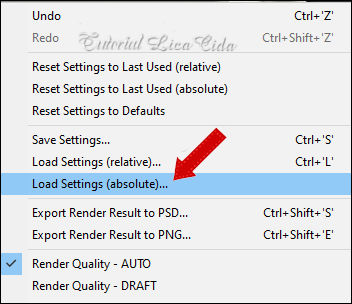
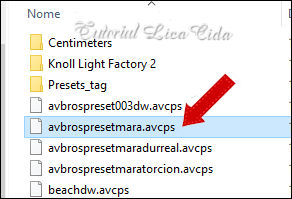
Clique em Abrir e depois em Apply.
Layers → Duplicate.
Image → Mirror → Mirror Horizontal.
Layers → Merge → Merge Down.
4_.
Effects → Image Effects → Offset: H: 0 / V: 210 — Custom e Transparent marcados.
5_.
Image → Rotate Right.
6_.
Plugin Distort → Shear.
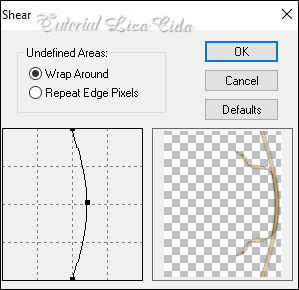
7_.
Image → Rotate Left.
8_.
Plugin Alien Skin Eye Candy 5: Impact → Extrude.
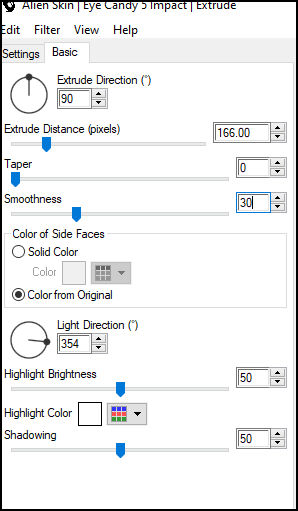
9_.
Image → Canvas Size: 1024 x 800 — Bottom: 100.
10_.
Layers → New Raster Layer.
Layers → Arrange → Send to Bottom.
Pinte com o gradiente formado no item 1.
11_.
Selections → Select All.
Edit → Copy no SuizaBella_Ref_AG-001124
Edit → Paste Into Selection.
Selections → Select None.
12_.
Effects → Image Effects → Seamless Tiling: Default.
13_.
Adjust → Blur → Radial Blur.
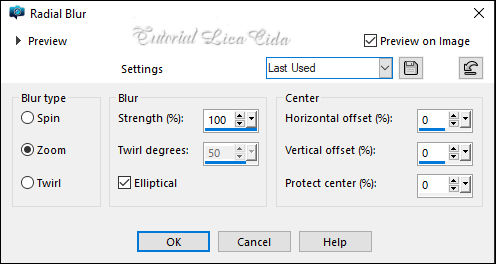
14_.
Plugin Simple → Blintz.
Adjust → Sharpness → Sharpen More.
15_.
Com a ferramenta Freehand Selection — Point to point, selecione o triângulo formado.
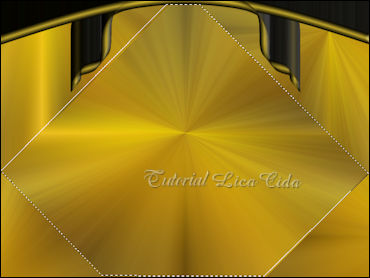
Effects → 3D Effects → Drop Shadow: 10 / 10 / 85 / 20,00 — Color: #000000.
Repita com Vertical e Horizontal negativos:
Effects → 3D Effects → Drop Shadow: -10 / -10 / 85 / 20,00 — Color: #000000.
Selections → Select None.
16_.
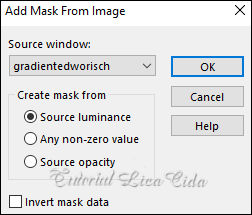
Layers → New Mask Layer → From Image: gradientedworisch.
Effects → Edge Effects → Enhance.
Layers → Merge → Merge Group.
17_.
Layers → New Raster Layer.
Layers → Arrange → Send to Bottom.
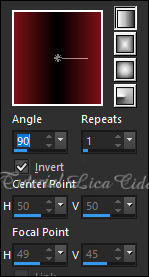
Use uma cor contrastante no Background: #791318.
Configure o gradiente como no print:
18_.
Ative a Group-Raster 2.
Plugin Nik Software → Color Efex Pro 3.0 → Bi-Color Filters — Color Set: Cool/Warm 1.
Repita na Raster 1 (use a gosto).
19_.
Ative novamente a Group-Raster 2.
Plugin MuRa's Seamless → Duplicate.
Repita o item 16: aplique a mask gradientedworisch.
20_.
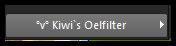
Plugin 'v' Kiwi's Oelfilter → Zig-Zack — Default.
21_.
Effects → Reflection Effects → Rotating Mirror: 0 / 180 — Reflect.
22_.
Edit → Copy no SuizaBella_Ref_AG-001124
Edit → Paste As New Layer.
Image → Resize: 80% — Resize all layers desmarcado.
Posicione.
Adjust → Sharpness → Sharpen More.
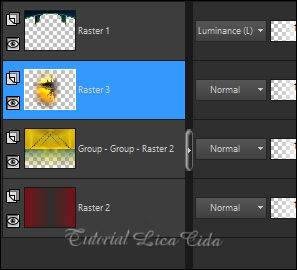
LAYERS
23_.
Edit → Copy nas escadas_Maria José
Edit → Paste As New Layer.
Objects → Align → Bottom.
24_.
Edit → Copy no elemento arquivo net
Edit → Paste As New Layer.
Acerte o posicionamento a gosto.
Blend Mode: Screen (layer superior).
25_.
Edit → Copy no CalGuisAdreanna11112013
Edit → Paste As New Layer.
Plugin Alien Skin Eye Candy 5: Impact → Perspective Shadow — Blurry.
Posicione.
26_.
Edit → Copy no Callitubes-11diversos
Edit → Paste As New Layer.
Plugin Alien Skin Eye Candy 5: Impact → Perspective Shadow — Blurry.
Posicione.
Image → Add Borders: 1 px, Symmetric marcado — Color: #000000.
27_.
Plugin AAA Frames → Foto Frame — Width: 25, demais valores Default.
Assine e salve.
Espero que gostem.
Obrigada!
Aparecida / LicaCida, setembro de 2021.
Rio de Janeiro - Brasil.

VOLTAR
Copyright ©2026 - Web Design - Naise Minas
|


