|
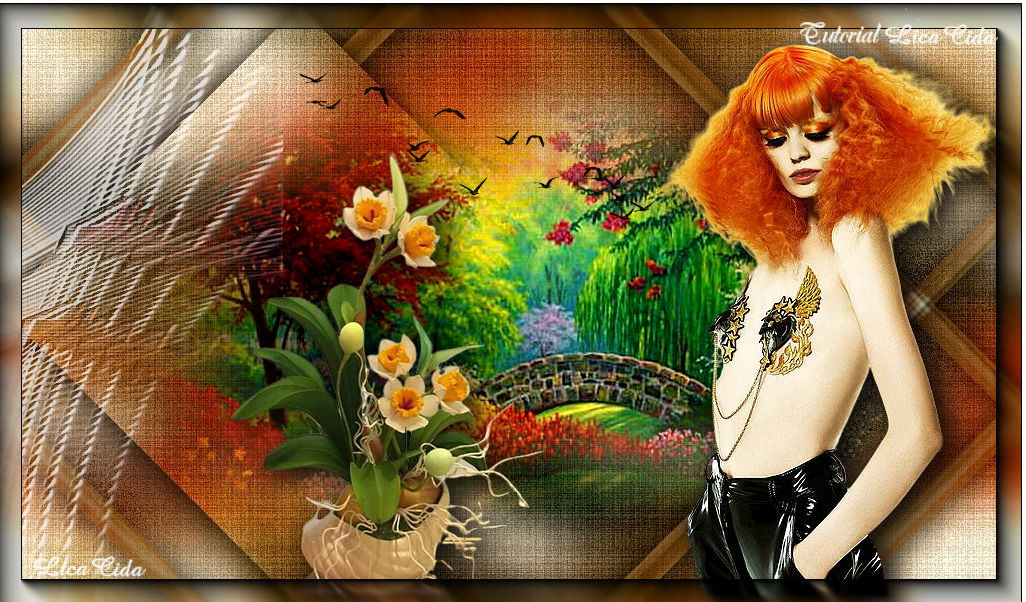
Admirável
TRADUÇÕES

MATERIAL

Preset: Preset_InnerBevel_Deep Beveled --
Salvar na pasta Presets do My PSP Files.
Tubes: exclusivo-naisem (usado com autorização da autora)
KamilTubes-454
TUBE_NAISEM_FLORES_126
Decor: decolateral´lc
bird_brushes_II_by_lpdragonfly_5
Marca-d'água.
Efeitos do PSP.
PLUGINS
Plugin Texturize → Raw Canvas
Plugin Simple → 4 Way Average
Plugin Simple → Left Right Wrap
Plugin VanDerLee → UnPlugged-X → 45° Rectangle
Plugin AAA Frames → Foto Frame
TUTORIAL
|
Esta seta marca sua linha
Clique e arraste para movê-la
|
|
1_.
Abra o material no PSP, duplique e feche o original.
Escolha duas cores para trabalhar: Foreground: #191919 — Background: #da8926.
2_.
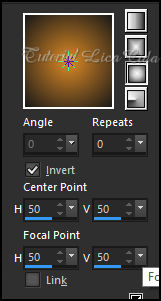
Pinte com o gradiente Sunburst formado pelas cores em uso.
3_.
Selections → Select All.
Edit → Copy no tube exclusivo-naisem (usado com autorização da autora)
Edit → Paste Into Selection.
Selections → Select None.
4_.
Effects → Image Effects → Seamless Tiling — Default.
5_.
Adjust → Blur → Gaussian Blur — Radius: 26,00.
6_.
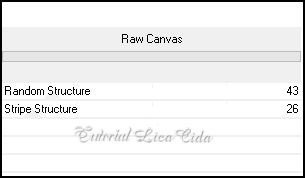
Plugin Texturize → Raw Canvas.
Layers → Duplicate.
7_.
Effects → Geometric Effects → Perspective - Horizontal.
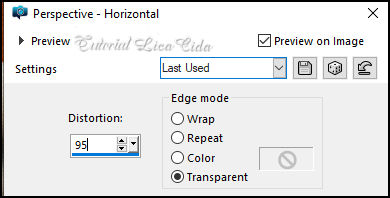
Image → Mirror → Mirror Horizontal.
Repita o Perspective - Horizontal com os mesmos valores.
8_.
Effects → Image Effects → Offset.
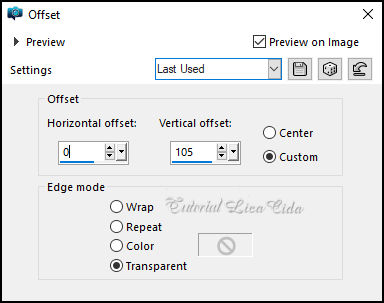
9_.
Effects → Geometric Effects → Skew.
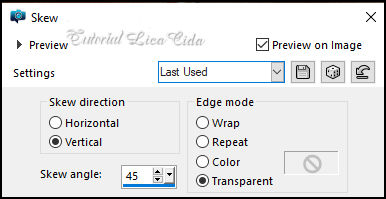
Layers → Duplicate.
Image → Mirror → Mirror Horizontal.
Layers → Merge → Merge Down.
10_.
Plugin Simple → 4 Way Average.
Effects → User Defined Filter → Emboss_3.
11_.
Plugin Simple → Left Right Wrap.
12_.
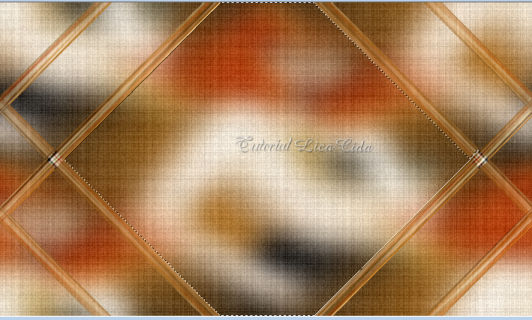
Com a ferramenta Magic Wand (Default), selecione o centro como mostra o print.
13_.
Edit → Copy no misted KamilTubes-454
Edit → Paste As New Layer.
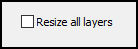
Image → Resize: 80% — Resize all layers desmarcado.
Selections → Invert.
Pressione a tecla Delete.
Selections → Invert.
Adjust → Sharpness → Sharpen More.
Selections → Select None.
14_.
Com a ferramenta Magic Wand (Default), selecione as laterais como mostra o print.
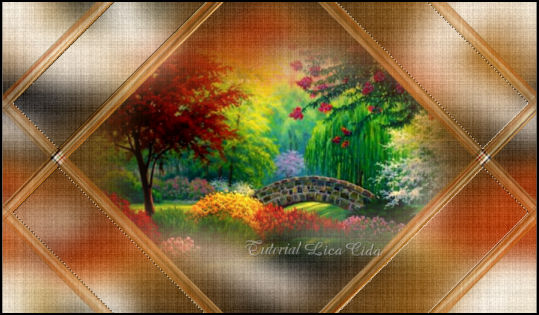
15_.
Selections → Modify → Feather: 12.
16_.
Layers → New Raster Layer.
Edit → Copy no misted KamilTubes-454
Edit → Paste Into Selection.
Adjust → Sharpness → Sharpen More.
17_.
Effects → 3D Effects → Inner Bevel — Preset: Deep Beveled (no material).
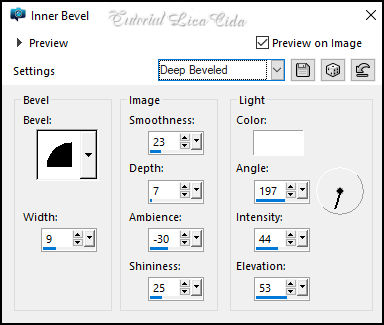
Selections → Select None.
18_.
Plugin Texturize → Raw Canvas (print do item 6).
19_.
Effects → Texture Effects → Mosaic - Antique.
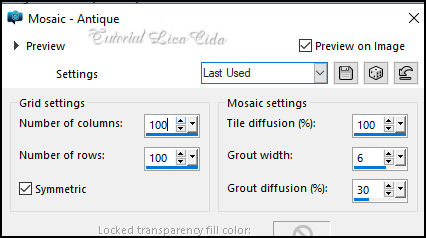
Blend Mode: Multiply.
Layers → Merge → Merge Down.
Effects → 3D Effects → Drop Shadow: 0 / 0 / 80 / 40,00 — Color: #000000.
Repita o Drop Shadow.
20_.
Na mesma layer:
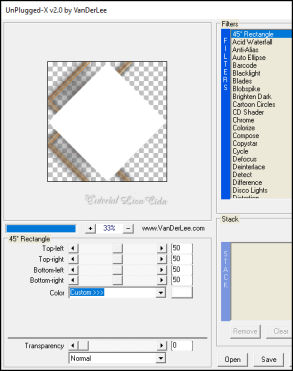
Plugin VanDerLee → UnPlugged-X → 45° Rectangle.
21_.
Com a ferramenta Magic Wand (Default), selecione o retângulo.
Ative a layer do fundo (Raster 1).
Selections → Promote Selection to Layer.
Layers → Arrange → Move Up.
Effects → 3D Effects → Drop Shadow: 0 / 0 / 80 / 40,00 — Color: #000000.
Layers → Merge → Merge Visible.
22_.
Edit → Copy no decolateral´lc
Edit → Paste As New Layer.
Objects → Align → Left.
23_.
Edit → Copy no bird_brushes_II_by_lpdragonfly_5
Edit → Paste As New Layer.
Posicione.
24_.
Edit → Copy no tube TUBE_NAISEM_FLORES_126
Edit → Paste As New Layer.
Posicione e use a gosto.
25_.
Edit → Copy no tube exclusivo-naisem
Edit → Paste As New Layer.
Posicione e use a gosto.
Layers → Merge → Merge Visible.
26_.
Plugin AAA Frames → Foto Frame: Width: 25 — demais valores Default.
Repita.
Aplique a marca-d'água.
Assine e salve.
File → Export → JPEG Optimizer.
Aparecida / LicaCida, janeiro de 2024.
Rio de Janeiro - Brasil.

VOLTAR
Copyright ©2026 - Web Design - Naise Minas
|


