|
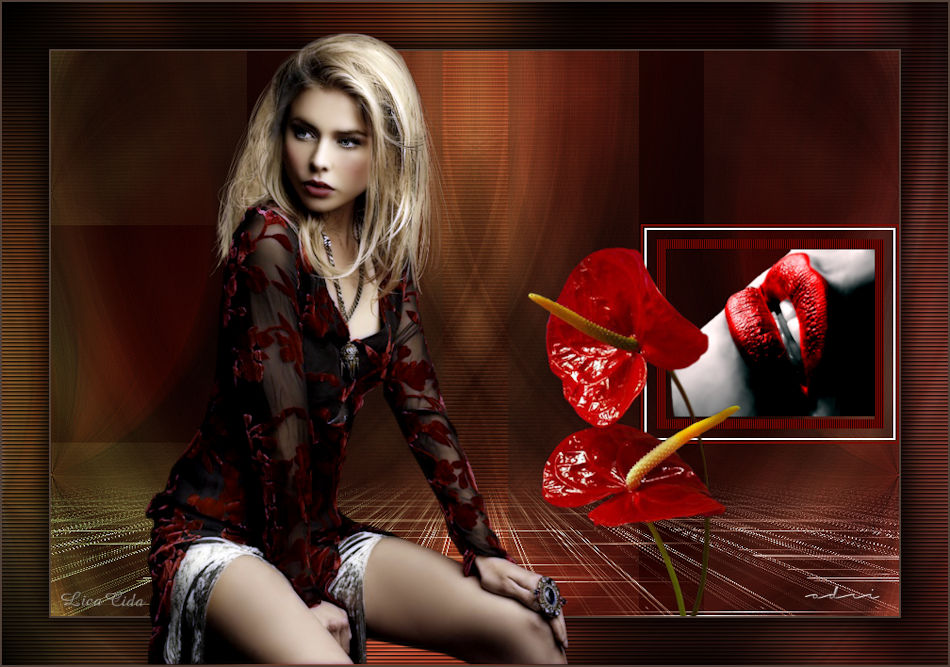
Carolina
TRADUÇÕES

MATERIAL

Seleção: AD_25 --
Salvar na pasta Selections do PSP.
Tubes: Gabry-woman 029
5761 - TUBES SUELYDAM
flowers_48_bycrealine
Back: cristallc
Marca-d'água.
Efeitos do PSP.
Versão usada: PSP X8.
PLUGINS
Plugin VM Experimental → Guess What
Plugin VM Instant Art → Lightlines
Plugin Transparency → Eliminate Black
Plugin Simple → 4 Way Average
Plugin MuRa's Meister → Perspective Tiling
Plugin AP [Lines] → Lines - SilverLining
Plugin Nik Software → Color Efex Pro 3.0 → Bi-Color Filters
Plugin Graphics Plus → Cross Shadow
TUTORIAL

|
Esta seta marca sua linha
Clique e arraste para movê-la
|
|
1_.
Abra uma nova imagem transparente de 900 x 600 px.
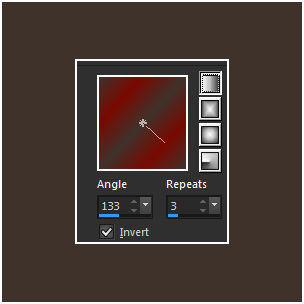
Pinte com o gradiente formado pelas cores #790b03 e #3f322b.
Configure: Style: Linear — Angle: 133 — Repeats: 3 — Invert marcado.
2_.
Selections → Select All.
Edit → Copy no tube Gabry-woman 029
Edit → Paste Into Selection.
Selections → Select None.
Effects → Image Effects → Seamless Tiling — Default.
3_.
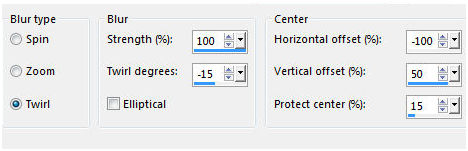
Adjust → Blur → Radial Blur.
Layers → Duplicate.
Image → Mirror.
Blend Mode: Overlay.
Layers → Merge → Merge Down.
Effects → Edge Effects → Enhance More.
Layers → Duplicate.
4_.
Plugin VM Experimental → Guess What: 163 / 110 / 59 / 107 / 255.
5_.
Plugin Transparency → Eliminate Black.
6_.
Effects → Texture Effects → Blinds.
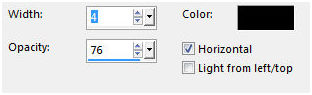
Blend Mode: Screen.
7_.
Plugin Simple → 4 Way Average.
Layers → Duplicate.
Layers → Merge → Merge Down.
8_.
Layers → New Raster Layer.
Pinte com qualquer cor usada no tutorial.
Plugin VM Instant Art → Lightlines: 117 / 113 / 74.
9_.
Repita o item 5: Plugin Transparency → Eliminate Black.
10_.
Plugin MuRa's Meister → Perspective Tiling.
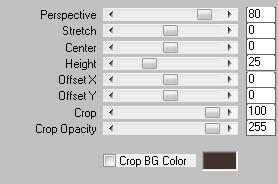
Com a ferramenta Magic Wand — Feather: 60, clique na parte transparente.
Veja a configuração:

Pressione a tecla Delete cinco ou seis vezes, para suavizar bem o efeito.
Selections → Select None.
11_.
Ative a Raster 1.
Selections → Load/Save Selection → Load Selection From Disk → AD_25.
Selections → Promote Selection to Layer.
12_.
Layers → New Raster Layer.
Pinte com a cor #790b03 (usada no Foreground).
Selections → Modify → Contract: 2 px.
Pressione a tecla Delete.
13_.
Selections → Modify → Contract: 2 px.
Layers → New Raster Layer.
Pinte com a cor #ffffff.
Selections → Modify → Contract: 2 px.
Pressione a tecla Delete.
Layers → Merge → Merge Down (aplique duas vezes).
Layers → Arrange → Bring to Top.
A seleção continua ativa.
14_.
Selections → Modify → Contract: 10 px.
Layers → New Raster Layer.
Pinte com a cor #790b03 (usada no Foreground).
Selections → Modify → Contract: 10 px.
Pressione a tecla Delete.
Selections → Invert.
15_.
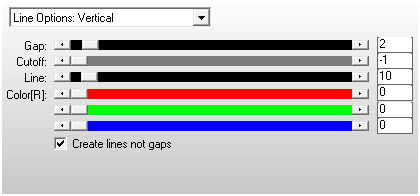
Plugin AP [Lines] → Lines - SilverLining.
16_.
Edit → Copy no tube 5761 - TUBES SUELYDAM
Edit → Paste As New Layer.
Posicione e redimensione proporcionalmente.
Pressione a tecla Delete.
Selections → Select None.
Layers → Merge → Merge Down (aplique duas vezes).
17_.
Edit → Copy no tube flowers_48_bycrealine
Edit → Paste As New Layer.
Posicione.
18_.
Ative a Raster 2.
Layers → New Raster Layer.
Selections → Select All.
Edit → Copy no cristallc
Edit → Paste Into Selection.
Selections → Select None.
Blend Mode: Overlay.
19_.
Ative a Raster 1.
Layers → Duplicate.
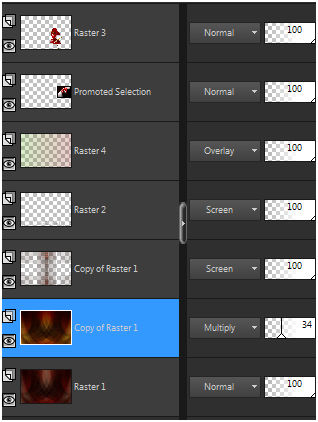
Plugin Nik Software → Color Efex Pro 3.0 → Bi-Color Filters — Color Set: Brown 1.
20_.
Image → Add Borders: 2 px, Symmetric marcado — Color: #524138.
Edit → Copy.
Image → Add Borders: 50 px, Symmetric marcado — Color: #ffffff.
Selecione a borda.
Edit → Paste Into Selection.
21_.
Adjust → Blur → Radial Blur (veja o print do item 3).
22_.
Effects → Texture Effects → Blinds (veja o print do item 6).
23_.
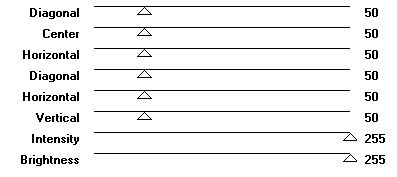
Plugin Graphics Plus → Cross Shadow.
Selections → Invert.
Effects → 3D Effects → Drop Shadow: 0 / 0 / 80 / 40,00 — Color: #000000.
Selections → Select None.
24_.
Edit → Copy no tube Gabry-woman 029
Edit → Paste As New Layer.
Posicione.
25_.
Image → Add Borders: 2 px, Symmetric marcado — Color: #524138.
Image → Resize: Width 950 px.
Aplique a marca-d'água.
Assine e salve.
Esperamos que gostem.
Tutorial escrito por Adri e Lica.
Aparecida / LicaCida, outubro de 2015.
Rio de Janeiro - Brasil.


VOLTAR
Copyright ©2026 - Web Design - Naise Minas
|

