|
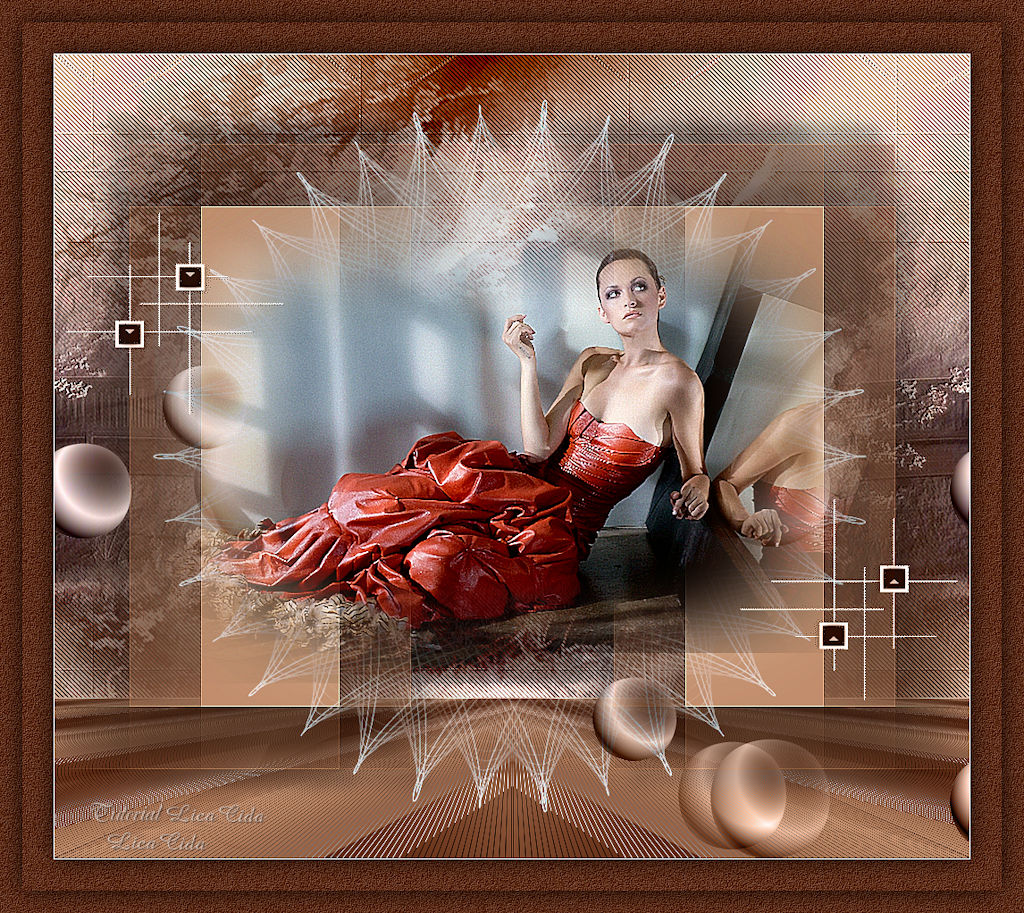
Castorke
DEDICATÓRIA
Carinhosamente.
TRADUÇÕES

MATERIAL

Tubes: cas_tube4_11_woman_19052011p
cas_tube9_3_landschap_19062011
Decos: esfera_camerontags
esfera_camerontags trabalhada
esferas_camerontags deco
decoarquivonet
Texture: Texture-1_Tine --
Salvar na pasta Textures do PSP.
Mask: nevoa-vi
Marca-d'água.
Efeitos do PSP.
Versão usada: PSP X9.
PLUGINS
Plugin Mehdi → Sorting Tiles
Plugin Tramages → Tow The Line
Plugin MuRa's Seamless → Emboss at Alpha
Plugin Carolaine and Sensibility → CS-DLines
Plugin Simple → Left Right Wrap
Plugin Toadies → What Are You?
Plugin MuRa's Meister → Perspective Tiling
Plugin DCspecial → Spiro FX
Plugin Transparency → Eliminate Black
Plugin Alien Skin Eye Candy 5: Impact → Perspective Shadow
Plugin Nik Software → Color Efex Pro 3.0 → Bleach Bypass
Plugin FM Tile Tools → Blend Emboss
TUTORIAL
|
Esta seta marca sua linha
Clique e arraste para movê-la
|
|
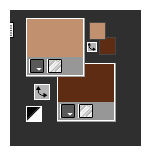
Configure as cores: Foreground: #c1906f — Background: #5e2c14.
1_.
Abra uma nova imagem transparente de 1024 x 900 px.
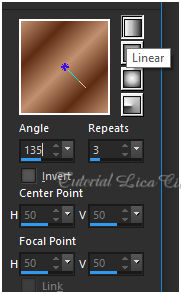
Pinte com o gradiente formado pelas cores configuradas acima.
Configure: Style: Linear — Angle: 135 — Repeats: 3 — Invert desmarcado.
2_.
Plugin Mehdi → Sorting Tiles: Block Range: 300-500 — Block: 300 — Crossed.
3_.
Plugin Tramages → Tow The Line (Default): 80 / 54 / 48 / 9.
4_.
Layers → New Raster Layer.
Pinte com o gradiente formado no item 1.
Adjust → Blur → Gaussian Blur — Radius: 33,00.
5_.
Layers → New Raster Layer.
Selections → Select All.
Edit → Copy no tube cas_tube9_3_landschap_19062011
Edit → Paste Into Selection.
Selections → Select None.
Com a ferramenta Pick Tool, puxe as laterais do tube para ocupar um pouco mais a layer.
Layers → Duplicate.
6_.
Adjust → Blur → Radial Blur.
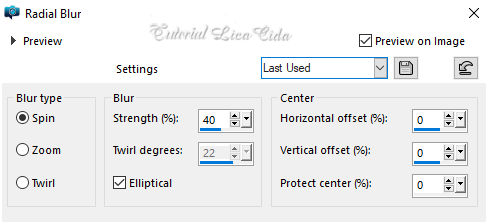
Blend Mode: Overlay.
Layers → Arrange → Move Down.
Ative a Raster 3.
Plugin MuRa's Seamless → Emboss at Alpha (Default).
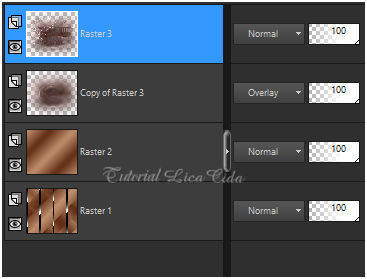
Retire a visibilidade da Raster 1.
Layers → Merge → Merge Visible.
7_.
Effects → Texture Effects → Texture: Texture-1_Tine.
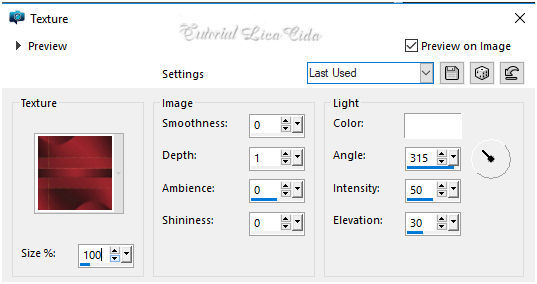
8_.
Plugin Carolaine and Sensibility → CS-DLines: 40 / 5.
Layers → New Raster Layer.
Pinte com a cor do Foreground.
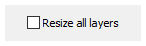
Image → Resize: 70% — Resize all layers desmarcado.
9_.
Plugin Simple → Left Right Wrap.
10_.
Plugin Toadies → What Are You?: 20 / 20.
11_.
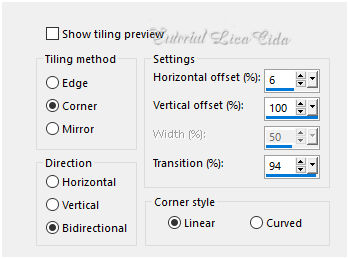
Effects → Image Effects → Seamless Tiling.
12_.
Effects → Reflection Effects → Rotating Mirror: 0 / 0 — Reflect.
Effects → Edge Effects → Enhance.
Effects → 3D Effects → Drop Shadow: 21 / 18 / 50 / 20,00 — Color: #000000.
Repita com os valores negativos: V: -21 / H: -18.
13_.
Ative a Raster 1.
Plugin MuRa's Meister → Perspective Tiling: Default, com Height: 20 (demais valores iguais).
Layers → Arrange → Move Up.
14_.
Effects → Reflection Effects → Rotating Mirror: 0 / 180 — Reflect.
Plugin MuRa's Seamless → Emboss at Alpha (Default).
15_.
Edit → Copy no tube cas_tube9_3_landschap_19062011
Edit → Paste As New Layer.
Effects → Image Effects → Seamless Tiling (print do item 11).
Effects → User Defined Filter → Emboss_3.
16_.
Layers → New Raster Layer.
Pinte com a cor #000000.
Layers → Arrange → Bring to Top (Raster 4).
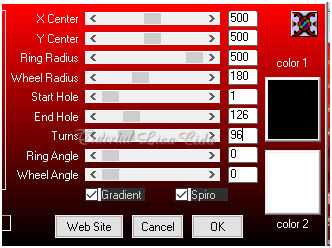
Plugin DCspecial → Spiro FX.
17_.
Plugin Transparency → Eliminate Black.
Image → Resize: 90% — Resize all layers desmarcado.
Blend Mode: Screen.
18_.
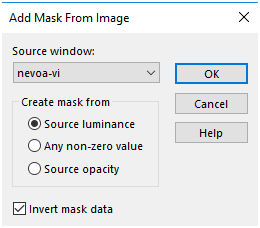
Layers → New Mask Layer → From Image: nevoa-vi — Invert mask data marcado (20-20).
Effects → Edge Effects → Enhance.
Layers → Merge → Merge Group.
Plugin Alien Skin Eye Candy 5: Impact → Perspective Shadow — Blurry.
19_.
Edit → Copy no esfera_camerontags trabalhada
Edit → Paste As New Layer.
A original (esfera_camerontags) segue no material; use a gosto.
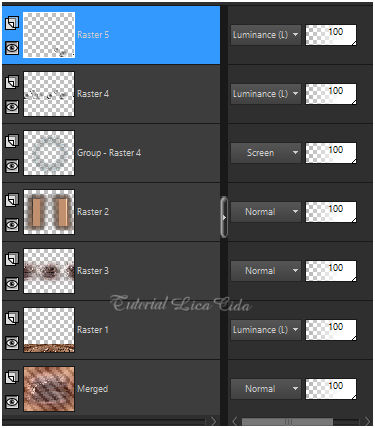
Blend Mode: Luminance (L).
20_.
Edit → Copy no esferas_camerontags deco
Edit → Paste As New Layer (Raster 5).
Objects → Align → Bottom.
LAYERS
21_.
Edit → Copy no tube cas_tube4_11_woman_19052011p
Edit → Paste As New Layer.
Layers → Duplicate.
Adjust → Blur → Radial Blur (print do item 6).
Blend Mode: Overlay.
Layers → Arrange → Move Down.
22_.
Edit → Copy no decoarquivonet
Edit → Paste As New Layer.
23_.
Ative a layer Merged.
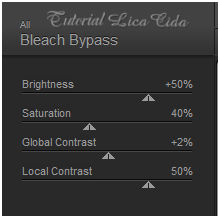
Plugin Nik Software → Color Efex Pro 3.0 → Bleach Bypass.
Layers → Duplicate.
Blend Mode: Burn (use a gosto).
Na Raster 1, mude o Blend Mode para Normal.
24_.
Image → Add Borders: 1 px, Symmetric marcado — Color: #ffffff.
Selections → Select All.
Image → Add Borders: 60 px, Symmetric marcado — Color: #5e2c14 (cor do Background).
Selections → Invert.
Adjust → Add/Remove Noise → Add Noise: 15% — Uniform — Monochrome marcado.
Plugin FM Tile Tools → Blend Emboss.
Selections → Invert.
Effects → 3D Effects → Drop Shadow: 0 / 0 / 80 / 40,00 — Color: #000000.
Selections → Select All.
Selections → Modify → Contract: 25 px.
Effects → 3D Effects → Drop Shadow: 0 / 0 / 80 / 40,00 — Color: #000000.
Selections → Select None.
Image → Resize: Width: 1024 px.
Aplique a marca-d'água.
Assine e salve.
Espero que gostem.
Obrigada!
Aparecida / LicaCida, abril de 2021.
Rio de Janeiro - Brasil.

VOLTAR
Copyright ©2026 - Web Design - Naise Minas
|


