|
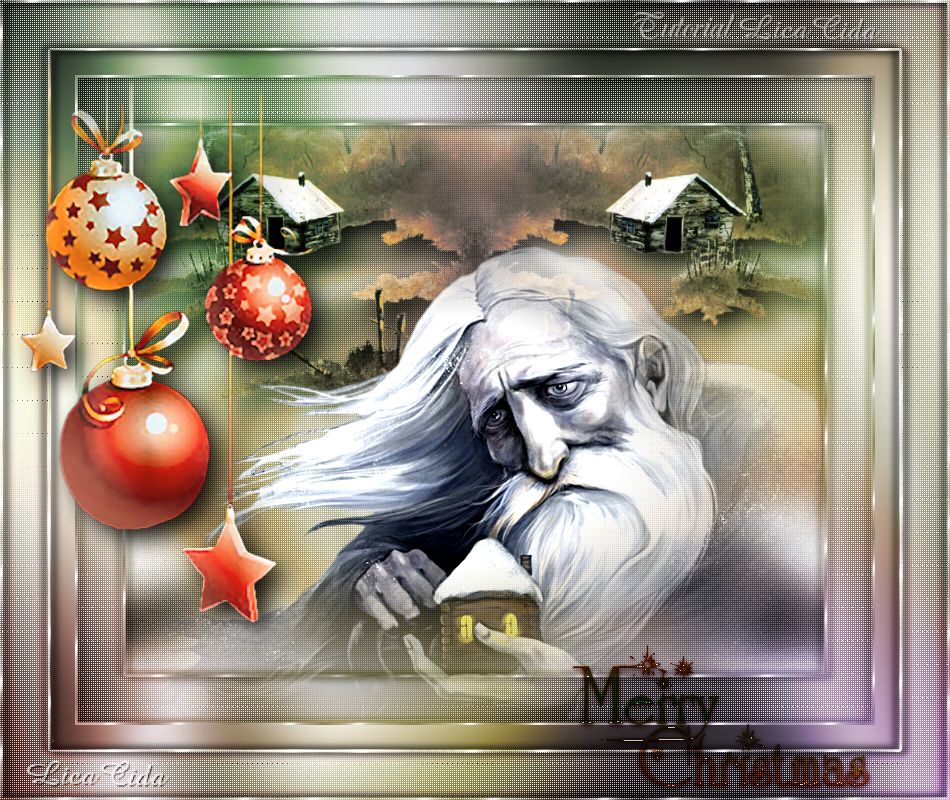
Christmas Old Winter
TRADUÇÕES

MATERIAL

Tubes: kikirou1228_mist_paysage
kikirou1234_old_winter
kikirou1290_decos
Pattern: Silver foil
WordArt: christmaswordart5yez
Back: BACK6-RB (Regina Barbeiro)
Marca-d'água.
Efeitos do PSP.
Versão usada: PSP X3.
Refeito e revisado no PSP X6.
PLUGINS
Plugin Distort → Twirl
Plugin penta.com → color dot
Plugin Alien Skin Eye Candy 5: Impact → Perspective Shadow
Plugin Alien Skin Eye Candy 5: Impact → Glass
Plugin Graphics Plus → Cross Shadow
Plugin L en K's → Zitah
TUTORIAL

|
Esta seta marca sua linha
Clique e arraste para movê-la
|
|
1_.
Abra uma nova imagem transparente de 350 x 275 px.
Selections → Select All.
Edit → Copy no tube kikirou1228_mist_paysage
Edit → Paste Into Selection.
Selections → Select None.
Layers → Duplicate.
OBSERVAÇÃO
Use neste item um tube que não deixe marcas (veja a parte inferior) e que fique proporcional (veja a parte superior).
2_.
Image → Canvas Size: 700 x 275 — Right: 350 — demais valores: 0.
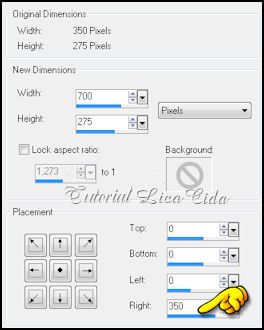
Image → Mirror.
Layers → Merge → Merge Down.
3_.
Layers → New Raster Layer.
Image → Canvas Size: 700 x 550 — Bottom: 275 — demais valores: 0.

4_.
Layers → Arrange → Send to Bottom.
Pinte com o gradiente formado pelas cores #a2998d e #e0dfe4.
Configure: Style: Sunburst — Repeats: 0 — Invert marcado — Center Point: H: 50 / V: 50.

5_.
Selections → Select All.
Edit → Paste Into Selection.
Selections → Select None.
Effects → Image Effects → Seamless Tiling → Default.
Adjust → Blur → Gaussian Blur — Radius: 18,00.
Adjust → Add/Remove Noise → Add Noise.
Uniform e Monochrome marcados — Noise: 8.
6_.
Plugin Distort → Twirl: 719.

Repita o Plugin Distort → Twirl com o valor negativo: -519.
7_.
Plugin penta.com → color dot → Default.
8_.
Ative a Raster 1.
Plugin Alien Skin Eye Candy 5: Impact → Perspective Shadow.
Settings: Drop Shadow, Blurry.
9_.
Image → Add Borders: 50 px, Symmetric marcado — Color: #ffffff.
Selecione a borda.
10_.
Pinte com o gradiente formado pelas cores usadas no item 4.
Configure: Style: Radial — Angle: 45 — Repeats: 5 — Invert desmarcado — Center Point: H: 50 / V: 50.

11_.
Plugin Graphics Plus → Cross Shadow → Default.
12_.
Plugin penta.com → color dot → Default.
13_.
Plugin L en K's → Zitah: o primeiro valor 5; os demais, como o plugin abrir.
Adjust → Sharpness → Sharpen More.
14_.
Selections → Modify → Select Selection Borders.
Inside e Anti-alias marcados — Border: 2.
15_.
Layers → New Raster Layer.
Pinte com a Pattern Silver foil — Angle: 0 — Scale: 100.
16_.
Effects → 3D Effects → Inner Bevel.

17_.
Effects → 3D Effects → Drop Shadow: 2 / 5 / 70 / 10,00.
Repita com os valores negativos: -2 / -5 / 70 / 10,00.
Selections → Select None.
18_.
Image → Add Borders: 25 px, Symmetric marcado — Color: #ffffff.
Selecione a borda.
19_.
Pinte com o gradiente Radial formado no item 10.
20_.
Repita o item 11:
Plugin Graphics Plus → Cross Shadow → Default.
Selections → Select None.
21_.
Image → Add Borders: 50 px, Symmetric marcado — Color: #ffffff.
Selecione a borda.
Repita os itens 10 a 17.
22_.
Edit → Copy no tube kikirou1234_old_winter
Edit → Paste As New Layer.
Image → Resize: 80% — Resize all layers desmarcado.
Posicione.
23_.
Effects → Photo Effects → Film and Filters.

Repita o efeito.
24_.
Edit → Copy no tube kikirou1290_decos
Edit → Paste As New Layer.
Image → Resize: 110% — Resize all layers desmarcado.
Repita o Resize.
Posicione.
25_.
Plugin Alien Skin Eye Candy 5: Impact → Perspective Shadow.
Settings: Drop Shadow, Blurry.
26_.
Edit → Copy no WordArt christmaswordart5yez (ou outro de sua escolha).
Edit → Paste As New Layer.
Image → Resize: 110% — Resize all layers desmarcado.
Posicione.
27_.
Plugin Alien Skin Eye Candy 5: Impact → Glass.
Settings: Default — Basic: Glass Color: #ad3312.

Repita o item 23 uma única vez:
Effects → Photo Effects → Film and Filters.
LAYERS
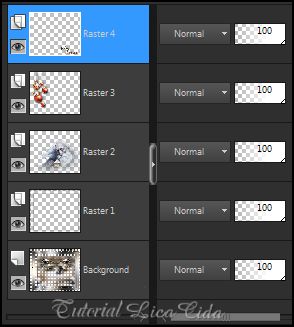
28_.
Duplique a layer Background.
Layers → New Raster Layer.
Layers → Arrange → Move Down.
29_.
Selections → Select All.
Edit → Copy no BACK6-RB
Edit → Paste Into Selection.
Selections → Select None.
Image → Flip.
Altere os Blend Modes e a Opacity das layers, conforme os prints.


Layers → Merge → Merge All (Flatten).
Aplique a marca-d'água.
Assine e salve como JPG.
Espero que apreciem e gostem.
Tutorial criado por Aparecida / LicaCida em novembro de 2010.
Refeito e revisado em novembro de 2013.
Rio de Janeiro - Brasil.

VOLTAR
Copyright ©2026 - Web Design - Naise Minas
|

