|
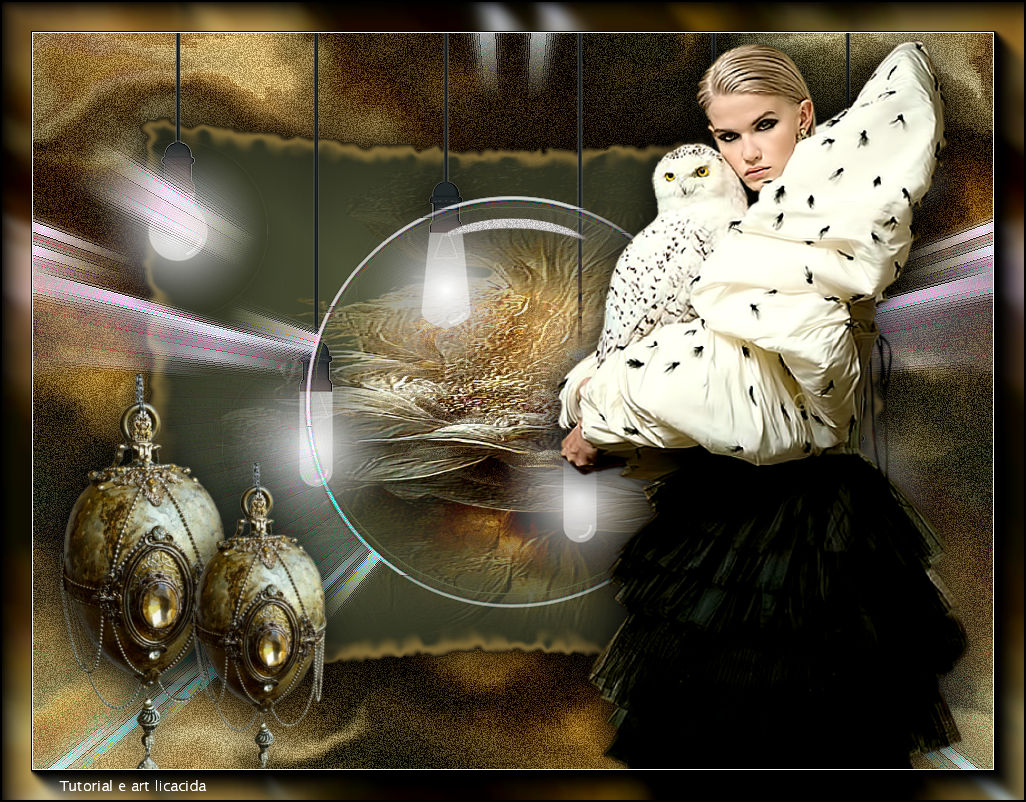
Darling, Don't Be Afraid
TRADUÇÕES

MATERIAL

Back inicial: adorno-bymp
Tubes: Callitubes-2872mulheres
Callitubes-292flores.imagejpg
Callitubes-292flores.pspimage
Deco: Callitubes-299decor
Renee-TUBES-Novembre-2022-26
Mask: 20 20
Marca-d'água.
Efeitos do PSP.
PLUGINS
Plugin Distortion → Smelter 2
Plugin dsb flux → Bright Noise
Plugin Alien Skin Xenofex 2 → Burnt Edges
Plugin Alien Skin Eye Candy 5: Impact → Glass
Plugin Alien Skin Eye Candy 5: Impact → Perspective Shadow
Plugin MV's Plugins → PanoWrap
Plugin AAA Filters → Custom
Plugin AAA Frames → Foto Frame
TUTORIAL
|
Esta seta marca sua linha
Clique e arraste para movê-la
|
|
Configure: Foreground: #1f2115 — Background: #777f53.
1_.
Abra o seu misted (usei o Callitubes-292flores).
Copie e faça uma imagem JPG, usando como fundo a cor do Foreground.
Você terá uma imagem .pspimage e outra .jpg (segue o modelo no material).
Opcional: use a mask 20 20.
2_.
Abra o adorno-bymp (deixe a layer com a visibilidade desligada).
3_.
Layers → New Raster Layer.
Layers → Arrange → Send to Bottom.
4_.
Edit → Copy no misted JPG (ou no Callitubes-292flores.imagejpg)
Selections → Select All.
Edit → Paste Into Selection.
Selections → Select None.
No tube, usei a mask 20 20.
5_.
Effects → Image Effects → Seamless Tiling — Transition: 100%.
6_.
Adjust → Blur → Gaussian Blur — Radius: 21,00.
7_.
Plugin Distortion → Smelter 2.
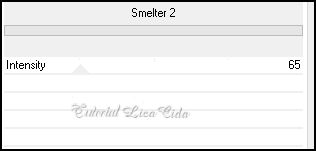
8_.
Plugin dsb flux → Bright Noise.
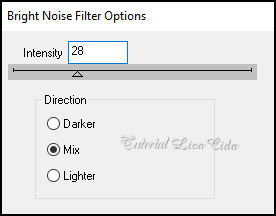
9_.
Layers → New Raster Layer.
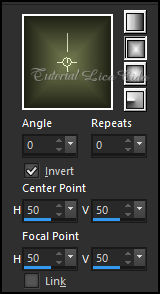
Pinte com o gradiente formado pelas cores configuradas acima.
Configure: Style: Rectangular — Angle: 0 — Repeats: 0 — Invert marcado — Center Point: H: 50 / V: 50 — Focal Point: H: 50 / V: 50.
10_.
Selections → Select All.
Selections → Modify → Contract: 60 px.
11_.
Plugin Alien Skin Xenofex 2 → Burnt Edges.
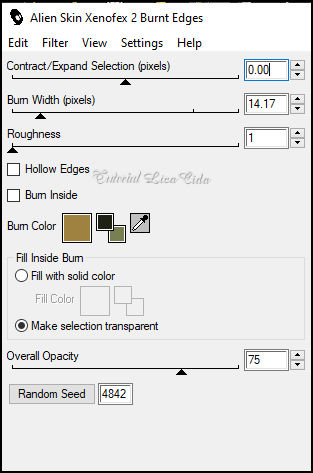
Repita o efeito.
12_.
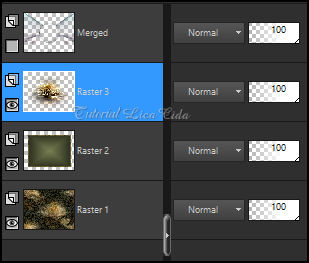
Layers → New Raster Layer.
Edit → Copy no Callitubes-292flores.pspimage
Edit → Paste Into Selection.
Use a mask 20 20.
Effects → User Defined Filter → Emboss_3.
Selections → Select None.
Layers → Merge → Merge Down.
13_.
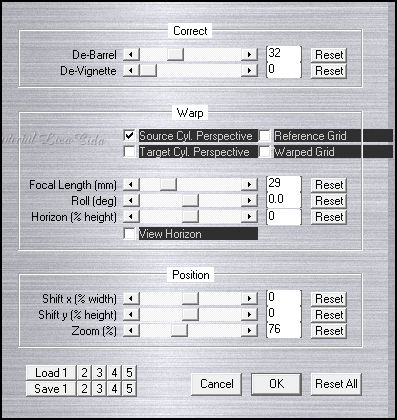
Plugin MV's Plugins → PanoWrap.
Plugin Alien Skin Eye Candy 5: Impact → Perspective Shadow, a gosto.
14_.
Ative a Raster 1 (fundo).
Plugin AAA Filters → Custom → Landscape.
15_.
Ative a Merged (topo).
Image → Mirror → Mirror Vertical.
Effects → Edge Effects → Enhance.
16_.
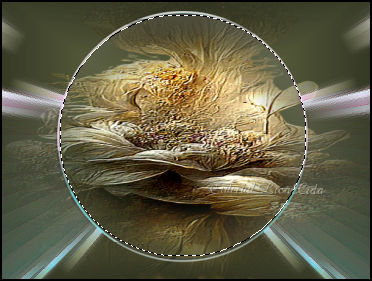
Selecione o círculo.
Layers → New Raster Layer.
Edit → Copy no Callitubes-292flores.pspimage (deverá estar com a mask 20 20 aplicada)
Edit → Paste Into Selection.
17_.
Selections → Modify → Contract: 5 px.
Layers → Duplicate.
18_.
Plugin Alien Skin Eye Candy 5: Impact → Glass — Clear (use a gosto).
19_.
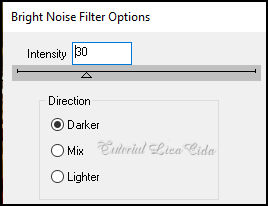
Plugin dsb flux → Bright Noise.
20_.
Effects → 3D Effects → Chisel.
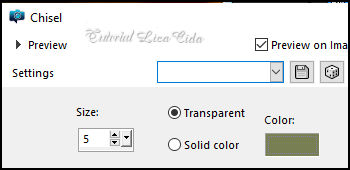
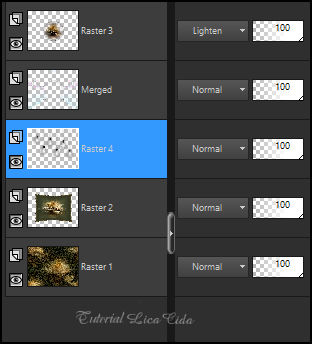
Blend Mode: Lighten.
Selections → Select None.
Layers → Merge → Merge Down.
21_.
Ative a Raster 2.
Edit → Copy no Renee-TUBES-Novembre-2022-26
Edit → Paste As New Layer.
Objects → Align → Top.
Plugin Alien Skin Eye Candy 5: Impact → Perspective Shadow, a gosto.
22_.
Ative a layer do topo.
Edit → Copy no Callitubes-2872mulheres
Edit → Paste As New Layer.
Posicionamento, Resize e sombra a gosto.
23_.
Edit → Copy no Callitubes-299decor
Edit → Paste As New Layer.
Posicionamento, Resize e sombra a gosto.
Layers → Merge → Merge Visible.
24_.
Plugin AAA Frames → Foto Frame: Width: 30 — Matte: 1 — demais valores Default.
Repita o efeito.
Aplique a marca-d'água.
Assine e salve.
Espero que apreciem.
Aparecida / LicaCida, março de 2023.
Rio de Janeiro - Brasil.

VOLTAR
Copyright ©2026 - Web Design - Naise Minas
|


