|
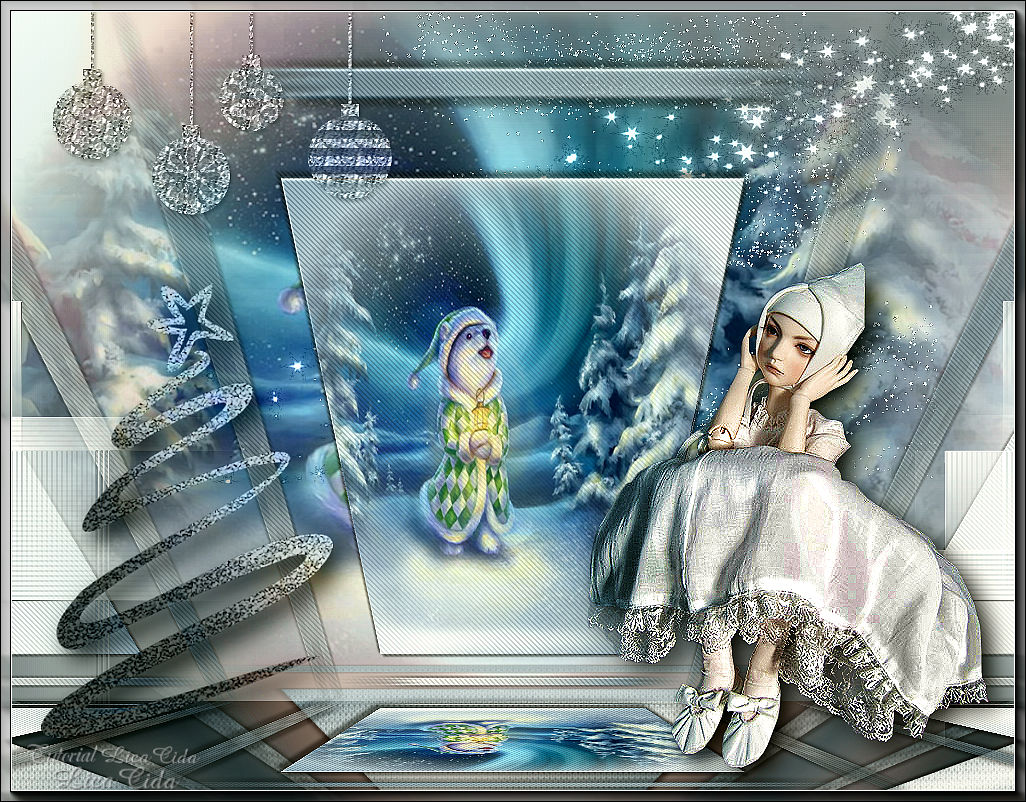
Encantos de Natal
TRADUÇÕES

MATERIAL

Gradiente: ivy_winter1 --
Salvar na pasta Gradients do PSP.
Preset: Illumination → Lights → Preset_Lights_merry (Merry Christmas) --
Salvar na pasta Presets do PSP.
Tubes: JHanna_554 tube
_k@rine_ dreams _Misted_Christmas_2676_Decembre_2013
Mask: Narah_Mask_1450
Decos: LF-ChristmasDeco-28112014
decoperspectivelc
Fairy_Dust_Silvie_07.01.2019
element 42
Marca-d'água.
Efeitos do PSP.
Versão usada: PSP X8.
PLUGINS
Plugin FM Tile Tools → Blend Emboss
Plugin MuRa's Seamless → Emboss at Alpha
Plugin Carolaine and Sensibility → CS-DLines
Plugin FunHouse → Loom
Plugin Toadies → Weave
Plugin Tile & Mirror → Distortion Mirror (horizontal)
Plugin Alien Skin Eye Candy 5: Impact → Perspective Shadow
Plugin AAA Filters → Custom (opcional)
Plugin AAA Frames → Foto Frame
TUTORIAL
|
Esta seta marca sua linha
Clique e arraste para movê-la
|
|
1_.
Abra uma nova imagem transparente de 1024 x 700 px.
Pinte com o gradiente ivy_winter1.
Configure: Style: Sunburst — Repeats: 0 — Invert desmarcado — Center Point: H: 50 / V: 100 — Focal Point: H: 100 / V: 100.
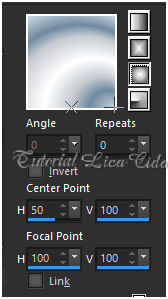
Adjust → Blur → Gaussian Blur — Radius: 28,00.
2_.
Adjust → Add/Remove Noise → Add Noise.
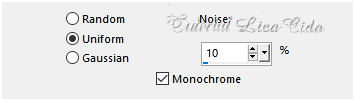
Plugin FM Tile Tools → Blend Emboss — Default.
Layers → Duplicate (retire a visibilidade da Raster 1).
3_.
Layers → New Mask Layer → From Image: Narah_Mask_1450.
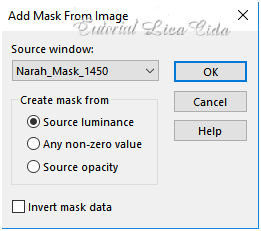
Layers → Merge → Merge Group.
Plugin MuRa's Seamless → Emboss at Alpha — Default.
Effects → 3D Effects → Drop Shadow: 4 / 4 / 50 / 4,00 — Color: #000000.
Repita com Vertical e Horizontal negativos (-4).
4_.
Effects → Geometric Effects → Perspective - Vertical.
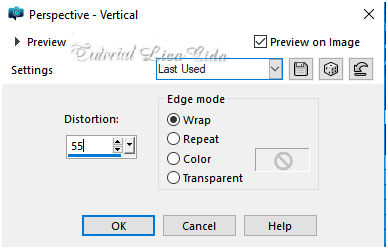
5_.
Plugin Carolaine and Sensibility → CS-DLines — Default (40 / 5).
6_.
Com a ferramenta Magic Wand (Default), selecione o efeito central da mask.
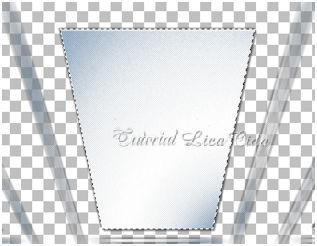
Layers → New Raster Layer.
Selections → Select All.
Edit → Copy no _k@rine_ dreams _Misted_Christmas_2676_Decembre_2013
Edit → Paste Into Selection.
Selections → Select None.
Plugin MuRa's Seamless → Emboss at Alpha — Default.
Blend Mode: Multiply.
Layers → Merge → Merge Down.
7_.
Layers → New Raster Layer.
Com a ferramenta Flood Fill — Opacity: 50%, pinte com o mesmo gradiente formado no item 1.
Plugin FunHouse → Loom.
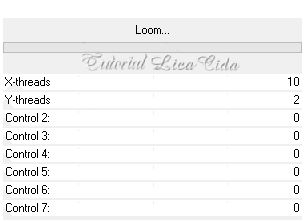
Selections → Select All.
Edit → Paste Into Selection (o misted _k@rine_ dreams _Misted_Christmas_2676_Decembre_2013 deverá estar na memória).
Selections → Select None.
Plugin MuRa's Seamless → Emboss at Alpha — Default.
Blend Mode: Multiply.
Layers → Merge → Merge Down.
Layers → Arrange → Move Down.
Ative novamente a visibilidade da Raster 1 e volte o Flood Fill para Opacity: 100%.
8_.
Ative a layer superior (Group - Copy of Raster 1).
Com a ferramenta Magic Wand (Default), selecione os efeitos laterais da mask.
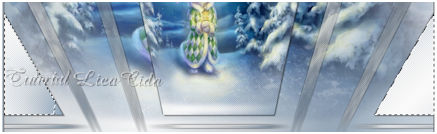
Selections → Promote Selection to Layer.
Selections → Select None.
9_.
Plugin Toadies → Weave — Default (59 / 48 / 222).
Plugin MuRa's Seamless → Emboss at Alpha — Default.
10_.
Image → Canvas Size: 1024 x 800 — Bottom: 100.
11_.
Ative a layer da mask (Group - Copy of Raster 1) e duplique essa layer (Layers → Duplicate).
Ative a régua (View → Rulers).
Com a ferramenta Pick Tool (Default), desça até 700 px e acerte até o final do top (veja o print).

Effects → 3D Effects → Drop Shadow: 4 / 4 / 50 / 4,00 — Color: #000000.
Repita com Vertical e Horizontal negativos (-4).
Desative a régua.
12_.
Ative a Raster 1.
Com a ferramenta Pick Tool (Default), desça o gradiente até o final do back.
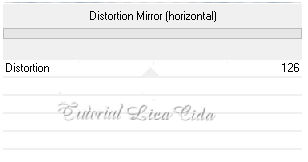
Plugin Tile & Mirror → Distortion Mirror (horizontal): 126.
13_.
Effects → Illumination Effects → Lights → Preset_Lights_merry (Merry Christmas).
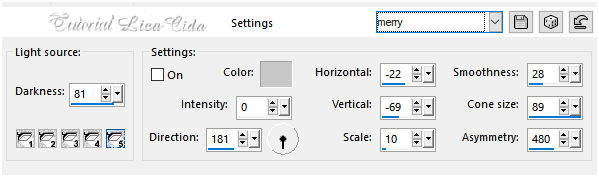
Layers → Duplicate.
Blend Mode: Screen.
14_.
Edit → Copy no decoperspectivelc
Edit → Paste As New Layer.
Objects → Align → Bottom.
LAYERS
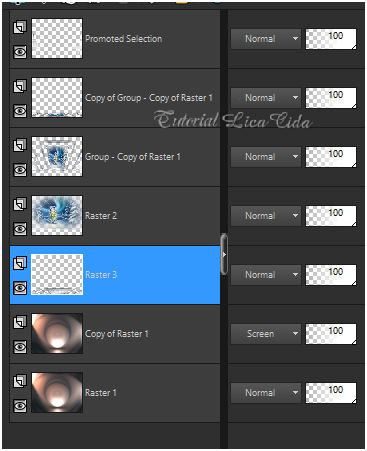
Altere os Blend Modes e a Opacity das layers.
15_.
Ative a Raster 2.
Edit → Copy no Fairy_Dust_Silvie_07.01.2019
Edit → Paste As New Layer.
Posicione.
Adjust → One Step Photo Fix.
Blend Mode: Luminance (L).
16_.
Edit → Copy no LF-ChristmasDeco-28112014
Edit → Paste As New Layer.
Posicione.
Layers → Arrange → Bring to Top.
Blend Mode: Luminance (L).
Adjust → One Step Photo Fix.
17_.
Edit → Copy no JHanna_554 tube
Edit → Paste As New Layer.
Posicione.
Plugin Alien Skin Eye Candy 5: Impact → Perspective Shadow — Drop Shadow, Blurry.
18_.
Edit → Copy no element 42
Edit → Paste As New Layer.
Posicione.
Blend Mode: Luminance (L).
Repita o item 13: Effects → Illumination Effects → Lights → Preset_Lights_merry (Merry Christmas).
Plugin Alien Skin Eye Candy 5: Impact → Perspective Shadow — Drop Shadow, Blurry.
Adjust → One Step Photo Fix.
19_.
Image → Add Borders: 1 px, Symmetric marcado — Color: #ffffff.
Opcional: Plugin AAA Filters → Custom — Landscape (Default).
20_.
Plugin AAA Frames → Foto Frame — Default — Width: 10.
Aplique a marca-d'água.
Assine e salve como JPG.
Espero que gostem.
Aparecida / LicaCida, dezembro de 2019.
Rio de Janeiro - Brasil.

VOLTAR
Copyright ©2026 - Web Design - Naise Minas
|


