|
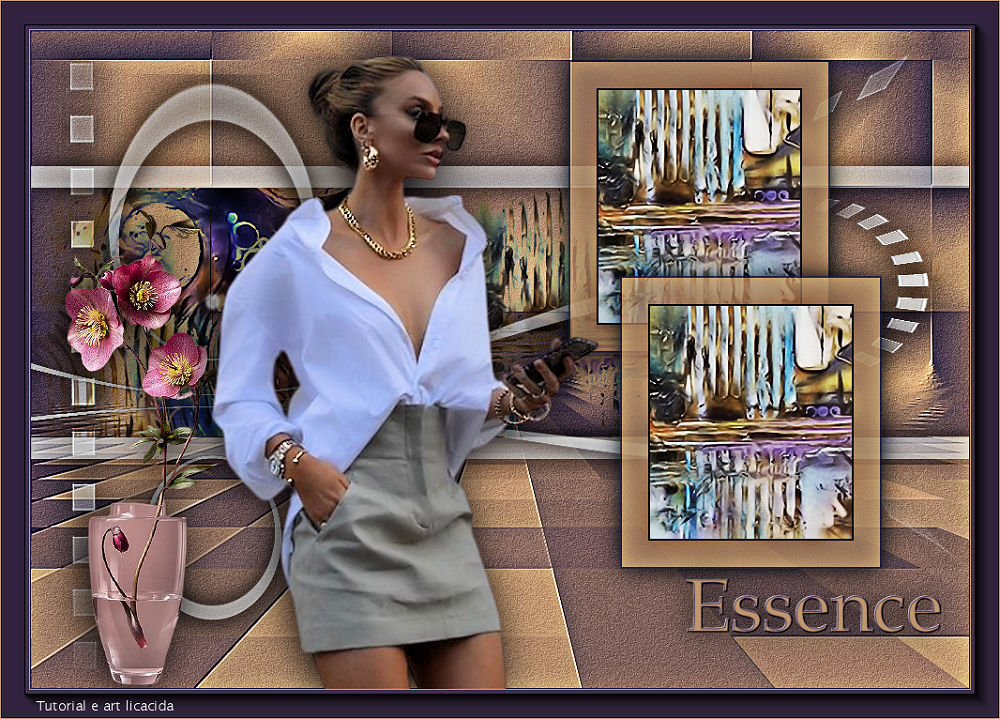
Essence
TRADUÇÕES

MATERIAL

Tubes: 3767 - woman - LB TUBES (2)
Callitubes-153flores
misted_abstrait2_tine_07.2020-100
Deco: deco1_lc
deco2_lc
Texto: titulo_lc
Marca-d'água.
Efeitos do PSP.
Versão usada: PSP X9.
PLUGINS
Plugin VM Distortion → Tilomat 2000
Plugin Frischluft → Mosaic Plane
Plugin FM Tile Tools → Blend Emboss
Plugin AAA Frames → Foto Frame
TUTORIAL
|
Esta seta marca sua linha
Clique e arraste para movê-la
|
|
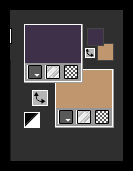
Configure: Foreground: #3e3149 — Background: #c0966f.
1_.
Abra uma nova imagem transparente de 1000 x 700 px.
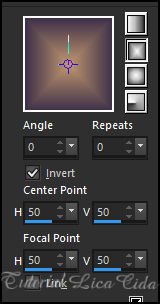
Pinte com o gradiente formado pelas cores configuradas acima.
Configure: Style: Rectangular.
2_.
Plugin VM Distortion → Tilomat 2000 — Default.
3_.
Plugin Frischluft → Mosaic Plane.
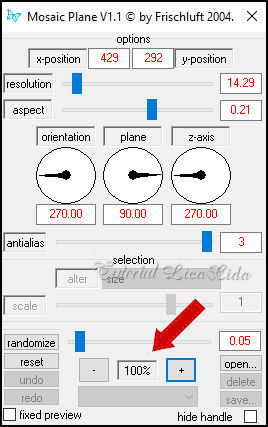
Image → Mirror → Mirror Vertical.
Effects → User Defined Filter → Emboss_3.
4_.
Adjust → Add/Remove Noise → JPEG Artifact Removal.
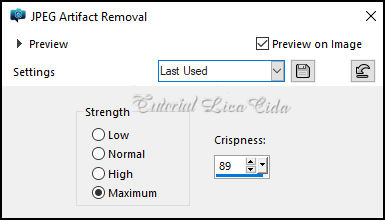
5_.
Plugin FM Tile Tools → Blend Emboss.
6_.
Ative a ferramenta Selection Tool (tecla S) → Custom Selection.
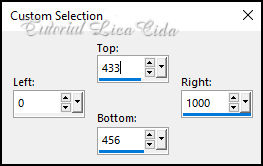
7_.
Layers → New Raster Layer.
Na ferramenta Flood Fill, Opacity: 50%.
Pinte com a cor #ffffff.
Selections → Select None.
Layers → Duplicate.
8_.
Com a ferramenta Pick Tool, posicione: Position X: 0 — Position Y: 144.
Tecle M para desativar a ferramenta.
Layers → Merge → Merge Down.
Effects → 3D Effects → Drop Shadow: 1 / 1 / 100 / 50,00 — Color: #000000.
9_.
Ative a ferramenta Selection Tool (tecla S) → Custom Selection.
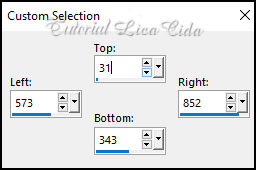
10_.
Layers → New Raster Layer.
Na ferramenta Flood Fill, Opacity: 80%.
Pinte com a cor do Foreground: #3e3149.
11_.
Selections → Modify → Contract: 2.
Tecle Delete.
12_.
Na ferramenta Flood Fill, Opacity: 80%.
Pinte com a cor do Background: #c0966f.
13_.
Selections → Modify → Contract: 30.
14_.
Edit → Copy no misted_abstrait2_tine_07.2020-100
Edit → Paste As New Layer.
Posicione o misted a gosto.
Selections → Invert.
Tecle Delete.
Selections → Invert.
Adjust → Sharpness → Sharpen.
15_.
Effects → 3D Effects → Chisel — Color: #3e3149 (cor do Foreground).
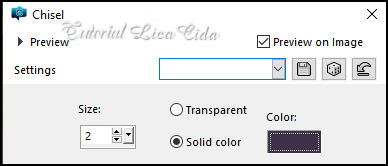
Selections → Select None.
Layers → Merge → Merge Down.
Effects → 3D Effects → Drop Shadow: 1 / 1 / 100 / 50,00 — Color: #000000.
Layers → Duplicate.
16_.
Com a ferramenta Pick Tool, posicione: Position X: 593 — Position Y: 230.
Tecle M para desativar a ferramenta.
Layers → Merge → Merge Down.
Observação: na ferramenta Flood Fill, volte a Opacity para 100%.
17_.
Ative a Raster 2.
Com a ferramenta Magic Wand (Tolerance: 0 — Feather: 0), selecione as bordas.
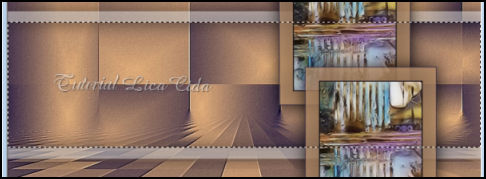
18_.
Edit → Copy no misted_abstrait2_tine_07.2020-100
Edit → Paste As New Layer.
Posicione o misted a gosto.
Selections → Invert.
Tecle Delete.
Selections → Invert.
Adjust → Sharpness → Sharpen.
Selections → Select None.
Layers → Properties → General → Blend Mode: Darken (ou outro a gosto).
19_.
Ative novamente a Raster 2.
Layers → Duplicate (as bordas).
Effects → Distortion Effects → Pinch — Strength: 100%.
20_.
Effects → Distortion Effects → Warp.
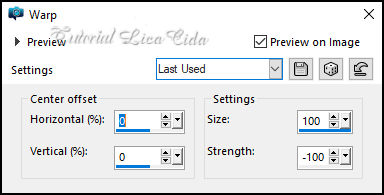
Layers → Arrange → Move Up.
21_.
Com a ferramenta Pick Tool, posicione: Position X: -307 — Position Y: 46.
Tecle M para desativar a ferramenta.
Effects → 3D Effects → Drop Shadow: 1 / 1 / 100 / 50,00 — Color: #000000.
Organize as layers:
LAYERS
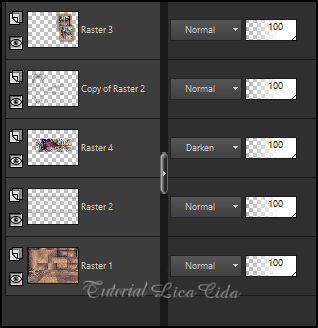
22_.
Na layer Copy of Raster 2:
Edit → Copy no deco1_lc
Edit → Paste As New Layer.
23_.
Com a ferramenta Pick Tool, posicione: Position X: 670 — Position Y: -75.
Tecle M para desativar a ferramenta.
Effects → 3D Effects → Drop Shadow: 1 / 1 / 100 / 50,00 — Color: #000000.
24_.
Edit → Copy no deco2_lc
Edit → Paste As New Layer.
25_.
Com a ferramenta Pick Tool, posicione: Position X: -41 — Position Y: 9.
Tecle M para desativar a ferramenta.
Effects → 3D Effects → Drop Shadow: 1 / 1 / 100 / 50,00 — Color: #000000.
Image → Add Borders: 1 px, Symmetric marcado — Color: #3e3149 (Foreground).
Image → Add Borders: 1 px, Symmetric marcado — Color: #c0966f (Background).
Layers → Duplicate.
26_.
Effects → Edge Effects → High Pass.
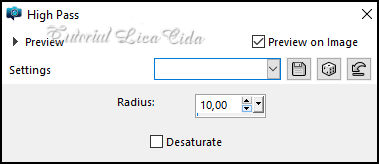
Layers → Properties → General → Blend Mode: Overlay.
Layers → Merge → Merge Down.
27_.
Edit → Copy no tube Callitubes-153flores
Edit → Paste As New Layer.
Posicione a gosto.
Aplique um Drop Shadow a gosto.
28_.
Edit → Copy no tube 3767 - woman - LB TUBES (2)
Edit → Paste As New Layer.
Posicione a gosto.
Aplique um Drop Shadow a gosto.
29_.
Edit → Copy no titulo_lc
Edit → Paste As New Layer.
Posicione a gosto.
Image → Add Borders: 30 px, Symmetric marcado — Color: #3e3149 (Foreground).
30_.
Plugin AAA Frames → Foto Frame — Width: 25, restante Default.
Image → Add Borders: 1 px, Symmetric marcado — Color: #c0966f (Background).
Aplique a marca-d'água.
Assine e salve.
Image → Resize: Width 1000 px.
Espero que apreciem.
Aparecida / LicaCida, agosto de 2022.
Rio de Janeiro - Brasil.

VOLTAR
Copyright ©2026 - Web Design - Naise Minas
|


