|
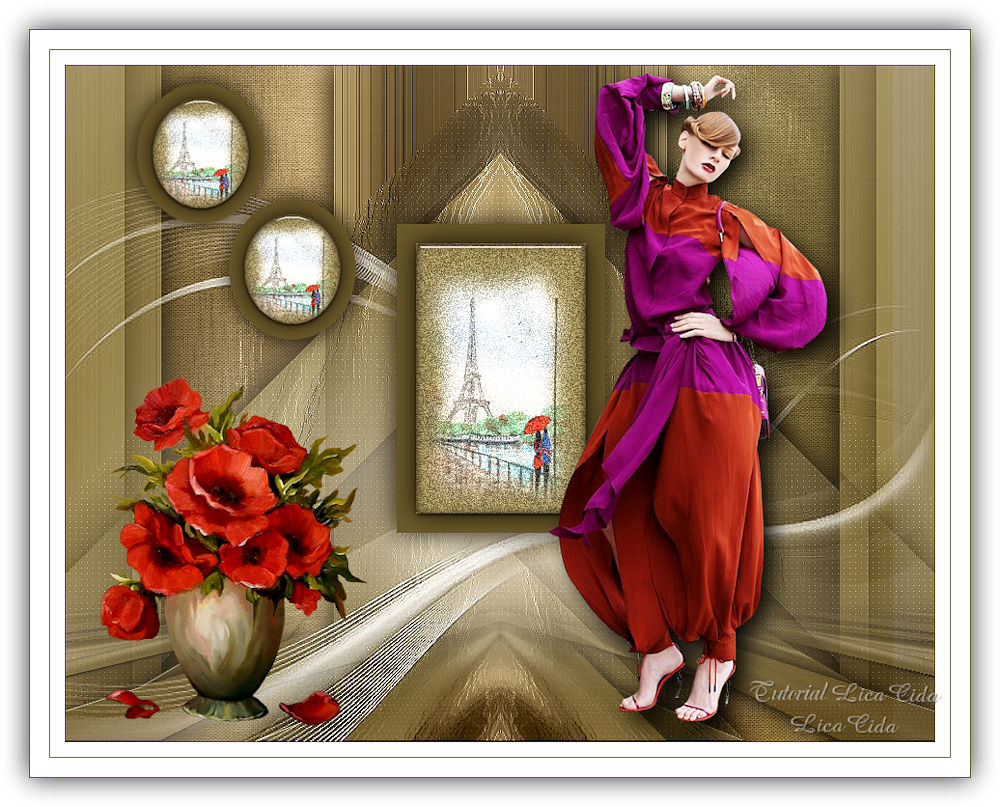
Glamour
TRADUÇÕES

MATERIAL

Seleções: Selection #1 e Selection #2 --
guardadas no Alpha Channel da imagem alphachannel_Glamour.
Tubes: Tocha24471
Paysage misted jewel 033
6499-Luz Cristina
Mask: creation.tine_masque293
Backs: back inicial_lc
back_glamour_lc
Deco: deco_glamour_lc
Marca-d'água.
Efeitos do PSP.
Versão usada: PSP X9.
PLUGINS
Plugin Filter Factory Gallery A → Weave
Plugin FunHouse → Loom
Plugin Filters Unlimited 2 → Paper Textures → Canvas, Fine
Plugin Carolaine and Sensibility → CS-LDots
Plugin Transparency → Eliminate Black
Plugin MuRa's Meister → Perspective Tiling
Plugin MuRa's Seamless → Emboss at Alpha
Plugin dsb flux → Bright Noise
Plugin Alien Skin Eye Candy 5: Impact → Glass
Plugin Alien Skin Eye Candy 5: Impact → Perspective Shadow
Plugin AAA Filters → Custom
TUTORIAL
|
Esta seta marca sua linha
Clique e arraste para movê-la
|
|
1_.
Abra a imagem alphachannel_Glamour.
Faça uma cópia (Window → Duplicate) e feche a original.
Vamos trabalhar na cópia.
2_.
Selections → Select All.
Edit → Copy no back inicial_lc
Edit → Paste Into Selection.
Layers → New Raster Layer.
3_.
Selections → Select All.
Edit → Copy no back_glamour_lc
Edit → Paste Into Selection.
Selections → Select None.
Blend Mode: Luminance (L).
Layers → Merge → Merge Down.
4_.
Effects → Art Media Effects → Brush Strokes.
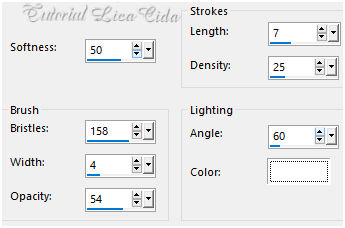
Layers → Duplicate.
5_.
Plugin Filter Factory Gallery A → Weave.
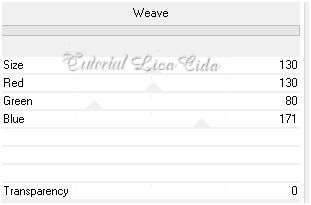
6_.
Ative a Raster 1.
Plugin FunHouse → Loom — Default.
7_.
Plugin Filters Unlimited 2 → Paper Textures → Canvas, Fine — Default.
8_.
Ative a Copy of Raster 1.
Plugin Carolaine and Sensibility → CS-LDots — Default (50 / 3 / 2).
9_.
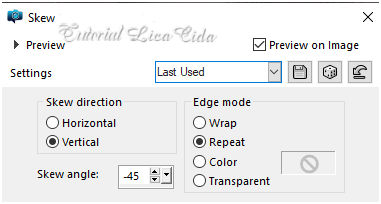
Effects → Geometric Effects → Skew.
Effects → Reflection Effects → Rotating Mirror: 0 / 0 — Reflect.
Effects → 3D Effects → Drop Shadow: 0 / 0 / 80 / 40,00 — Color: #000000.
Layers → New Raster Layer.
10_.
Ferramenta Flood Fill — Opacity: 80%: pinte com uma cor mais escura usada no back inicial_lc (#70653b).
Plugin Transparency → Eliminate Black.
Blend Mode: Soft Light.
11_.
Ative a Copy of Raster 1.
Layers → Duplicate.
Layers → Arrange → Move Up.
Plugin MuRa's Meister → Perspective Tiling — Default, Height: 20 (demais valores iguais).
Com a ferramenta Magic Wand — Feather: 60, clique na parte transparente.
Pressione a tecla Delete três vezes, para suavizar o efeito.
Selections → Select None.
Effects → 3D Effects → Drop Shadow: 0 / 0 / 80 / 40,00 — Color: #000000.
Plugin MuRa's Seamless → Emboss at Alpha — Default.
12_.
Ative a Copy of Raster 1.
Edit → Copy no deco_glamour_lc
Edit → Paste As New Layer.
Blend Mode: Luminance (L).
LAYERS
As layers estão assim:
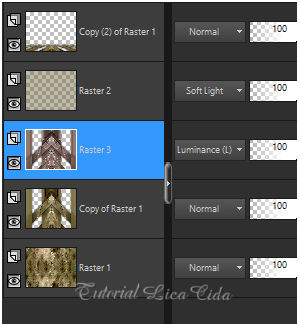
Ative a layer superior.
Layers → New Raster Layer.
Ferramenta Flood Fill — Opacity: 100%: pinte com a cor #ffffff.
13_.
Layers → New Mask Layer → From Image: creation.tine_masque293.
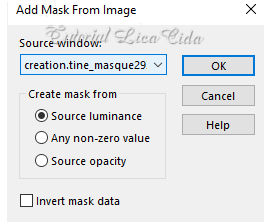
Effects → Edge Effects → Enhance.
Layers → Merge → Merge Group.
Plugin MuRa's Seamless → Emboss at Alpha — Default.
14_.
Selections → Load/Save Selection → Load Selection From Alpha Channel → Selection #1.
Layers → New Raster Layer.
15_.
Pinte com a cor escolhida (#70653b).
Selections → Modify → Contract: 20 px.
Effects → 3D Effects → Drop Shadow: 0 / 0 / 80 / 40,00 — Color: #000000.
16_.
No Paysage misted jewel 033: Image → Resize: 80% — Resize all layers desmarcado.
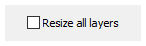
Edit → Copy no Paysage misted jewel 033
Edit → Paste Into Selection.
17_.
Plugin dsb flux → Bright Noise.
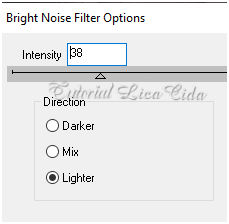
18_.
Plugin Alien Skin Eye Candy 5: Impact → Glass (use a gosto).
Selections → Select None.
Effects → 3D Effects → Drop Shadow: 0 / 0 / 80 / 40,00 — Color: #000000.
19_.
Selections → Load/Save Selection → Load Selection From Alpha Channel → Selection #2.
Layers → New Raster Layer.
20_.
Pinte com a cor escolhida (#70653b).
Selections → Modify → Contract: 20 px.
Effects → 3D Effects → Drop Shadow: 0 / 0 / 80 / 40,00 — Color: #000000.
21_.
Reduza mais o Paysage misted jewel 033: Image → Resize: 60% — Resize all layers desmarcado.
Edit → Copy no Paysage misted jewel 033
Edit → Paste Into Selection.
22_.
Plugin dsb flux → Bright Noise (print do item 17).
23_.
Plugin Alien Skin Eye Candy 5: Impact → Glass (use a gosto).
Selections → Select None.
Effects → 3D Effects → Drop Shadow: 0 / 0 / 80 / 40,00 — Color: #000000.
Image → Resize: 80% — Resize all layers desmarcado.
Layers → Duplicate.
24_.
Effects → Image Effects → Offset: H: -95 / V: 120 — Custom e Transparent marcados.
25_.
Ative a Raster 2 (veja no print das layers).
Layers → Arrange → Bring to Top.
Plugin AAA Filters → Custom — Landscape (Default).
26_.
Edit → Copy no tube Tocha24471
Edit → Paste As New Layer.
Redimensione e posicione a gosto.
Plugin Alien Skin Eye Candy 5: Impact → Perspective Shadow — Blurry.
27_.
Edit → Copy no tube 6499-Luz Cristina
Edit → Paste As New Layer.
Redimensione e posicione a gosto.
Plugin Alien Skin Eye Candy 5: Impact → Perspective Shadow — Blurry.
BORDA
Image → Add Borders: 1 px, Symmetric marcado — Color: #70653b.
Image → Add Borders: 15 px, Symmetric marcado — Color: #ffffff.
Image → Add Borders: 1 px, Symmetric marcado — Color: #70653b.
Image → Add Borders: 20 px, Symmetric marcado — Color: #ffffff.
Image → Add Borders: 1 px, Symmetric marcado — Color: #70653b.
Selections → Select All.
Image → Add Borders: 30 px, Symmetric marcado — Color: #ffffff.
Effects → 3D Effects → Drop Shadow: 0 / 0 / 80 / 40,00 — Color: #000000.
Selections → Select None.
Image → Resize: Width 1000 px.
Aplique a marca-d'água.
Assine e salve.
Aparecida / LicaCida, agosto de 2021.
Rio de Janeiro - Brasil.
OUTRO MODELO
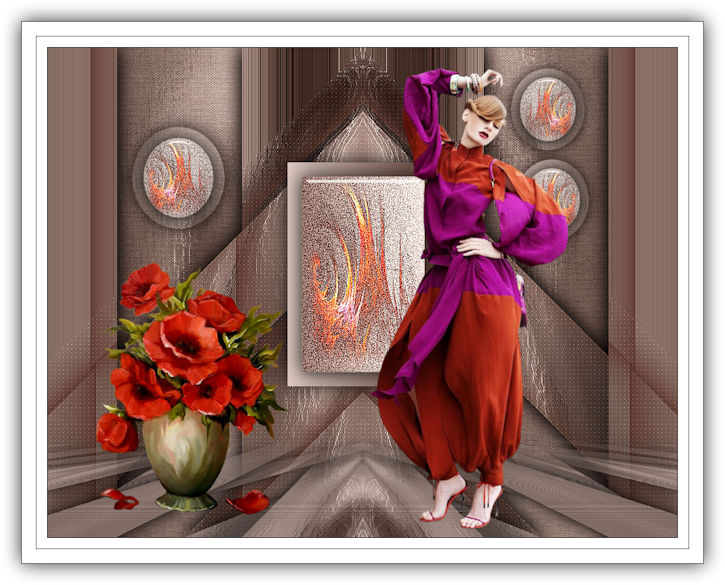
Segundo modelo, com o tube deco_1671 - fire - LB TUBES, sem mask.

VOLTAR
Copyright ©2026 - Web Design - Naise Minas
|


