|
Gray
TRADUÇÕES

MATERIAL

Seleções: seld1lc
seld2lc --
Salvar na pasta Selections do PSP.
Tubes: Gabry-paesaggio-120
Gabry-woman948
Decoração: deco1lc
deco2lc
Brush: designal brushes2 by Flina_12
Marca-d'água.
Efeitos do PSP.
Versão usada: PSP X7.
PLUGINS
Plugin Simple → Diamonds
Plugin VanDerLee → UnPlugged-X → Defocus
Plugin Carolaine and Sensibility → CS-DLines
TUTORIAL
|
Esta seta marca sua linha
Clique e arraste para movê-la
|
|
1_.
Abra uma nova imagem transparente de 900 x 600 px.
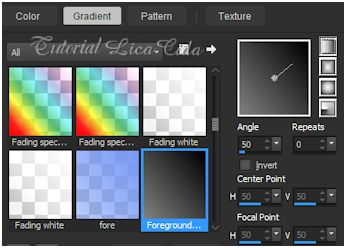
Pinte com o gradiente formado por cores que combinem com o seu tube: #808080 e #000000.
Configure: Style: Linear — Angle: 50 — Repeats: 0 — Invert desmarcado.
2_.
Plugin Simple → Diamonds.
3_.
Selections → Load/Save Selection → Load Selection From Disk → seld1lc.
Layers → New Raster Layer.
Pinte com a cor #000000.
Selections → Select None.
Image → Flip.
Objects → Align → Top.
OBSERVAÇÃO
Escolha o seu tube (paisagem) e reduza-o no tamanho a ser usado.
Com a ferramenta Magic Wand (Default), selecione o triângulo formado.
4_.
Edit → Copy no tube Gabry-paesaggio-120 (reduzido — Raster 1)
Edit → Paste Into Selection.
Selections → Select None.
5_.
Plugin VanDerLee → UnPlugged-X → Defocus: 6.
Repita com Defocus: 4.
Effects → Edge Effects → Enhance.
6_.
Selections → Select All.
Selections → Float.
Selections → Defloat.
Edit → Paste Into Selection.
Selections → Select None.
Effects → 3D Effects → Drop Shadow: 0 / 0 / 80 / 40,00 — Color: #000000.
7_.
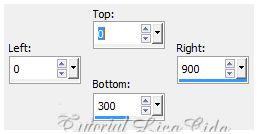
Tecle a letra S e ative a Custom Selection.
Layers → New Raster Layer.
Pinte com o mesmo gradiente formado no item 1, modificando: Invert marcado.
8_.
Effects → Texture Effects → Blinds — Color: #808080.
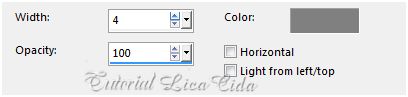
Selections → Select None.
Layers → Arrange → Move Down.
9_.
Ative a Raster 1.
Repita a Custom Selection (item 7).
Selections → Promote Selection to Layer.
Selections → Load/Save Selection → Load Selection From Disk → seld2lc.
Tecle Delete.
Selections → Select None.
Layers → Arrange → Move Up.
Layers → Duplicate.
Image → Flip.
Layers → Merge → Merge Down.
10_.
Effects → Image Effects → Seamless Tiling.
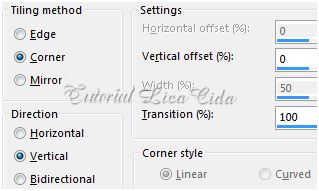
11_.
Plugin Carolaine and Sensibility → CS-DLines — Default (40 / 5).
12_.
Plugin VanDerLee → UnPlugged-X → Defocus: 4.
Effects → 3D Effects → Drop Shadow: 0 / 0 / 80 / 40,00 — Color: #000000.
LAYERS
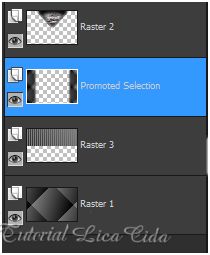
13_.
Ative a Raster 3.
Edit → Copy no deco1lc
Edit → Paste As New Layer.
14_.
Ative a layer superior.
Edit → Copy no deco2lc
Edit → Paste As New Layer.
Use a gosto.
15_.
Edit → Copy no brush designal brushes2 by Flina_12
Edit → Paste As New Layer.
Posicione.
16_.
Edit → Copy no tube Gabry-woman948
Edit → Paste As New Layer.
Redimensione e posicione.
17_.
Image → Add Borders: 1 px, Symmetric marcado — Color: #000000.
18_.
Image → Add Borders: 40 px, Symmetric marcado — Color: #ffffff.
Selecione a borda.
19_.
Pinte com o mesmo gradiente formado no item 1, modificando: Angle: 0 — Repeats: 1.
20_.
Effects → Texture Effects → Blinds — Color: #808080.
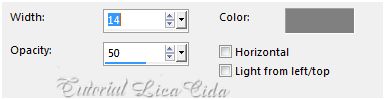
Selections → Invert.
21_.
Effects → 3D Effects → Drop Shadow: 0 / 0 / 80 / 40,00 — Color: #000000.
Selections → Select None.
Layers → Duplicate.
22_.
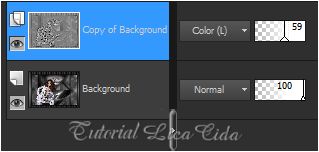
Effects → Edge Effects → High Pass — Radius: 10.
Use o Blend Mode e a Opacity a gosto.
Aplique a marca-d'água.
Assine e salve.
Espero que gostem.
Aparecida / LicaCida, abril de 2015.
Rio de Janeiro - Brasil.


VOLTAR
Copyright ©2026 - Web Design - Naise Minas
|


