|
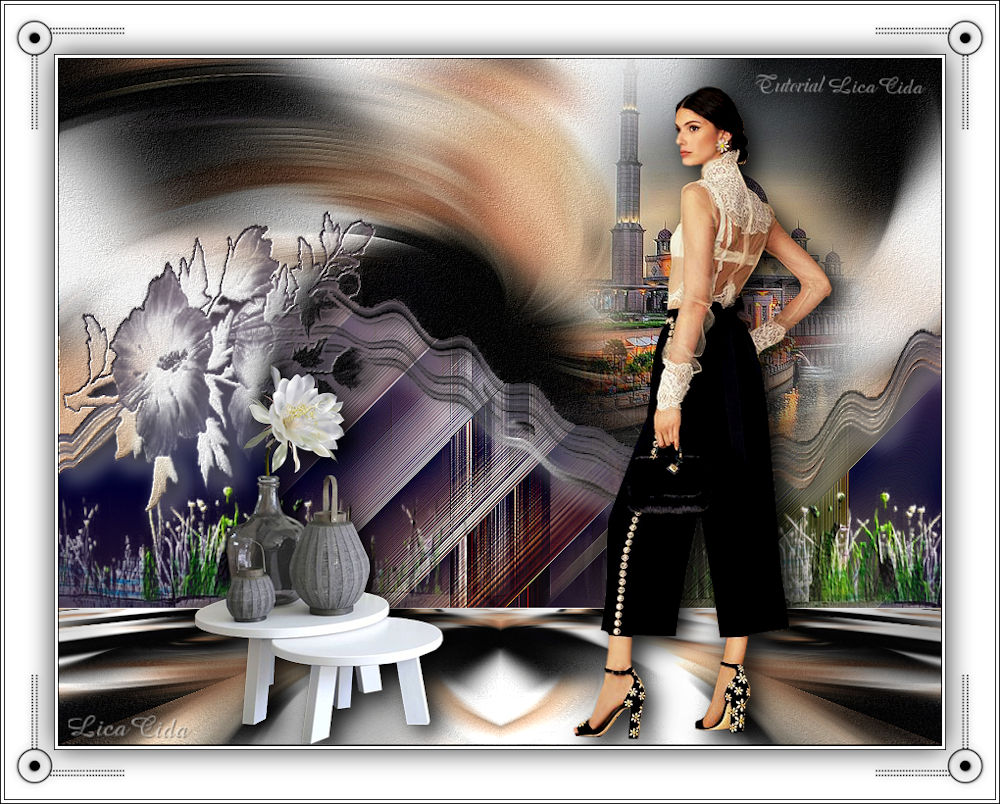
I Am
TRADUÇÕES

MATERIAL

Tubes: 5312-luzcristina
5472-luzcristina
5156-luzcristina
Decos: Jeanne_Deko_Tafeltjes_17_02_2018
deco2lc
deco_arquivo
Masks: hairflores5dworisch
Mask_herbe
Textura: Corel_15_047 (Tin foil)
Marca-d'água.
Efeitos do PSP.
Versão usada: PSP X9.
PLUGINS
Plugin FM Tile Tools → Blend Emboss
Plugin Filters Unlimited 2 → Buttons & Frames → 3D Glass Frame 2
Plugin Toadies → Weaver
Plugin Virtual Painter 4
Plugin MuRa's Seamless → Emboss at Alpha
Plugin MuRa's Meister → Perspective Tiling
Plugin Filters Unlimited 2 → &<Sandflower Specials^v^> → Pool Shadow
Plugin Nik Software → Color Efex Pro 3.0 → Bi-Color Filters
Plugin Alien Skin Eye Candy 5: Impact → Perspective Shadow
Plugin Simple → Top Left Mirror
TUTORIAL

|
Esta seta marca sua linha
Clique e arraste para movê-la
|
|
1_.
Abra uma nova imagem transparente de 900 x 600 px.
Selections → Select All.
Edit → Copy no tube 5312-luzcristina
Edit → Paste Into Selection.
Selections → Select None.
Effects → Image Effects → Seamless Tiling: Default.
Layers → Merge → Merge All (Flatten).
Layers → Promote Background Layer.
2_.
Adjust → Blur → Radial Blur.

Effects → Edge Effects → Enhance.
Adjust → Add/Remove Noise → JPEG Artifact Removal: Maximum — Crispness: 89.
Plugin FM Tile Tools → Blend Emboss — Default.
Layers → Duplicate.
3_.
Selections → Select All.
Selections → Modify → Contract: 70 px.
Plugin Filters Unlimited 2 → Buttons & Frames → 3D Glass Frame 2.

Selections → Invert.
Pressione a tecla Delete.
Selections → Select None.
4_.
Effects → Texture Effects → Texture: Corel_15_047 (Tin foil).

5_.
Effects → Geometric Effects → Perspective - Horizontal: 55 — Transparent.
Repita com o valor negativo: -55 — Transparent.
6_.
Effects → Reflection Effects → Kaleidoscope.
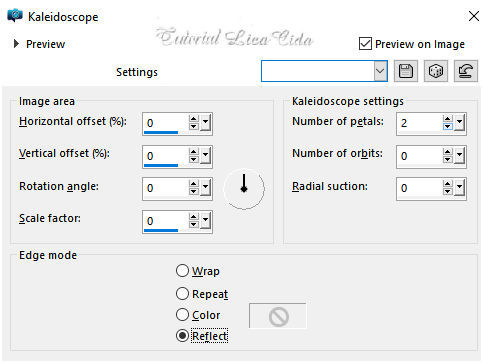
7_.
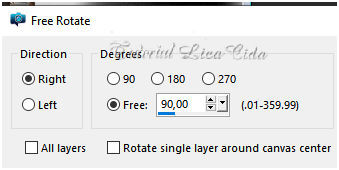
Image → Free Rotate.
Effects → Distortion Effects → Pinch: 100%.
Image → Resize: 80% — Resize all layers desmarcado.

8_.
Plugin Toadies → Weaver — Default (59 / 48 / 222).
9_.
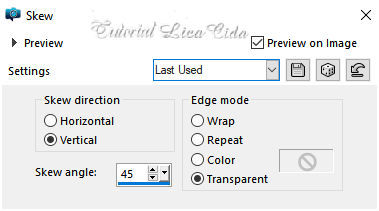
Effects → Geometric Effects → Skew.
Effects → Edge Effects → Enhance.
10_.
Edit → Copy no deco2lc
Edit → Paste As New Layer.
Effects → Image Effects → Offset.

Effects → Edge Effects → Enhance.
Ative a Raster 1.
Layers → Duplicate.
Layers → Arrange → Bring to Top.
11_.
Layers → New Mask Layer → From Image: hairflores5dworisch.

Layers → Merge → Merge Group.
Plugin MuRa's Seamless → Emboss at Alpha — Default.
Effects → 3D Effects → Drop Shadow: 10 / 10 / 100 / 30,00 — Color: #000000.
Effects → Image Effects → Offset.

12_.
Image → Canvas Size: 900 x 700 — Bottom: 100.
13_.
Escolha duas cores do back formado: Foreground: #9f7456 — Background: #d8bdb0.
Configure o gradiente: Style: Linear — Angle: 0 — Repeats: 0 — Invert desmarcado.
Layers → New Raster Layer.
Layers → Arrange → Send to Bottom.
Pinte com o gradiente formado acima.
14_.
Ative a Raster 1.
Plugin MuRa's Meister → Perspective Tiling — Default, Height: 20.
Effects → Reflection Effects → Rotating Mirror: 0 / 180 — Reflect.
Plugin MuRa's Seamless → Emboss at Alpha — Default.
Layers → Arrange → Move Up (duas vezes).
15_.
Plugin Filters Unlimited 2 → &<Sandflower Specials^v^> → Pool Shadow — Default.


16_.
Ative a Raster 3.
Selections → Select All.
Edit → Copy no misted 5472-luzcristina
Edit → Paste Into Selection.
Selections → Select None.
17_.
Effects → Distortion Effects → Pixelate: 17 / 17.
Adjust → Blur → Motion Blur: 359 / 100.
Effects → Edge Effects → Enhance.
Plugin FM Tile Tools → Blend Emboss — Default.
Layers → Duplicate.
18_.
Plugin Nik Software → Color Efex Pro 3.0 → Bi-Color Filters — Color Set: Cool/Warm 2.

Altere os Blend Modes e a Opacity das layers (use a gosto).

19_.
Ative a layer superior.
Edit → Paste As New Layer (o misted 5472-luzcristina deve estar na memória).
Image → Resize: 80% — Resize all layers desmarcado.
Adjust → Sharpness → Sharpen.
Posicione a gosto.
20_.
Edit → Copy no Jeanne_Deko_Tafeltjes_17_02_2018
Edit → Paste As New Layer.
Redimensione e posicione a gosto.
Plugin Alien Skin Eye Candy 5: Impact → Perspective Shadow — Blurry.
21_.
Edit → Copy no tube 5312-luzcristina
Edit → Paste As New Layer.
Image → Mirror → Mirror Horizontal.
Redimensione e posicione.
Plugin Alien Skin Eye Candy 5: Impact → Perspective Shadow — Blurry.
OPCIONAL
Escolha um misted que possa fazer um acabamento no Perspective Tiling e abra no PSP.
Escolhi o misted 5156-luzcristina (observe abaixo que usei como modelo o mesmo misted).
22_.
Layers → New Mask Layer → From Image: Mask_herbe.

Layers → Merge → Merge Group.
Plugin MuRa's Seamless → Emboss at Alpha — Default.
Edit → Copy nos matinhos formados
Edit → Paste As New Layer.
Use a gosto (veja o modelo).
23_.
Image → Add Borders: 1 px, Symmetric marcado — Color: #000000.
Image → Add Borders: 3 px, Symmetric marcado — Color: #ffffff.
Image → Add Borders: 1 px, Symmetric marcado — Color: #000000.
Image → Add Borders: 50 px, Symmetric marcado — Color: #ffffff.
24_.
Edit → Copy no deco_arquivo
Edit → Paste As New Layer.
Effects → Image Effects → Offset.

25_.
Plugin Simple → Top Left Mirror.
26_.
Selections → Select All.
Selections → Modify → Contract: 50 px.
Effects → 3D Effects → Drop Shadow: 0 / 0 / 80 / 40,00 — Color: #000000.
Selections → Select None.
Image → Add Borders: 1 px, Symmetric marcado — Color: #000000.
Image → Add Borders: 3 px, Symmetric marcado — Color: #ffffff.
Image → Add Borders: 1 px, Symmetric marcado — Color: #000000.
Image → Resize: Width 1000 px.
Aplique a marca-d'água.
Assine e salve.
Espero que gostem.
Obrigada!
Aparecida / LicaCida, dezembro de 2020.
Rio de Janeiro - Brasil.
OUTRO MODELO


VOLTAR
Copyright ©2026 - Web Design - Naise Minas
|


