|
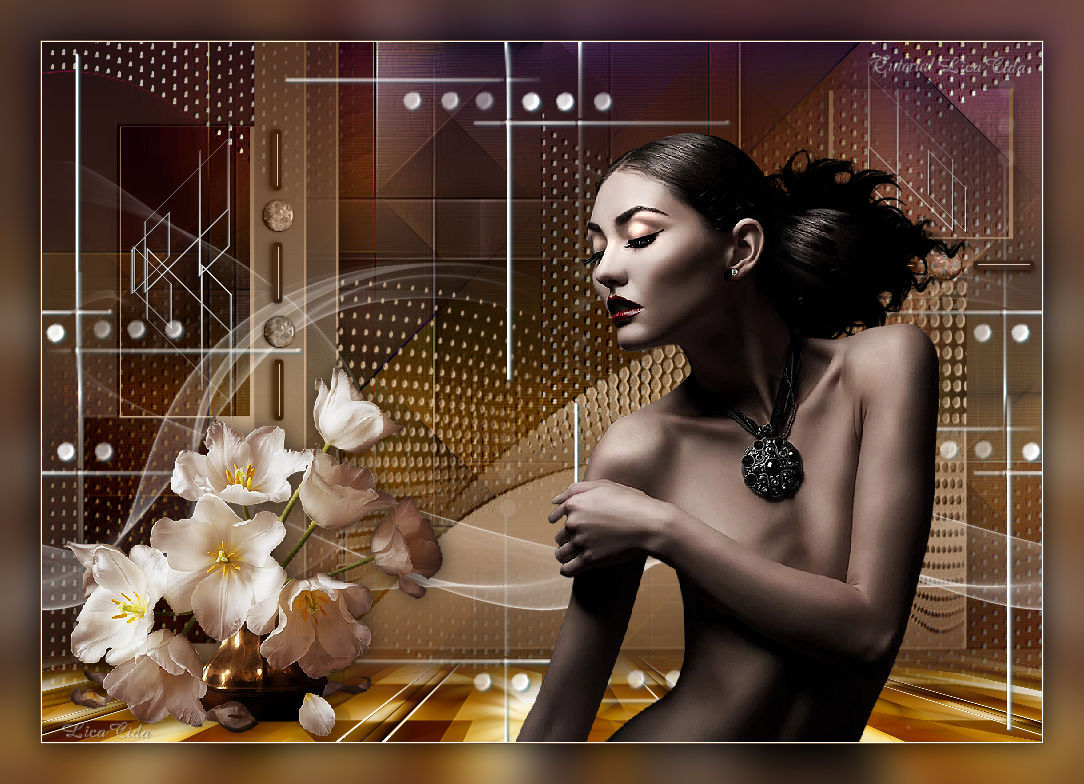
Life White
TRADUÇÕES

MATERIAL

Tubes: Gabry-women 196-17
Still_life_white_tulips_CibiBijoux
Mask: ildiko_maszk_2016_66
Decos: decoviolette
@ildiko_create_deco_free_008
Ildiko_create_deco (86)
Ildiko_create_deco (146)
Backs: free_back_ildiko (4)
ildiko_create_háttér (3)
Marca-d'água.
Efeitos do PSP.
Versão usada: PSP X8.
PLUGINS
Plugin Artistiques → Pastels
Plugin Mehdi → Sorting Tiles
Plugin AAA Frames → Foto Frame
Plugin MuRa's Meister → Perspective Tiling
Plugin Nik Software → Color Efex Pro 3.0 → Bi-Color User Defined
TUTORIAL

|
Esta seta marca sua linha
Clique e arraste para movê-la
|
|
1_.
Abra uma nova imagem transparente de 1000 x 700 px.
Selections → Select All.
Edit → Copy no free_back_ildiko (4)
Edit → Paste Into Selection.
Selections → Select None.
2_.
Layers → Duplicate.
Retire a visibilidade da layer original (Raster 1).
Adjust → Blur → Gaussian Blur — Radius: 22,00.
Plugin Artistiques → Pastels.
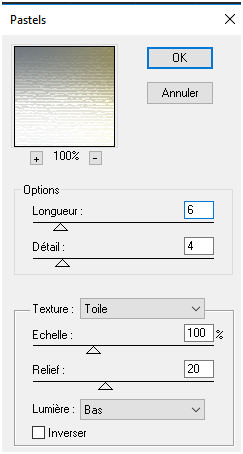
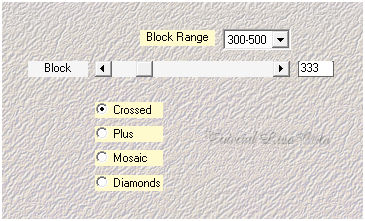
Plugin Mehdi → Sorting Tiles.
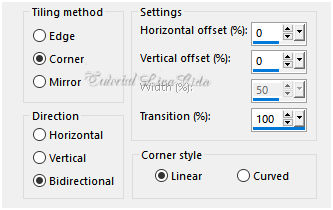
Effects → Image Effects → Seamless Tiling.
Effects → User Defined Filter → Emboss_3.
3_.
Layers → New Raster Layer.
Selections → Select All.
Edit → Copy no ildiko_create_háttér (3)
Edit → Paste Into Selection.
Selections → Select None.
Blend Mode: Multiply.
Effects → User Defined Filter → Emboss_3.
4_.
Layers → New Raster Layer.
Pinte com o gradiente formado pelas cores #704a2c e #cfb08f.
Configure: Style: Linear — Angle: 0 — Repeats: 1 — Invert desmarcado.
Layers → New Mask Layer → From Image: ildiko_maszk_2016_66.
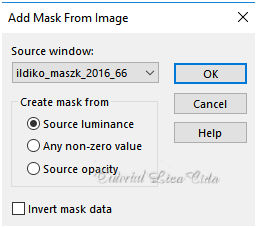
Effects → User Defined Filter → Emboss_3.
Layers → Merge → Merge Group.
Effects → 3D Effects → Drop Shadow: 1 / 1 / 60 / 30,00 — Color: #000000.
5_.
Ative a Raster 1 e ative novamente a sua visibilidade.
Plugin AAA Frames → Foto Frame.
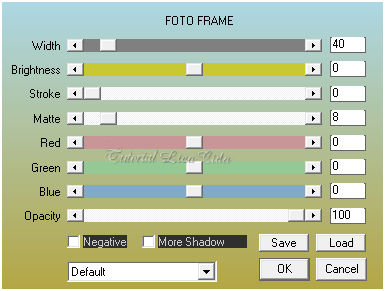
Image → Free Rotate.
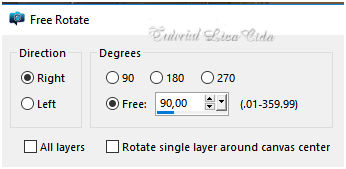
6_.
Layers → Arrange → Bring to Top.
Plugin MuRa's Meister → Perspective Tiling.
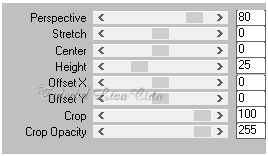
Com a ferramenta Magic Wand — Feather: 60, clique na parte transparente.
Pressione a tecla Delete (quatro ou cinco vezes, para suavizar o efeito).
Selections → Select None.
Plugin Nik Software → Color Efex Pro 3.0 → Bi-Color User Defined — Default.
Effects → User Defined Filter → Emboss_3.
7_.
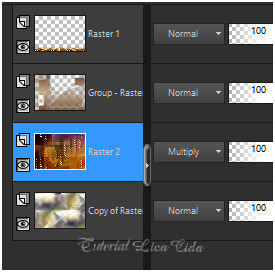
Aplique o mesmo plugin também na Raster 2: Plugin Nik Software → Color Efex Pro 3.0 → Bi-Color User Defined — Default.
Altere os Blend Modes e a Opacity das layers.
8_.
Ative a layer da mask (Group-Raster 3).
Ative a ferramenta Selection Tool (tecla S) → Custom Selection.
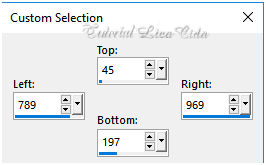
Selections → Modify → Contract: 2 px.
Pressione a tecla Delete.
Selections → Select None.
Ative a ferramenta Selection Tool (tecla S) → Custom Selection 2.
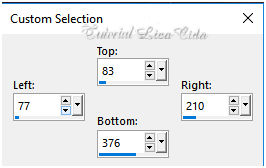
Selections → Modify → Contract: 2 px.
Pressione a tecla Delete.
Selections → Select None.
9_.
Edit → Copy no @ildiko_create_deco_free_008 (Raster 2)
Edit → Paste As New Layer.
Effects → Image Effects → Offset: H: -361 / V: 121 — Custom e Transparent marcados.
Edit → Copy no @ildiko_create_deco_free_008 (Raster 3)
Edit → Paste As New Layer.
Effects → Image Effects → Offset: H: 376 / V: 241 — Custom e Transparent marcados.
Layers → Merge → Merge Down.
10_.
Layers → New Raster Layer (Raster 4).
Selections → Select All.
Edit → Copy no decoviolette
Edit → Paste Into Selection.
Selections → Select None.
Layers → Arrange → Bring to Top.
Effects → Image Effects → Seamless Tiling (veja o print do item 2).
11_.
Edit → Copy no Ildiko_create_deco (86)
Edit → Paste As New Layer.
Com a ferramenta Pick Tool, acerte as laterais (veja o modelo).
12_.
Edit → Copy no Ildiko_create_deco (146)
Edit → Paste As New Layer.
Blend Mode: Luminance (L).
Layers → Duplicate.
Use como no modelo.
13_.
Edit → Copy no tube Gabry-women 196-17
Edit → Paste As New Layer.
Posicione e redimensione a gosto.
14_.
Edit → Copy no tube Still_life_white_tulips_CibiBijoux
Edit → Paste As New Layer.
Posicione e redimensione a gosto.
15_.
Image → Add Borders: 1 px, Symmetric marcado — Color: cor mais escura (Foreground).
Image → Add Borders: 1 px, Symmetric marcado — Color: #ffffff.
Aplique a marca-d'água.
Assine e salve.
Espero que gostem. Obrigada!
Aparecida / LicaCida, novembro de 2017.
Rio de Janeiro - Brasil.

VOLTAR
Copyright ©2026 - Web Design - Naise Minas
|


