|
Many Faces Gracynha
TRADUÇÕES
JustanIllusion_Background
Tubes: corinne.vicaire - femme 24.03.11
WordArt: Many Face
Marca-d'água.
Versão PSP X3.
PLUGINS
Plugin penta.com → color dot
TUTORIAL
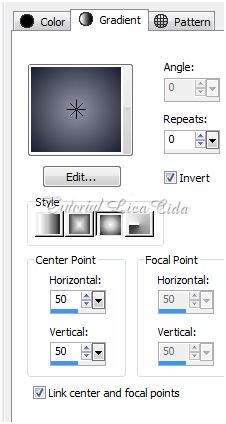
1_. Abra uma nova imagem transparente de 900 x 600 px. Pinte com o gradiente formado pelas cores #1a1d2e e #9295a6. Configure: Style: Sunburst — Repeats: 0 — Invert marcado — Center Point: H: 50 / V: 50.
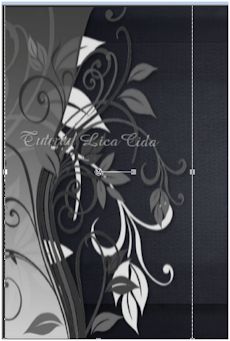
2_. Layers → New Raster Layer. Selections → Select All. Edit → Copy no JustanIllusion_Background Edit → Paste Into Selection. Selections → Select None. Blend Mode → Overlay. Observe a cor usada; se necessário, use outro Blend Mode. Adjust → Sharpness → Sharpen More. Effects → 3D Effects → Drop Shadow: 18 / -2 / 73 / 17,00 — Color: #000000. 3_. Edit → Copy no kTs_Jhu_152 Edit → Paste As New Layer. Posicione do lado esquerdo da tag e, com a ferramenta Deform Tool, abaixe ou levante o efeito. Blend Mode → Luminance (L).
4_. Layers → Duplicate. Effects → Image Effects → Seamless Tiling → Side by Side.
Blend Mode → Screen. 5_. Ative a ferramenta Selection → Rectangle → Custom Selection. Ou pressione a tecla S. Top: 63 — Left: 0 — Right: 532 — Bottom: 534.
Layers → New Raster Layer. Pinte com o mesmo gradiente formado no item 1. Effects → 3D Effects → Chisel: 3 — Solid Color — Color: #000000.
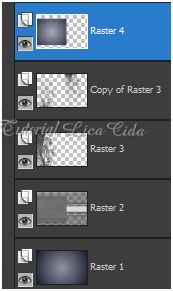
Plugin penta.com → color dot → Default. Selections → Select None. Layers:
6_. Edit → Copy no tube corinne.vicaire - femme 24.03.11 Edit → Paste As New Layer. Effects → Image Effects → Offset: H: -138 / V: 0 — Custom e Transparent marcados. Opacity: 38%. Duplique essa layer. Image Resize 80% - Resize all layers desmarcado. Acomode a gosto. 7_. Edit → Copy no Kat_Framefreebie1 Edit → Paste As New Layer. Posicione do lado esquerdo do efeito da Raster 4 e, com a ferramenta Deform Tool, puxe para o lado direito, ocupando o efeito. Blend Mode → Hard Light. Effects → 3D Effects → Drop Shadow: 18 / -2 / 73 / 17,00 — Color: #000000. 8_. Edit → Copy nos Diamonds Edit → Paste As New Layer. Posicione como no modelo. 9_. Edit → Copy no WordArt Many Face Edit → Paste As New Layer. Posicione entre os Diamonds. 10_. Duplique a Raster 2. Plugin MuRa's Meister → Perspective Tiling.
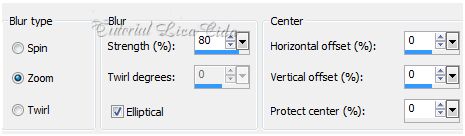
Blend Mode → Luminance. Adjust → Add/Remove Noise → JPEG Artifact Removal — Maximum: 100. Plugin FM Tile Tools → Blend Emboss → Default. Effects → Image Effects → Seamless Tiling → Side by Side. Veja o print do item 4. 11_. Ative a layer superior. Edit → Copy no tube corinne.vicaire - femme 24.03.11 Edit → Paste As New Layer. Effects → Image Effects → Offset: H: -248 / V: -20 — Custom e Transparent marcados. 12_. Edit → Copy no tube corinvase_15_bycrealinejuin2012 Edit → Paste As New Layer. Image Resize 90% - Resize all layers desmarcado. Posicione a gosto. 13_. Image → Add Borders → 1 px, Symmetric marcado — Color: #9295a6. 14_. Image → Add Borders → 1 px, Symmetric marcado — Color: #1a1d2e. 15_. Image → Add Borders → 1 px, Symmetric marcado — Color: #9295a6. 16_. Layers → Duplicate. Image Resize 90% - Resize all layers desmarcado. Effects → 3D Effects → Drop Shadow: 18 / 2 / 73 / 17,00 — Color: #000000. Repita com os valores negativos: -18 / -2 / 73 / 17,00. 17_. Na layer Background: Adjust → Blur → Radial Blur.
Adjust → Sharpness → Sharpen More. Plugin Graphics Plus → Cross Shadow → Default. Plugin penta.com → color dot → Default. Plugin Alf's Border FX → Border Fade 1.
Aplique a marca-d'água. Assine e salve. Espero que gostem. Aparecida / LicaCida, em fevereiro de 2013. Rio de Janeiro - Brasil.
Copyright ©2020/2025 - Web Design - Liriani Silva®
|