|
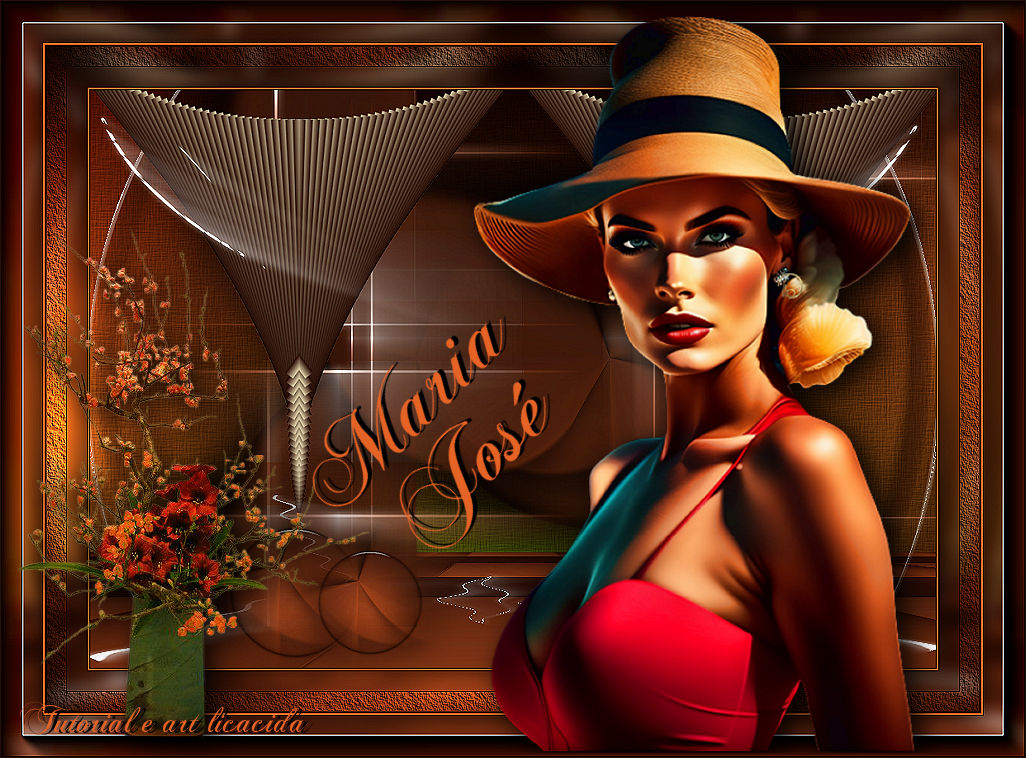
Maria José
TRADUÇÕES

MATERIAL

Imagem: imagem anexada-bylc
Preset: Illumination → Lights → Preset_Lights_abstract --
Salvar na pasta Presets do PSP.
Tubes: Callitubes-3235mulheres (1)
Callitubes-162flores
Texture: Corel_15_013
Mask: !!!!gradientedworisch
Deco: circledeco-bylc
circulo acabamento-bylc
decochão-bylc
decotopo-bylc
Título: titulobylc
Marca-d'água.
Efeitos do PSP.
PLUGINS
Plugin Filter Factory Gallery B → Button Deluxe
Plugin MuRa's Meister → Pole Transform
Plugin MuRa's Meister → Perspective Tiling
Plugin Alien Skin Eye Candy 5: Impact → Motion Trail
Plugin Mehdi → Weaver
Plugin AAA Frames → Texture Frame
Plugin AAA Frames → Foto Frame
TUTORIAL
|
Esta seta marca sua linha
Clique e arraste para movê-la
|
|
1_.
Abra o material no PSP, duplique e feche os originais.
Escolha duas cores para trabalhar: Foreground: #2b1008 — Background: #e66326.
2_.
Abra a imagem anexada-bylc.
Layers → New Raster Layer.
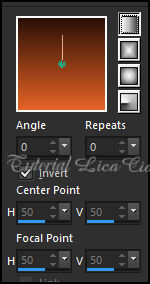
Pinte com o gradiente formado pelas cores em uso.
Configure: Style: Linear — Angle: 0 — Repeats: 0 — Invert marcado.
3_.
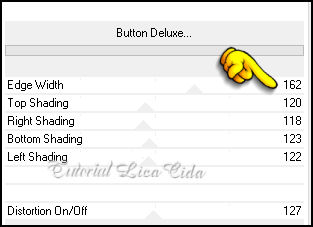
Plugin Filter Factory Gallery B → Button Deluxe.
4_.
Com a ferramenta Selection Tool (tecla S), selecione o efeito.
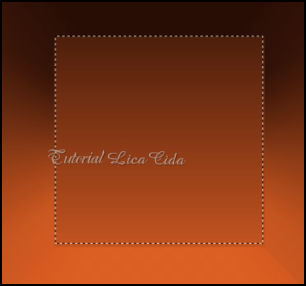
5_.
Effects → 3D Effects → Inner Bevel.
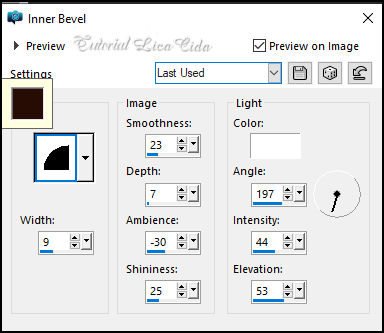
Selections → Promote Selection to Layer.
Selections → Select None.
6_.
Effects → Image Effects → Seamless Tiling: Side by Side.
7_.
Plugin MuRa's Meister → Pole Transform.
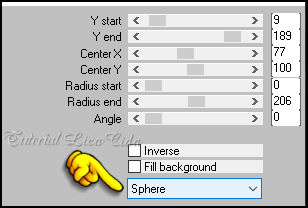
Effects → 3D Effects → Drop Shadow: 10 / 10 / 100 / 50,00 — Color: #000000.
Repita com os valores negativos: -10 / -10.
8_.
Na layer do topo, repita: Effects → 3D Effects → Inner Bevel.
9_.
Layers → New Mask Layer → From Image: !!!!gradientedworisch.
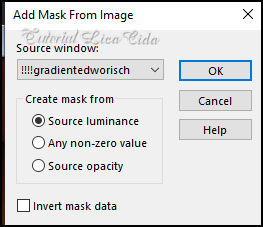
Effects → Edge Effects → Enhance.
Layers → Merge → Merge Group.
10_.
Repita na layer inferior (Raster 2):
Layers → New Mask Layer → From Image: !!!!gradientedworisch.
Effects → Edge Effects → Enhance.
Layers → Merge → Merge Group.
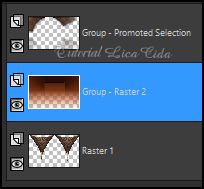
11_.
Ative a layer do topo (Group - Promoted Selection).
Plugin MuRa's Meister → Pole Transform (print do item 7).
Layers → Duplicate.
Image → Mirror → Mirror Vertical.
Layers → Duplicate.
Image → Mirror → Mirror Horizontal.
12_.
Na layer do topo:
Layers → New Raster Layer.
Mude a cor do Foreground para #ffffff.
Use a ferramenta Airbrush
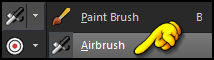
com as configurações indicadas:

Use como no modelo (são três traços de cada lado).
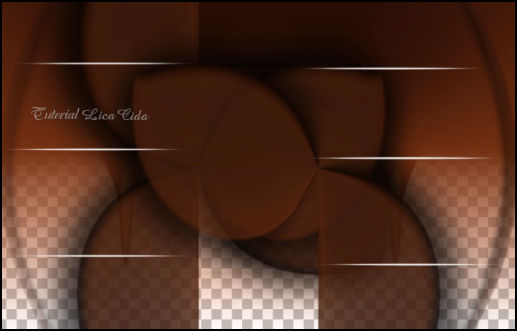
13_.
Effects → Geometric Effects → Skew.
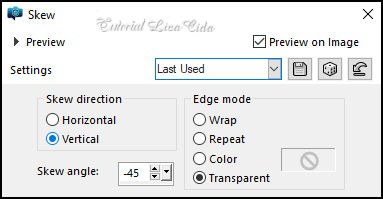
Layers → Duplicate.
Image → Mirror → Mirror Horizontal.
Layers → Merge → Merge Down.
14_.
Plugin Alien Skin Eye Candy 5: Impact → Motion Trail.
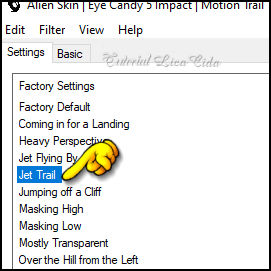
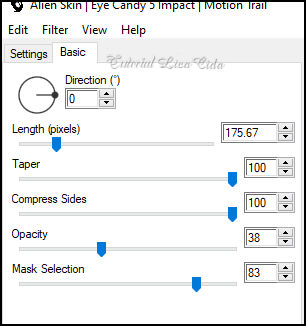
15_.
Plugin Mehdi → Weaver.
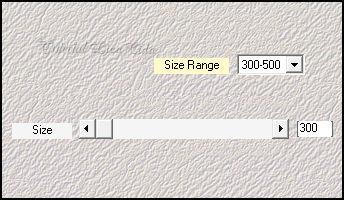
Layers → Duplicate.
Layers → Merge → Merge Down.
LAYERS
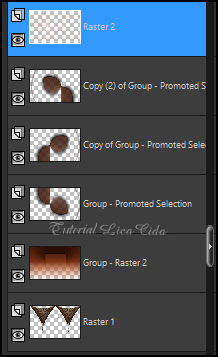
16_.
Image → Canvas Size: 1024 x 700 — Bottom: 50.
17_.
Ative a layer Group - Raster 2.
Plugin MuRa's Meister → Perspective Tiling: Height: 20.
18_.
Effects → Reflection Effects → Rotating Mirror: 0 / 0 — Reflect.
19_.
Layers → New Raster Layer.
Layers → Arrange → Send to Bottom.
Pinte com o mesmo gradiente em uso.
20_.
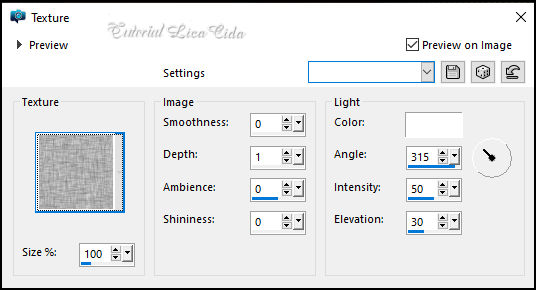
Effects → Texture Effects → Texture: Corel_15_013 (anexada ao material) ou use a gosto.
21_.
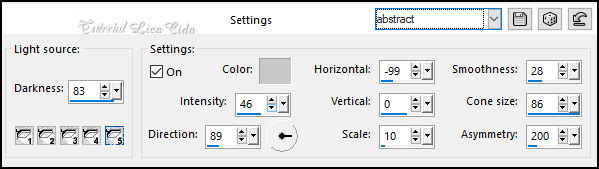
Effects → Illumination Effects → Lights → Preset_Lights_abstract.
22_.
Ative a Raster 1.
Layers → Arrange → Bring to Top.
23_.
Edit → Copy no circulo acabamento-bylc
Edit → Paste As New Layer.
Use a gosto.
24_.
Edit → Copy no circledeco-bylc
Edit → Paste As New Layer.
Use abaixo da Raster 1.
25_.
Edit → Copy no decochão-bylc
Edit → Paste As New Layer.
Objects → Align → Bottom.
26_.
Edit → Copy no decotopo-bylc
Edit → Paste As New Layer.
Layers → Arrange → Bring to Top.
Confira se o local usado está certo.
BORDAS
Image → Add Borders: 1 px, Symmetric marcado — Color: #2b1008 (escura).
Image → Add Borders: 2 px, Symmetric marcado — Color: #e66326 (clara).
Image → Add Borders: 1 px, Symmetric marcado — Color: #2b1008 (escura).
Edit → Copy.
Selections → Select All.
Image → Add Borders: 50 px, Symmetric marcado — Color: #ffffff.
Selections → Invert.
Edit → Paste Into Selection.
Adjust → Blur → Gaussian Blur — Radius: 10,00.
Plugin AAA Frames → Texture Frame: Width: 25, demais valores Default.
Edit → Repeat.
Selections → Invert.
Effects → 3D Effects → Drop Shadow: 0 / 0 / 80 / 40,00 — Color: #000000.
Selections → Select None.
Image → Add Borders: 1 px, Symmetric marcado — Color: #2b1008 (escura).
Image → Add Borders: 2 px, Symmetric marcado — Color: #e66326 (clara).
Image → Add Borders: 1 px, Symmetric marcado — Color: #2b1008 (escura).
Edit → Copy (deverá estar na memória).
Selections → Select All.
Image → Add Borders: 50 px, Symmetric marcado — Color: #ffffff.
Selections → Invert.
Edit → Paste Into Selection.
Adjust → Blur → Gaussian Blur — Radius: 10,00.
Plugin AAA Frames → Foto Frame: Width: 25 — Matte: 1, demais valores Default.
Edit → Repeat.
Selections → Invert.
Effects → 3D Effects → Drop Shadow: 0 / 0 / 80 / 40,00 — Color: #000000.
Selections → Select None.
27_.
Edit → Copy no tube Callitubes-3235mulheres (1)
Edit → Paste As New Layer.
Posicione e use a gosto.
28_.
Edit → Copy no tube Callitubes-162flores
Edit → Paste As New Layer.
Posicione e use a gosto.
29_.
Use o título (titulobylc) a gosto.
Image → Resize: Width 1024 px.
Aplique a marca-d'água.
Assine e salve.
File → Export → JPEG Optimizer.
Aparecida / LicaCida.
Rio de Janeiro - Brasil.

VOLTAR
Copyright ©2026 - Web Design - Naise Minas
|


