|
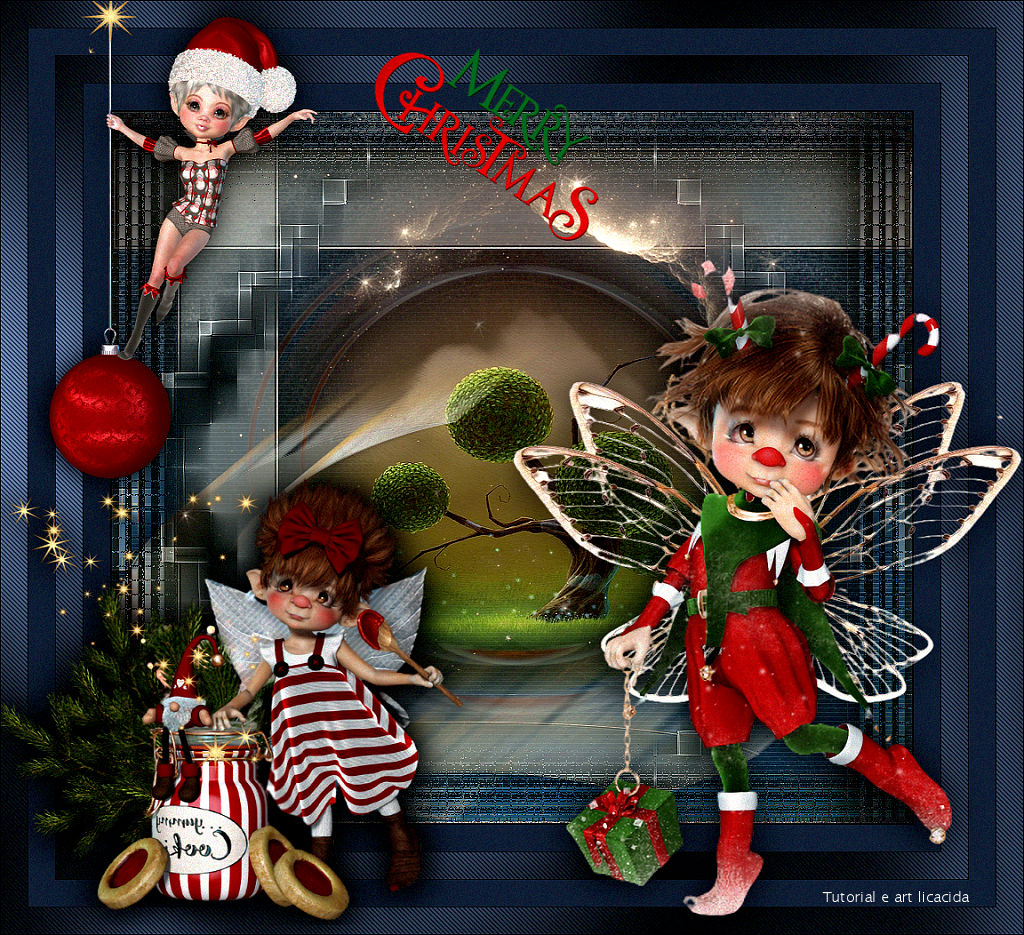
Merry Christmas 2022
TRADUÇÕES

MATERIAL

Preset: gold (Alien Skin Eye Candy 5: Impact → Glass) --
Dê um duplo clique sobre o preset para importá-lo para o plugin.
Seleções: Selection #1, #2 e #3 --
Salvas no canal alfa da imagem alphachannelnatal-bylc.
Tubes: Renee_TUBES-Fetes-2022-20
Renee_TUBES-Fetes-2022-8 (retire a estrela para o bastão da bailarina)
Renee_TUBES-Fetes-2022-39
Renee-TUBES-Novembre-2022- 3
Imagens: space_hole_by_paulinemoss-d71vqf6
Layered_Sphere_by_Kabuchan_56624
Deco: decoadorno_mp
Título: Renee_TUBES-Fetes-2022-6
Marca-d'água.
Efeitos do PSP.
PLUGINS
Plugin MuRa's Meister → Perspective Tiling
Plugin Alien Skin Eye Candy 5: Impact → Perspective Shadow
Plugin Alien Skin Eye Candy 5: Impact → Backlight
Plugin Alien Skin Eye Candy 5: Impact → Glass
Plugin Alien Skin Eye Candy 5: Nature → Snow Drift
Plugin Carolaine and Sensibility → cs_texture
Plugin Carolaine and Sensibility → CS-DLines
Plugin Flaming Pear → Flexify 2
Plugin AAA Filters → Custom
Plugin Graphics Plus → Cross Shadow
TUTORIAL
|
Esta seta marca sua linha
Clique e arraste para movê-la
|
|
Configure: Foreground: #202a3e (cor escura) — Background: #356795 (cor clara).
1_.
Abra o arquivo alphachannelnatal-bylc.
Pinte com o gradiente formado pelas cores configuradas acima.
Configure: Style: Linear — Angle: 180 — Repeats: 0 — Invert desmarcado.
2_.
Edit → Copy no Layered_Sphere_by_Kabuchan_56624
Edit → Paste As New Layer.
3_.
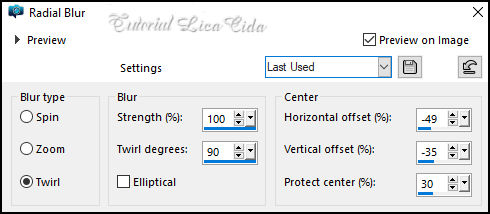
Adjust → Blur → Radial Blur.
Layers → Duplicate.
Layers → Merge → Merge Down.
Effects → Edge Effects → Enhance More.
Layers → Duplicate.
Image → Mirror → Mirror Horizontal.
Layers → Merge → Merge Down.
Layers → Duplicate.
4_.
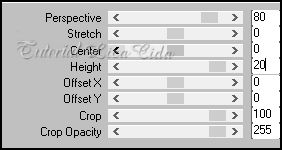
Plugin MuRa's Meister → Perspective Tiling.
5_.
Effects → Distortion Effects → Polar Coordinates — Rectangular to polar — Transparent.
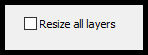
Image → Resize: 80% — Resize all layers desmarcado.
6_.
Com a ferramenta Magic Wand (Tolerance e Feather: 0), selecione o centro do círculo.
7_.
Layers → New Raster Layer.
Edit → Copy no Renee-TUBES-Novembre-2022- 3
Edit → Paste Into Selection.
Selections → Select None.
Adjust → Sharpness → Sharpen.
8_.
Volte à layer do círculo.
Plugin Alien Skin Eye Candy 5: Impact → Perspective Shadow — a gosto.
Layers → Duplicate.
Image → Resize: 80% — Resize all layers desmarcado.
Layers → Arrange → Move Up.
Edit → Repeat: Plugin Alien Skin Eye Candy 5: Impact → Perspective Shadow — a gosto.
9_.
Selections → Load/Save Selection → Load Selection From Alpha Channel → Selection #1.
10_.
Layers → New Raster Layer.
Pinte com a cor #ffffff.
11_.
Selections → Modify → Contract: 2.
Pressione a tecla Delete.
Selections → Select None.
12_.
Com a ferramenta Magic Wand (Tolerance e Feather: 0), selecione o centro da seleção.
Com a ferramenta Flood Fill (Opacity: 40), pinte com a cor #ffffff.
Selections → Select None.
Volte a Opacity do Flood Fill para 100%.
13_.
Plugin Carolaine and Sensibility → cs_texture — Default (52 / 0 / 175 / 0).
Effects → Edge Effects → Enhance.
Layers → Duplicate.
14_.
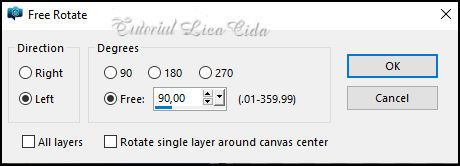
Image → Free Rotate.
15_.
Effects → Image Effects → Offset: H: -320 / V: -270 — Custom e Transparent marcados.
Layers → Merge → Merge Down.
Plugin Alien Skin Eye Candy 5: Impact → Perspective Shadow — a gosto.
Layers → Duplicate.
Image → Mirror → Mirror Horizontal.
16_.
Plugin Flaming Pear → Flexify 2.
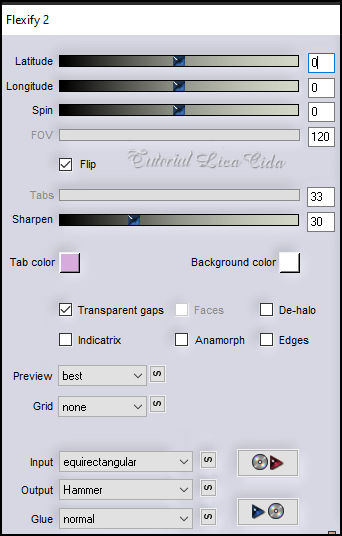
Image → Mirror → Mirror Vertical.
17_.
Effects → Image Effects → Offset: H: -57 / V: -131 — Custom e Transparent marcados.
Layers → Arrange → Move Down.
18_.
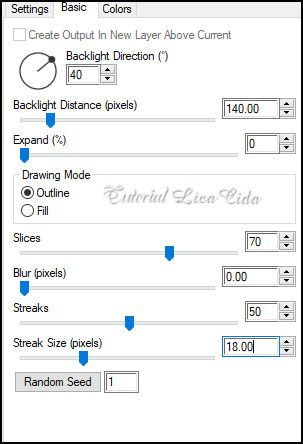
Plugin Alien Skin Eye Candy 5: Impact → Backlight.
19_.
Ative a Raster 1.
Plugin Carolaine and Sensibility → cs_texture — Default (52 / 0 / 175 / 0).
20_.
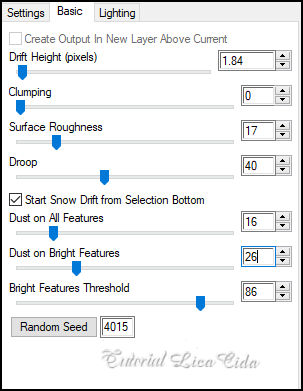
Plugin Alien Skin Eye Candy 5: Nature → Snow Drift — Basic.
21_.
Selections → Load/Save Selection → Load Selection From Alpha Channel → Selection #2.
22_.
Layers → New Raster Layer.
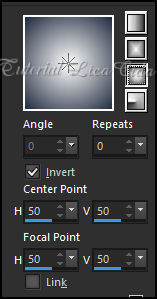
Pinte com o gradiente formado pela cor do Foreground e #ffffff.
Configure: Style: Sunburst — Repeats: 0 — Invert marcado — Center Point: H: 50 / V: 50 — Focal Point: H: 50 / V: 50.
23_.
Plugin Alien Skin Eye Candy 5: Impact → Glass — Settings: gold.
Selections → Select None.
24_.
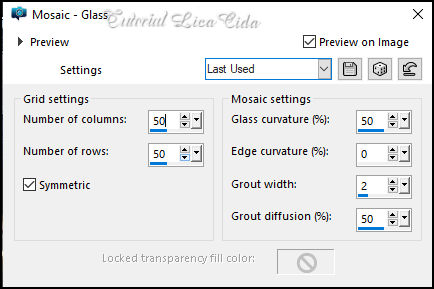
Effects → Texture Effects → Mosaic - Glass.
Layers → Arrange → Bring to Top.
Blend Mode: Multiply.
Layers → Duplicate.
Image → Mirror → Mirror Vertical.
Layers → Merge → Merge Down.
25_.
Selections → Load/Save Selection → Load Selection From Alpha Channel → Selection #3.
26_.
Layers → New Raster Layer.
Pinte com o mesmo gradiente Sunburst (print acima).
27_.
Plugin Alien Skin Eye Candy 5: Impact → Glass — Settings: gold.
Selections → Select None.
28_.
Effects → Texture Effects → Mosaic - Glass (print acima).
Blend Mode: Darken.
Layers → Duplicate.
Image → Mirror → Mirror Horizontal.
Layers → Merge → Merge Down.
29_.
Edit → Copy no decoadorno_mp
Edit → Paste As New Layer.
Blend Mode: Luminance (L).
30_.
Edit → Copy no space_hole_by_paulinemoss-d71vqf6
Edit → Paste As New Layer.
Com a ferramenta Pick Tool, posicione a gosto (opcional).
Image → Add Borders: 2 px, Symmetric marcado — Color: #000000.
31_.
Plugin AAA Filters → Custom — Landscape (Default).
BORDAS
Image → Add Borders: 30 px, Symmetric marcado — Color: #202a3e (Foreground).
Image → Add Borders: 1 px, Symmetric marcado — Color: #000000.
Selections → Select All.
Image → Add Borders: 30 px, Symmetric marcado — Color: #202a3e (Foreground).
Selections → Invert.
32_.
Plugin Carolaine and Sensibility → CS-DLines: 45 / 5.
33_.
Plugin Graphics Plus → Cross Shadow — Default.
Image → Add Borders: 1 px, Symmetric marcado — Color: #000000.
Selections → Select None.
Repita as bordas.
34_.
Edit → Copy nos tubes selecionados
Edit → Paste As New Layer.
Posicione e use a gosto.
Image → Resize: Width 1024 px.
Aplique a marca-d'água.
Assine e salve.
Espero que apreciem.
Obrigada!
Aparecida / LicaCida, dezembro de 2022.
Rio de Janeiro - Brasil.

VOLTAR
Copyright ©2026 - Web Design - Naise Minas
|


