|

Mother Africa
TRADUÇÕES

MATERIAL

Mask: Narah_mask_Abstract71
Textura: texture_57jpg
Fractal: fractal (2) (by TomWilcox)
Tubes: kikirou1567_Mother_Africa_by_BenHeine
kikirou1369_girafes
kikirou1434_african_women
Marca-d'água.
Efeitos do PSP.
Versão usada: PSP X3.
Refeito no PSP X5.
PLUGINS
Plugin Nik Software → Color Efex Pro 3.0 → Cross Balance
Plugin FM Tile Tools → Saturation Emboss
Plugin FM Tile Tools → Blend Emboss
TUTORIAL
|
Esta seta marca sua linha
Clique e arraste para movê-la
|
|
1_.
Abra uma nova imagem transparente de 850 x 600 px.
Pinte com o gradiente formado pelas cores #000000 e #b79a6f.
Configure: Style: Linear — Angle: 90 — Repeats: 1 — Invert desmarcado.

2_.
Layers → New Mask Layer → From Image: Narah_mask_Abstract71.
Layers → Merge → Merge Group.
3_.
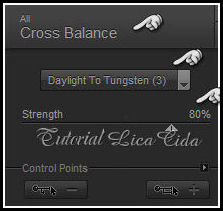
Plugin Nik Software → Color Efex Pro 3.0 → Cross Balance.
4_.
Layers → New Raster Layer.
Layers → Arrange → Move Down.
Pinte com a cor #ffffff.
5_.
Ative a Group-Raster 1.
Layers → Duplicate.
Layers → Merge → Merge Visible.
6_.
Adjust → Add/Remove Noise → Add Noise: Uniform e Monochrome marcados — Noise: 10.
7_.
Layers → New Raster Layer.
Selections → Select All.
Edit → Copy na texture_57jpg
Edit → Paste Into Selection.
Blend Mode: Overlay.
Layers → Duplicate.
Layers → Merge → Merge Down.
8_.
Plugin FM Tile Tools → Saturation Emboss: Default.
Plugin FM Tile Tools → Blend Emboss: Default (aplique duas vezes).
9_.
Layers → New Raster Layer.
Edit → Copy no fractal (2)
Edit → Paste Into Selection.
Selections → Select None.
Blend Mode: Overlay.
Repita: Plugin FM Tile Tools → Blend Emboss: Default.
10_.
Edit → Copy no tube kikirou1567_Mother_Africa_by_BenHeine
Edit → Paste As New Layer.
Image → Resize: 90% — Resize all layers desmarcado.
Image → Mirror.
Effects → Image Effects → Offset: H: -330 / V: 0 — Custom e Transparent marcados.
Blend Mode: Multiply.
Effects → 3D Effects → Drop Shadow: 8 / 8 / 80 / 30,00 — Color: #000000.
11_.
Edit → Copy no tube kikirou1369_girafes
Edit → Paste As New Layer.
Image → Resize: 90% — Resize all layers desmarcado.
Opacity: 55%.
Effects → Image Effects → Offset: H: 160 / V: -60 — Custom e Transparent marcados.
12_.
Layers → Duplicate.
Effects → Image Effects → Offset: H: 320 / V: 90 — Custom e Transparent marcados.
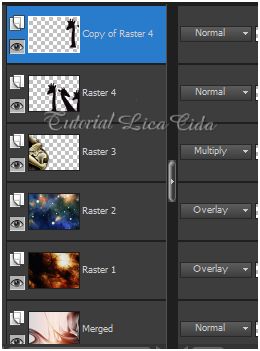
LAYERS
13_.
Ative a Raster 2.
Effects → Illumination Effects → Sunburst: Default.
Layers → Merge → Merge Visible.
14_.
Selections → Select All.
Selections → Modify → Contract: 40.
Selections → Invert.
Selections → Promote Selection to Layer.
Blend Mode: Multiply.
Repita: Selections → Promote Selection to Layer — Blend Mode: Multiply.
15_.
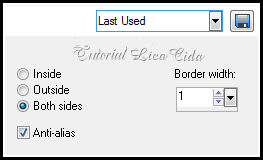
Selections → Modify → Select Selection Borders: Both sides e Anti-alias marcados — Border width: 1.
Layers → New Raster Layer.
Pinte com a cor #5772be.
Selections → Select None.
16_.
Image → Add Borders: 40 px, Symmetric marcado — Color: #ffffff.
17_.
Edit → Copy no tube kikirou1434_african_women
Edit → Paste As New Layer.
Posicione a gosto.
Layers → Merge → Merge All (Flatten).
Aplique a marca-d'água.
Assine e salve como JPG.
Espero que gostem e aprovem com carinho.
Aparecida / LicaCida, abril de 2011.
Revisado em abril de 2013.
Rio de Janeiro - Brasil.

VOLTAR
Copyright ©2026 - Web Design - Naise Minas
|

