|
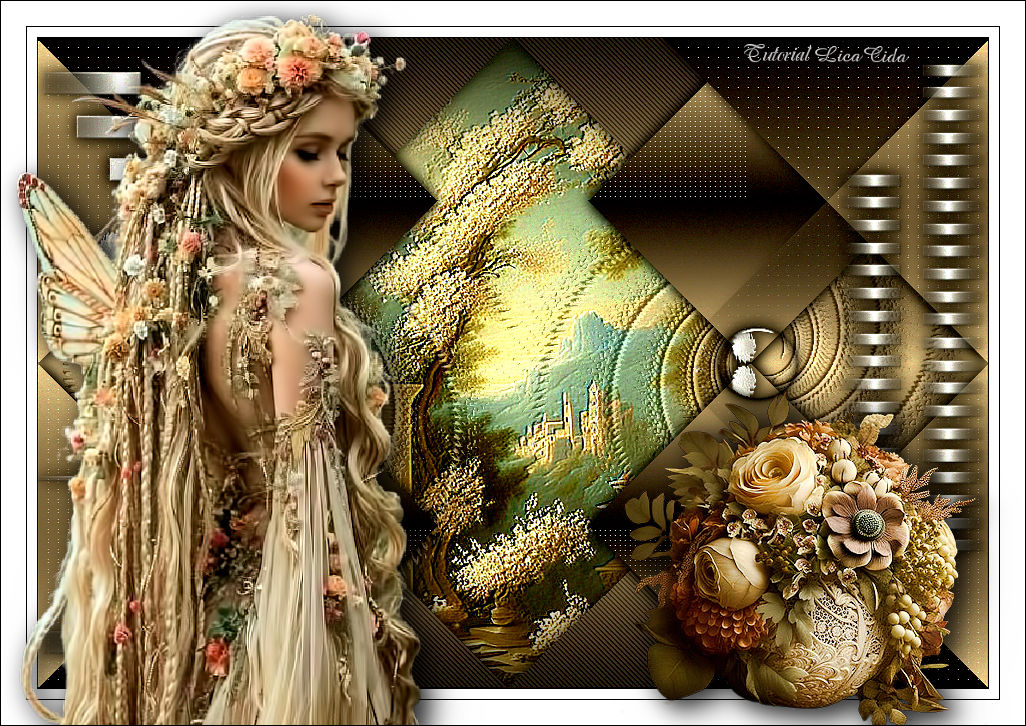
Nature
TRADUÇÕES

MATERIAL

Alpha Channel: alphanature --
Seleção (Selection #1) guardada no Alpha Channel da imagem.
Tubes: Callitubes-4532mulheres
Callitubes-111paisagens (1)
Callitubes-789flores
Decor: C1qNCDLk3oz2FhJZ66sFevE5US4
MaskViolette_R05-DECOR (decor1MaskViolette_R05, decor2MaskViolette_R05 e MaskViolette_R05)
Marca-d'água.
Efeitos do PSP.
PLUGINS
Plugin AP [Lines] → Lines - SilverLining
Plugin Graphics Plus → Vertical Mirror
Plugin Simple → Zoom Out and Flip
Plugin Carolaine and Sensibility → CS-DLines
Plugin AAA Filters → Custom
TUTORIAL
|
Esta seta marca sua linha
Clique e arraste para movê-la
|
|
1_.
Abra o material no PSP, duplique e feche o original.
Escolha duas cores para trabalhar: Foreground: #dec698 — Background: #0e0704.
2_.
Abra o arquivo alphanature.
Pinte com o gradiente Linear formado pelas cores em uso.
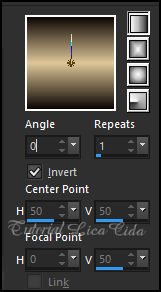
Layers → Duplicate.
Feche a visibilidade da Raster 1.
3_.
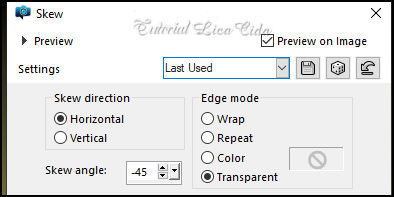
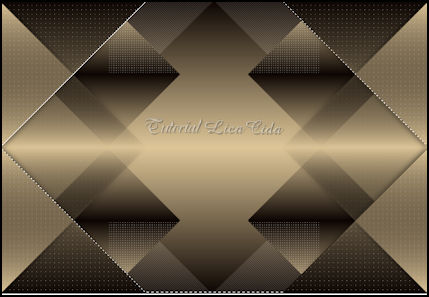
Effects → Geometric Effects → Skew.
4_.
Selections → Select All.
Selections → Float.
Selections → Defloat.
Aperte a tecla Delete.
Selections → Invert.
5_.
Pinte com o gradiente em uso.
Selections → Select None.
6_.
Plugin AP [Lines] → Lines - SilverLining.
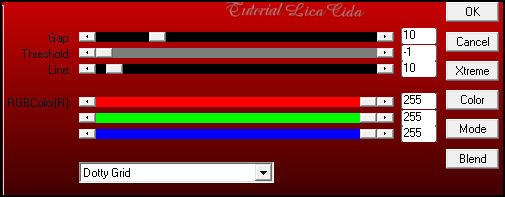
Layers → Duplicate.
7_.
Plugin Graphics Plus → Vertical Mirror — Default (128 / 0).
8_.
Effects → Reflection Effects → Rotating Mirror: 0 / 0 — Default.
Layers → Duplicate.
9_.
Effects → Image Effects → Seamless Tiling.
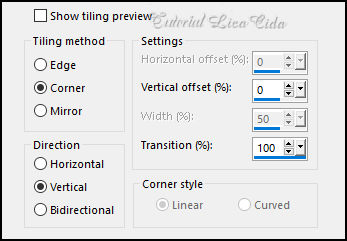
Effects → 3D Effects → Drop Shadow: 0 / 0 / 80 / 20,00 — Color: #000000.
Nos efeitos será usado o Drop Shadow acima.
Aplique o Drop Shadow como desejar.
10_.
Ative a Copy (2) of Raster 1.
Com a ferramenta Magic Wand (Default), selecione o centro do efeito formado.
Ative a Raster 1.
Selections → Promote Selection to Layer.
Selections → Select None.
11_.
Na Raster 1 (já ativada):
Selections → Load/Save Selection → Load Selection From Alpha Channel → Selection #1.
Selections → Promote Selection to Layer.
12_.
Plugin Carolaine and Sensibility → CS-DLines.
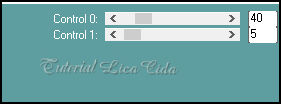
Selections → Select None.
Layers → Arrange → Move Up (duas vezes).
13_.
Ative a Copy (2) of Raster 1.
Layers → Duplicate.
Plugin Simple → Zoom Out and Flip.
Layers → Arrange → Move Down.
Blend Mode: Screen — Opacity: 100%.
14_.
Duplique a layer com o Blend Mode Screen.
Na layer duplicada (Copy (4) of Raster 1), mude o Blend Mode para Darken.
LAYERS
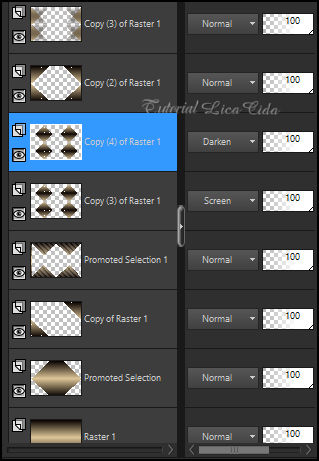
15_.
Com a ferramenta Magic Wand, selecione a layer Promoted Selection, acima da Raster 1.
Se necessário, clique mais de uma vez.
16_.
Edit → Copy no tube Callitubes-111paisagens (1)
Edit → Paste As New Layer.
Image → Resize: 80% — Resize all layers desmarcado.
Opcional: Effects → User Defined Filter → Emboss_3. Não usando o Emboss_3, aplique: Adjust → Sharpness → Sharpen.
Selections → Select None.
17_.
Edit → Copy no decor C1qNCDLk3oz2FhJZ66sFevE5US4
Edit → Paste As New Layer.
Image → Resize: 120% — Resize all layers desmarcado.
Blend Mode: Luminance (L) — Opacity: 100%.
Adjust → Sharpness → Sharpen.
18_.
Ative a layer do topo.
Abra o anexo MaskViolette_R05-DECOR.
Edit → Copy no decor1MaskViolette_R05
Edit → Paste As New Layer.
Pick Tool: Position X: 0 / Position Y: 17.
Effects → 3D Effects → Drop Shadow: 0 / 0 / 80 / 20,00 — Color: #000000.
19_.
Edit → Copy no decor2MaskViolette_R05
Edit → Paste As New Layer.
Pick Tool: Position X: 791 / Position Y: 10.
Effects → 3D Effects → Drop Shadow: 0 / 0 / 80 / 20,00 — Color: #000000.
20_.
Edit → Copy no decor MaskViolette_R05 (dentro do anexo MaskViolette_R05-DECOR)
Edit → Paste As New Layer.
Pick Tool: Position X: 188 / Position Y: 276.
Effects → 3D Effects → Drop Shadow: 0 / 0 / 80 / 20,00 — Color: #000000.
21_.
Effects → Reflection Effects → Rotating Mirror: 0 / 180.
Image → Add Borders: 1 px, Symmetric marcado — Color: #000000.
22_.
Plugin AAA Filters → Custom → Landscape — Default.
Image → Add Borders: 10 px, Symmetric marcado — Color: #ffffff.
Image → Add Borders: 1 px, Symmetric marcado — Color: #000000.
Image → Add Borders: 25 px, Symmetric marcado — Color: #ffffff.
23_.
Edit → Copy no tube Callitubes-4532mulheres
Edit → Paste As New Layer.
24_.
Edit → Copy no tube Callitubes-789flores
Edit → Paste As New Layer.
Use o Drop Shadow e posicione os tubes a gosto.
Image → Add Borders: 1 px, Symmetric marcado — Color: #000000.
Aplique a marca-d'água.
Assine e salve.
File → Export → JPEG Optimizer.
Aparecida / LicaCida, maio de 2024.
Rio de Janeiro - Brasil.

VOLTAR
Copyright ©2026 - Web Design - Naise Minas
|


