|
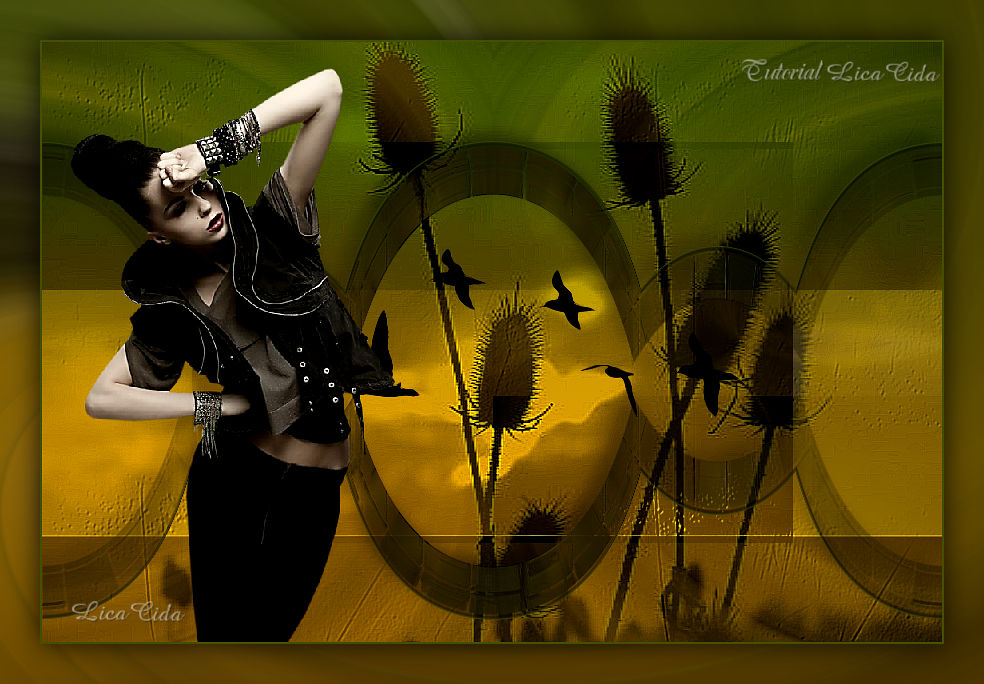
Natureza Abstrata
TRADUÇÕES

MATERIAL

Tubes: woman_686_tubed_by_thafs
Birds of a Feather II_32
Masks: Narah_Abstract004
Narah_Nature003
Textura: textura2
Marca-d'água.
Efeitos do PSP.
Versão usada: PSP X8.
PLUGINS
Plugin &<Bkg Kaleidoscope> → 4QFlip UpperL
Plugin VM Extravaganza → Transmission
Plugin Mehdi → Weaver
Plugin MuRa's Meister → Pole Transform
Plugin AP [Utility] → Utility Reflections
Plugin Nik Software → Color Efex Pro 3.0
Plugin AAA Filters → Custom
TUTORIAL

|
Esta seta marca sua linha
Clique e arraste para movê-la
|
|
1_.
Abra uma nova imagem transparente de 900 x 600 px.
Pinte com o gradiente formado pelas cores #4b5300 e #a5ba00.
Configure: Style: Rectangular — Angle: 0 — Repeats: 0 — Invert marcado.
2_.
Selections → Select All.
Edit → Copy no tube woman_686_tubed_by_thafs
Edit → Paste Into Selection.
Selections → Select None.
Effects → Image Effects → Seamless Tiling: Default.
Adjust → Blur → Radial Blur: Twirl — Elliptical — Strength: 100 / Twirl: 25 / Horizontal: -55 / Vertical: 0 / Protect center: 0.
3_.
Plugin &<Bkg Kaleidoscope> → 4QFlip UpperL.
4_.
Plugin VM Extravaganza → Transmission: 210 / 9 / 40.
Layers → Duplicate.
5_.
Plugin Mehdi → Weaver: SR: 300-500 — S: 300.
Layers → Duplicate.
Image → Mirror → Mirror Vertical.
Image → Resize: 80% — Resize all layers desmarcado.
Selecione a parte externa.
Selections → Invert.
6_.
Layers → New Mask Layer → From Image: Narah_Abstract004.
Effects → Edge Effects → Enhance More.

Layers → Merge → Merge Group.
7_.
Selections → Modify → Contract: 60 px.
Pressione a tecla Delete.
8_.
Effects → 3D Effects → Chisel: Size: 6 — Transparent — Color: #4b5300.
Selections → Select None.
9_.
Plugin MuRa's Meister → Pole Transform.
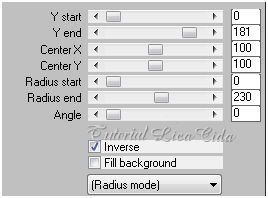
Effects → Image Effects → Offset: H: 0 / V: 58 — Custom e Transparent marcados.
Effects → 3D Effects → Drop Shadow: 1 / 1 / 100 / 1,00 — Color: #000000.
Layers → Duplicate.
Image → Mirror → Mirror Vertical.
Effects → Image Effects → Offset: H: 0 / V: -77 — Custom e Transparent marcados.
Layers → Merge → Merge Down.
Effects → 3D Effects → Drop Shadow: -10 / -10 / 50 / 20,00 — Color: #000000.
10_.
Layers → New Raster Layer.
Pinte com a cor #a5ba00.
Layers → New Mask Layer → From Image: Narah_Nature003.

Layers → Merge → Merge Group.
Effects → Edge Effects → Enhance More.
Layers → Arrange → Move Down.
Image → Mirror → Mirror Horizontal.
11_.
Ative a Copy of Raster 1.
Plugin AP [Utility] → Utility Reflections.

12_.
Plugin Nik Software → Color Efex Pro 3.0 → Bi-Color User Defined.

Blend Mode: Overlay.
13_.
Ative a Raster 1.
Effects → Texture Effects → Texture: textura2 (anexada ao material).

Effects → User Defined Filter → Emboss_3.
14_.
Ative a Group - Raster 2.
Plugin Nik Software → Color Efex Pro 3.0 → Bi-Color Filters — Color Set: Cool/Warm 2.
Altere os Blend Modes e a Opacity das layers.

15_.
Edit → Copy no tube Birds of a Feather II_32
Edit → Paste As New Layer.
Posicione.
16_.
Edit → Copy no tube woman_686_tubed_by_thafs
Edit → Paste As New Layer.
Posicione a gosto.
Image → Add Borders: 2 px, Symmetric marcado — Color: cor do Foreground.
17_.
Plugin AAA Filters → Custom — Landscape.
Aplique a marca-d'água.
Assine e salve.
Espero que gostem.
Aparecida / LicaCida, agosto de 2016.
Rio de Janeiro - Brasil.

VOLTAR
Copyright ©2026 - Web Design - Naise Minas
|

