|
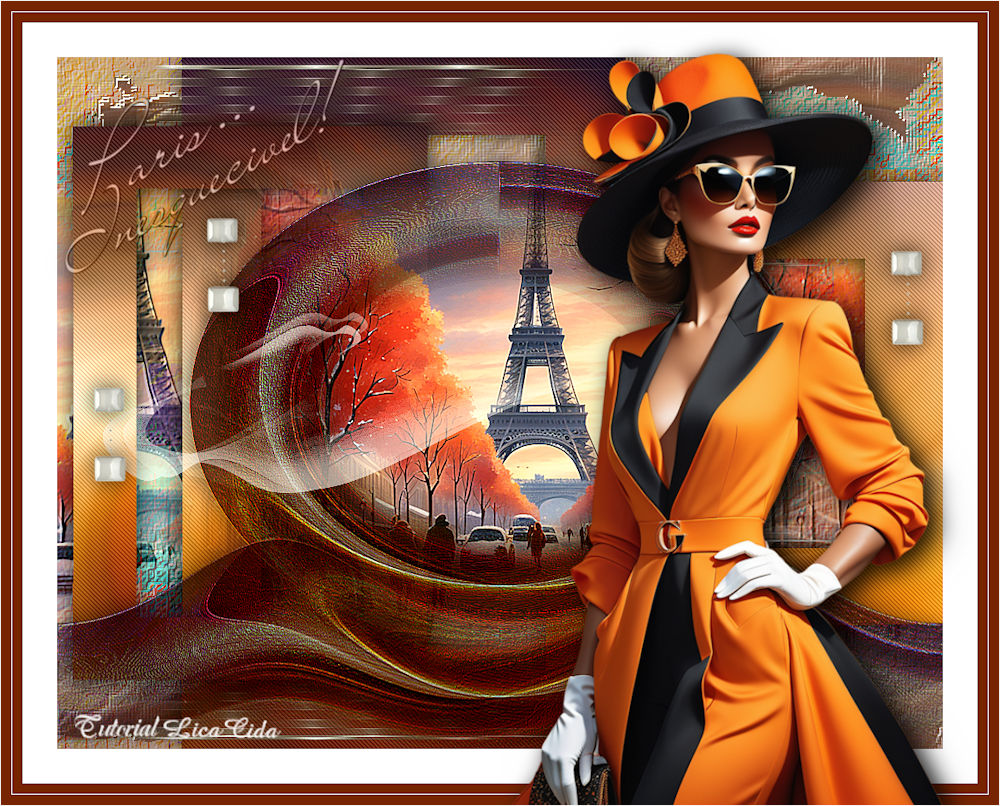
Paris... Inesquecível!
TRADUÇÕES

MATERIAL

Alpha Channel: alphachannel --
Seleções (Selection #1 a #5) guardadas no Alpha Channel da imagem.
Tubes: SuizaBella_Ref_AG-003964
KamilTube-1196-Landscape
bolamirror_mp
Back: back1-lc
Deco: deco1-lc
decoacabamento
Brush: designal brushes 3_13
Título: texto
texto2
Marca-d'água.
Efeitos do PSP.
PLUGINS
Plugin VM Natural → Weave Distortion
Plugin Nik Software → Color Efex Pro 3.0 → Bi-Color User Defined
Plugin Carolaine and Sensibility → CS-DLines
Plugin Graphics Plus → Cross Shadow
Plugin Convolution Filters → Emboss (light)
Plugin MuRa's Meister → Pole Transform
TUTORIAL
|
Esta seta marca sua linha
Clique e arraste para movê-la
|
|
1_.
Abra o material no PSP, duplique e feche o original.
Escolha duas cores para trabalhar: Foreground: #782f10 — Background: #bbbecb.
2_.
Abra o arquivo alphachannel.
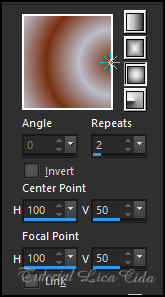
Pinte com o gradiente Sunburst formado pelas cores em uso.
3_.
Selections → Select All.
Edit → Copy no tube SuizaBella_Ref_AG-003964
Edit → Paste Into Selection.
Selections → Select None.
4_.
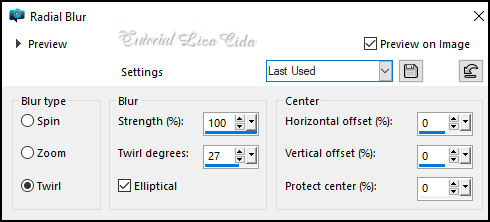
Adjust → Blur → Radial Blur.
Layers → Duplicate.
5_.
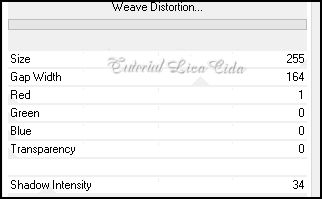
Plugin VM Natural → Weave Distortion.
6_.
Selections → Load/Save Selection → Load Selection From Alpha Channel → Selection #1.
Selections → Modify → Contract: 90 px.
Aperte a tecla Delete.
Selections → Select None.
7_.
Selections → Load/Save Selection → Load Selection From Alpha Channel → Selection #2.
Selections → Modify → Contract: 90 px.
Aperte a tecla Delete.
Selections → Select None.
8_.
Selections → Load/Save Selection → Load Selection From Alpha Channel → Selection #3.
Aperte a tecla Delete.
Selections → Select None.
9_.
Selections → Load/Save Selection → Load Selection From Alpha Channel → Selection #4.
Aperte a tecla Delete.
Selections → Select None.
10_.
Selections → Load/Save Selection → Load Selection From Alpha Channel → Selection #5.
Aperte a tecla Delete.
Selections → Select None.
11_.
Layers → Duplicate.
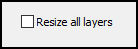
Image → Resize: 80% — Resize all layers desmarcado.
12_.
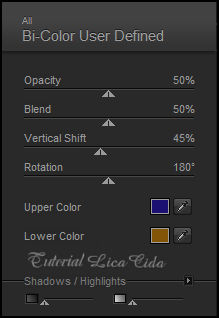
Plugin Nik Software → Color Efex Pro 3.0 → Bi-Color User Defined — Default.
Aplique nas duas layers do efeito.
13_.
Plugin Carolaine and Sensibility → CS-DLines — Default (40 / 5).
Aplique nas duas layers do efeito.
14_.
Ative a Copy (2) of Raster 1.
Effects → Image Effects → Offset: H: -200 / V: 0 — Custom e Transparent marcados.
Effects → 3D Effects → Drop Shadow: 0 / 0 / 80 / 40,00 — Color: #000000.
Aplique nas duas layers do efeito.
15_.
Ative a Raster 1.
Plugin Graphics Plus → Cross Shadow — Quick Tile I — Default (128 / 128 / 128).
16_.
Plugin Convolution Filters → Emboss (light): 191.
Repita (Edit → Repeat).
17_.
Edit → Copy no back1-lc
Edit → Paste As New Layer.
Effects → User Defined Filter → Emboss_3 e Emboss_5.
18_.
Layers → New Raster Layer.
Selections → Select All.
Edit → Copy no tube KamilTube-1196-Landscape
Edit → Paste Into Selection.
Selections → Select None.
19_.
Effects → Image Effects → Seamless Tiling: Side by side.
Effects → User Defined Filter → Emboss_3.
20_.
Ative a layer do topo.
Edit → Copy no bolamirror_mp
Edit → Paste As New Layer.
Adjust → Sharpness → Sharpen.
Layers → Duplicate.
21_.
Plugin MuRa's Meister → Pole Transform — Default, Inverse marcado.
22_.
Effects → Image Effects → Offset: H: 0 / V: 200 — Custom e Transparent marcados.
Image → Mirror → Mirror Vertical.
Layers → Merge → Merge Down.
23_.
Layers → Duplicate.
Layers → Merge → Merge Down.
Effects → 3D Effects → Drop Shadow: 0 / 0 / 80 / 40,00 — Color: #000000.
Opacity: 87%.
24_.
Edit → Copy no tube KamilTube-1196-Landscape
Edit → Paste As New Layer.
Layers → Arrange → Move Down.
Adjust → Sharpness → Sharpen More.
25_.
Ative a Copy of Raster 1.
Layers → New Raster Layer (Raster 6).
Selections → Select All.
Edit → Copy no deco1-lc
Edit → Paste Into Selection.
Selections → Select None.
Blend Mode: Lighten.
26_.
Ative a layer do topo.
Edit → Copy no designal brushes 3_13
Edit → Paste As New Layer.
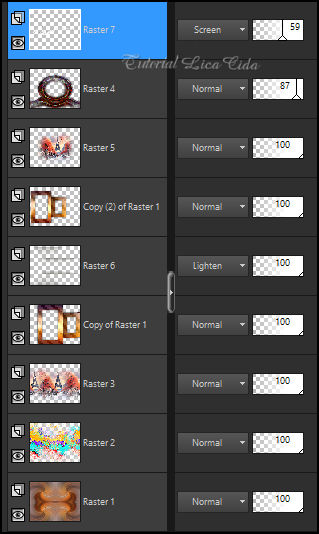
Blend Mode: Screen — Opacity: 59%.
LAYERS
27_.
Edit → Copy no decoacabamento
Edit → Paste As New Layer.
Posicione como no modelo.
28_.
Edit → Copy no texto
Edit → Paste As New Layer.
Posicione como no modelo.
Blend Mode: Luminance (L).
29_.
Image → Add Borders: 40 px, Symmetric marcado — Color: #ffffff.
Image → Add Borders: 12 px, Symmetric marcado — Color: #782f10 (cor do Foreground).
Image → Add Borders: 1 px, Symmetric marcado — Color: #ffffff.
Image → Add Borders: 12 px, Symmetric marcado — Color: #782f10 (cor do Foreground).
30_.
Edit → Copy no tube SuizaBella_Ref_AG-003964
Edit → Paste As New Layer.
Use a gosto.
Image → Add Borders: 1 px, Symmetric marcado — Color: #ffffff.
Image → Resize: Width 1000 px.
Aplique a marca-d'água.
Assine e salve.
File → Export → JPEG Optimizer.
Aparecida / LicaCida, abril de 2024.
Rio de Janeiro - Brasil.

VOLTAR
Copyright ©2026 - Web Design - Naise Minas
|


