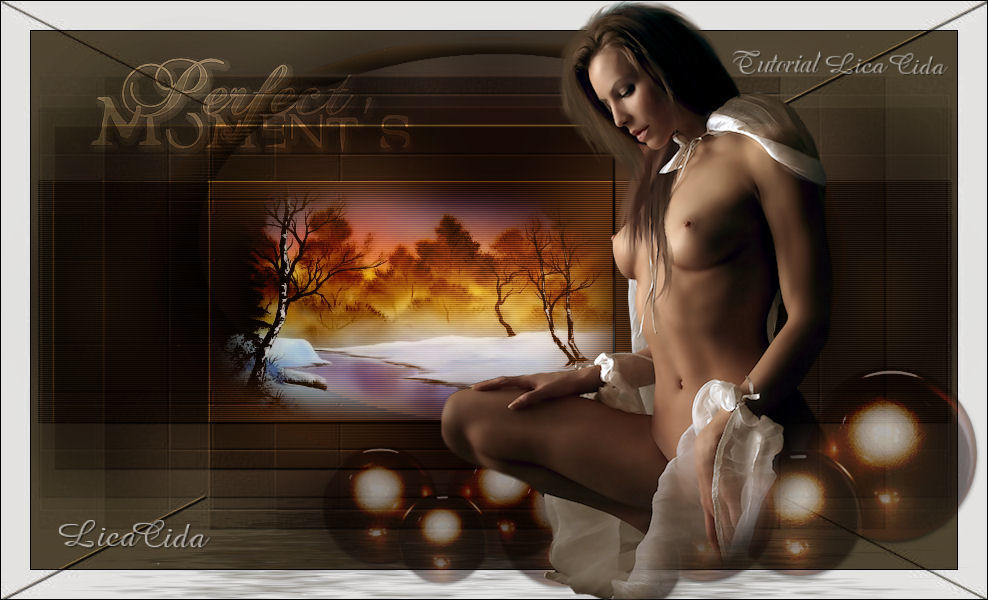
Perfect Moments

MATERIAL
Seleção: lc1Sel —
Salvar na pasta
Selections
do PSP.
Seleção: lc11Sel —
Salvar na pasta
Selections
do PSP.
Tubes: PSPCYBERTUBES-tube2011-370
calguisbobcrossmisted28122011
calguisbouleenor29122011
Mask: Narah_mask0133
Brush: WordArt Perfect Moment's — arquivo net
Marca D'água.
Efeitos do PSP.
Versão PSP X3.

PLUGINS
Plugin Simple → 4 Way Average
Plugin MuRa's Seamless → Emboss at Alpha
Plugin Flaming Pear → TransLine
Plugin Flaming Pear → Flood
Plugin Andromeda → Perspective
Plugin AAA Frames → Transparent Frame
TUTORIAL
|
Esta seta marca sua linha
Clique e arraste para movê-la
|
1_.
Abra uma nova imagem transparente de 988 x 600 px.
2_.
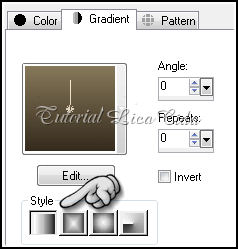
Pinte com o gradiente formado pelas cores #352b1d e #86785a.
Configure: Style: Linear — Angle: 0 — Repeats: 0 — Invert desmarcado.
3_.
Selections → Select All.
Edit → Copy no tube PSPCYBERTUBES-tube2011-370
Edit → Paste Into Selection.
Selections → Select None.
4_.
Adjust → Blur → Gaussian Blur — Radius: 28.
5_.
Plugin Simple → 4 Way Average.
Layers → Duplicate.
Blend Mode: Overlay.
6_.
Aplique a Narah_mask0133.
Layers → Merge → Merge Group.
7_.
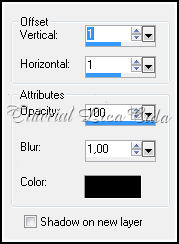
Effects → 3D Effects → Drop Shadow: 1 / 1 / 100 / 1 —
Color: #000000.
8_.
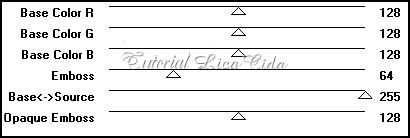
Plugin MuRa's Seamless → Emboss at Alpha → Default.
9_.
Layers → New Raster Layer.
Selections → Load/Save Selection →
Load Selection From Disk → lc11Sel.
Pinte com a cor #86785a.
Selections → Select None.
10_.
Plugin Flaming Pear → TransLine.
Blend Mode: Multiply.
11_.
Layers → New Raster Layer.
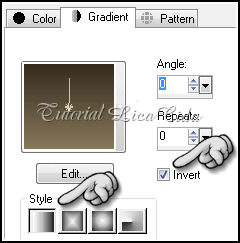
Pinte com o gradiente formado pelas cores #352b1d e #86785a.
Configure: Style: Linear — Angle: 0 — Repeats: 0 — Invert marcado.
12_.
Effects → Geometric Effects → Perspective - Horizontal.
Distortion: 80 — Transparent marcado.
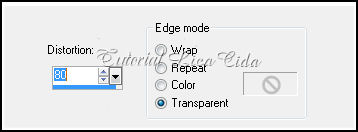
Image → Mirror.
13_.
Repita:
Effects → Geometric Effects → Perspective - Horizontal.
Distortion: 80 — Transparent marcado.
Veja o print do item 12.
14_.
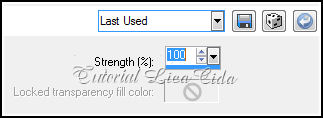
Effects → Distortion Effects → Pinch: 100.
15_.
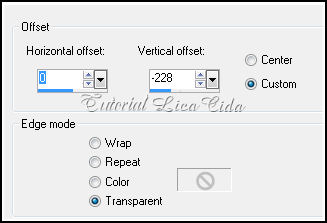
Effects → Image Effects → Offset:
H: 0 / V: -228 — Custom e Transparent marcados.
16_.
Effects → Distortion Effects → Polar Coordinates.
Rectangular to Polar — Transparent marcado.
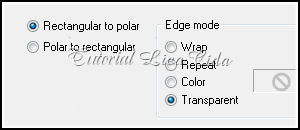
Image → Resize 90% - Resize all layers desmarcado.
17_.
Plugin Flaming Pear → TransLine.
Blend Mode: Hard Light.
Use a gosto.
18_.
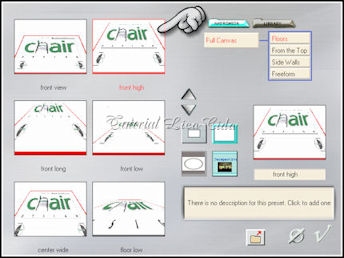
Plugin Andromeda → Perspective.
19_.
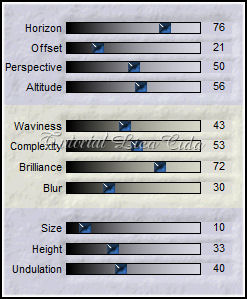
Plugin Flaming Pear → Flood.
20_.
Layers → New Raster Layer.
Selections → Load/Save Selection →
Load Selection From Disk → lc1Sel.
Pinte com a cor #86785a.
Selections → Select None.
21_.
Aplique a Narah_mask0133.
Layers → Merge → Merge Group.
22_.
Effects → 3D Effects → Drop Shadow:
1 / 1 / 100 / 1 — Color: #000000.
Veja o print do item 7.
23_.
Plugin MuRa's Seamless → Emboss at Alpha → Default.
Veja o print do item 8.
Blend Mode: Hard Light.
24_.
Layers → New Raster Layer.
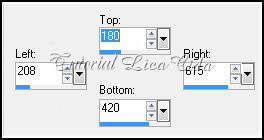
Ative a ferramenta Selection → Rectangle ou pressione a tecla S.
Em Custom Selection, configure:
Top: 180 — Left: 208 — Right: 615 — Bottom: 420.
25_.
Edit → Copy no tube calguisbobcrossmisted28122011
Edit → Paste Into Selection.
Selections → Select None.
Blend Mode: Hard Light — Opacity: 86%.
Use de acordo com sua imagem.
Adjust → One Step Photo Fix — Opcional.
26_.
Edit → Copy no tube calguisbouleenor29122011
Edit → Paste As New Layer.
Image → Resize 60% - Resize all layers desmarcado.
Blend Mode: Hard Light — Opacity: 68%.
Posicione.
Use os demais a gosto. Observe o modelo.
27_.
Edit → Copy no tube PSPCYBERTUBES-tube2011-370
Edit → Paste As New Layer.
Image → Resize 60% - Resize all layers desmarcado.
Image → Mirror.
Posicione. Observe o modelo.
Layers:
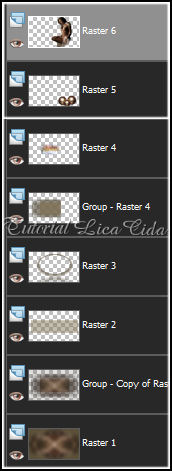
Ative a Raster 1.
28_.
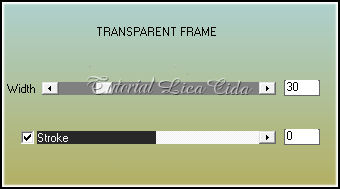
Plugin AAA Frames → Transparent Frame: 30.
29_.
Layers → Merge → Merge All (Flatten).
30_.
Edit → Copy no Brush WordArt Perfect Moment's
Edit → Paste As New Layer.
Aplique a Marca D'água.
Assine e salve.
Aparecida / LicaCida, em fevereiro de 2012.
Revisado para o blog em março de 2013.
Rio de Janeiro - Brasil.


VOLTAR
Copyright ©2020/2025 -
Web Design -
Liriani Silva®

