|
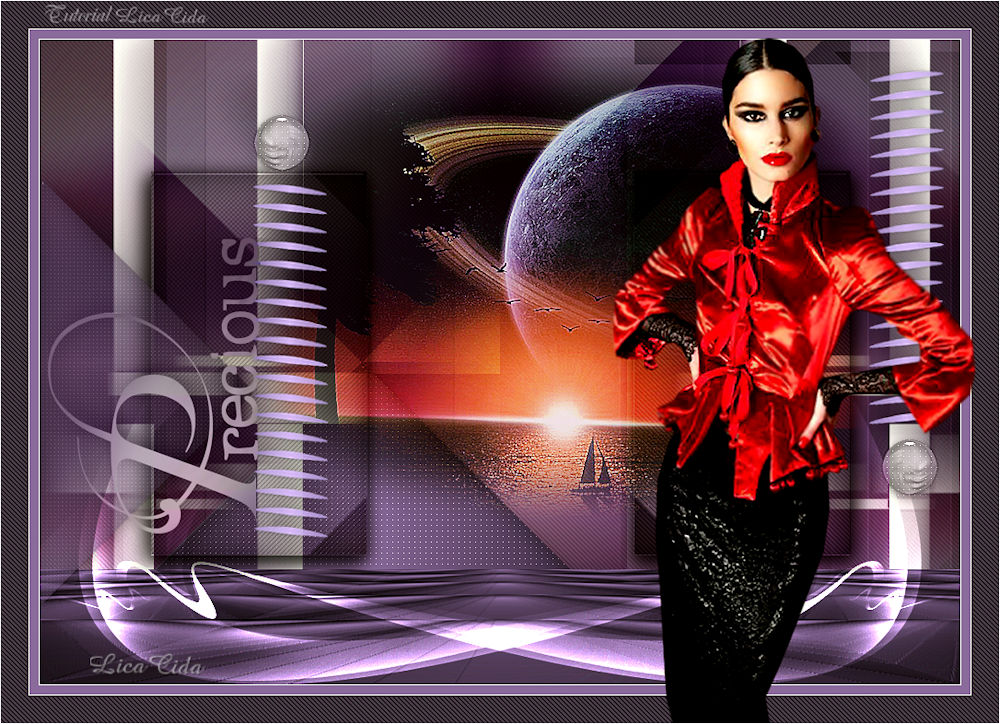
Precious
TRADUÇÕES

MATERIAL

Preset: katrina (Eye Candy 5: Impact → Glass) --
Dê duplo clique no preset para importá-lo ao plugin.
Tubes: 5104-luzcristina
Narah_Scenery_04-14-2018
TUBES-NAISEM_MULHERES_659
Brush: brush-arquivo
Decos: Ildiko_create_deco (133)
Ildiko_create_deco (157)
Ildiko_Desings_Created@Deco (2)
Texto: text-01-0_75eba
Marca-d'água.
Efeitos do PSP.
Versão usada: PSP X8.
PLUGINS
Plugin Filters Unlimited 2 → &<Bkg Designer sf10 I> → Barcode Generator
Plugin Simple → Pizza Slice Mirror
Plugin Simple → Half Wrap
Plugin Carolaine and Sensibility → CS-DLines
Plugin Carolaine and Sensibility → CS-LDots
Plugin VanDerLee → UnPlugged-X
Plugin Alien Skin Eye Candy 5: Impact → Glass
Plugin Two Moon → VerticalChopBlur
Plugin MuRa's Meister → Perspective Tiling
Plugin Nik Software → Color Efex Pro 3.0 → Bi-Color Filters
Plugin AAA Filters → Custom (opcional)
TUTORIAL
|
Esta seta marca sua linha
Clique e arraste para movê-la
|
|
Configure: Foreground: #241d2b — Background: #8a6fa3.
1_.
Abra uma nova imagem transparente de 1000 x 700 px.
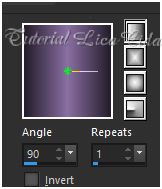
Pinte com o gradiente formado pelas cores selecionadas acima.
Configure: Style: Linear — Angle: 90 — Repeats: 1 — Invert desmarcado.
2_.
Selections → Select All.
Edit → Copy no TUBES-NAISEM_MULHERES_659
Edit → Paste Into Selection.
Selections → Select None.
OBSERVAÇÃO
Observe o tube que vai usar. Aqui não usei o mesmo do tutorial: precisei procurar um tube com cores claras para realçar o efeito.
Effects → Image Effects → Seamless Tiling: Default.
Adjust → Blur → Gaussian Blur — Radius: 28,00.
3_.
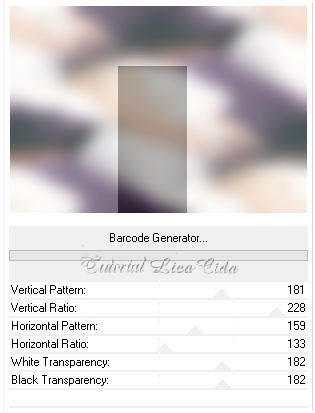
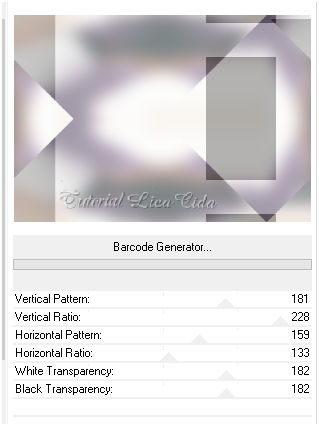
Plugin Filters Unlimited 2 → &<Bkg Designer sf10 I> → Barcode Generator.
Observe o efeito. Mude o valor de White Transparency para 182.
4_.
Plugin Simple → Pizza Slice Mirror.
Layers → Duplicate.
5_.
Plugin Simple → Half Wrap.
6_.
Repita o Plugin Filters Unlimited 2 → &<Bkg Designer sf10 I> → Barcode Generator.
Mude o valor de White Transparency para 182.
7_.
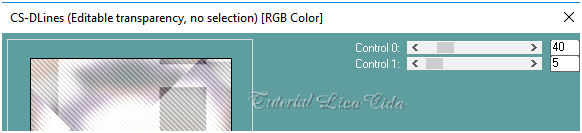
Plugin Carolaine and Sensibility → CS-DLines.
8_.
Layers → New Raster Layer.
Plugin VanDerLee → UnPlugged-X.
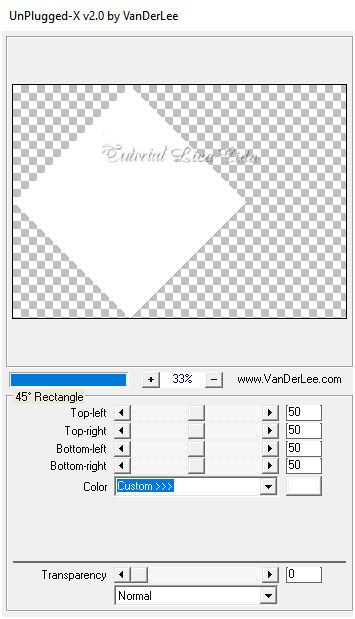
Com a ferramenta Magic Wand (Default), selecione a parte externa.
Selections → Invert.
Pinte com o mesmo gradiente formado no item 1.
9_.
Plugin Carolaine and Sensibility → CS-LDots.
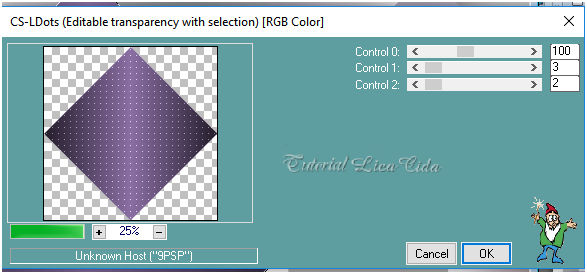
Selections → Select None.
Effects → 3D Effects → Drop Shadow: 5 / 5 / 50 / 30,00 — Color: #000000.
Layers → Duplicate.
Image → Resize: 70% — Resize all layers desmarcado.
Retire a visibilidade da Raster 2.
10_.
Na cópia (layer superior):
Effects → Image Effects → Offset.
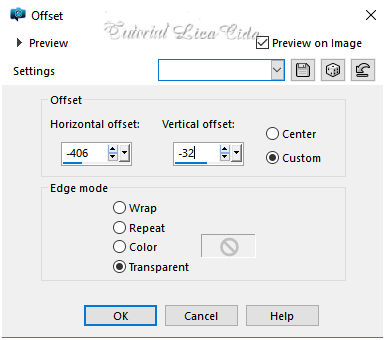
Opacity: 51%.
Ative novamente a visibilidade da Raster 2.
11_.
Ative a Raster 2.
Effects → Image Effects → Offset.
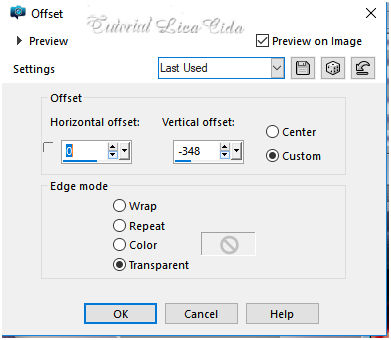
12_.
Aplique o efeito na Raster 2 e na sua cópia:
Plugin Alien Skin Eye Candy 5: Impact → Glass — Settings: katrina.
13_.
Ative a Raster 2.
Layers → New Raster Layer.
Selections → Select All.
Edit → Copy no Ildiko_create_deco (133)
Edit → Paste Into Selection.
Selections → Select None.
14_.
Ative a Copy of Raster 1 e selecione o efeito com a ferramenta Selection Tool — Rectangle (Default), como no modelo.
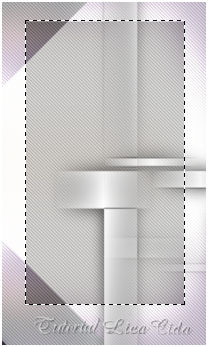
Selections → Promote Selection to Layer.
15_.
Plugin Alien Skin Eye Candy 5: Impact → Glass — Settings: katrina.
Selections → Select None.
Effects → 3D Effects → Drop Shadow: 5 / 5 / 50 / 30,00 — Color: #000000.
Layers → Arrange → Move Up (duas vezes).
16_.
Effects → Reflection Effects → Rotating Mirror: Horizontal: 0 — Rotation: 0 — Repeat.
17_.
Layers → New Raster Layer.
Layers → Arrange → Send to Bottom.
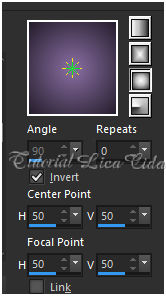
Pinte com o gradiente formado pelas cores selecionadas acima.
Configure: Style: Sunburst — Repeats: 0 — Invert marcado — Center Point: H: 50 / V: 50 — Focal Point: H: 50 / V: 50.
18_.
Plugin Two Moon → VerticalChopBlur.
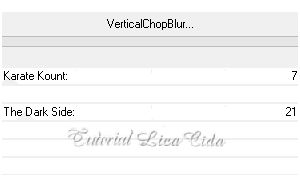
Effects → User Defined Filter → Emboss_3.
Layers → Duplicate.
19_.
Plugin MuRa's Meister → Perspective Tiling: Height: 18 — demais valores Default.
Repita o Plugin MuRa's Meister → Perspective Tiling: Height: 18 — demais valores Default.
Effects → User Defined Filter → Emboss_3.
Use a layer acima da Raster 3 (veja o print).
20_.
Ative a Raster 1.
Plugin Nik Software → Color Efex Pro 3.0 → Bi-Color Filters — Color Set: Violet/Pink 3 (use a gosto).
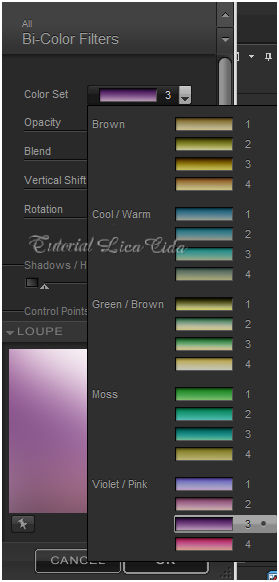
Altere os Blend Modes e a Opacity das layers.
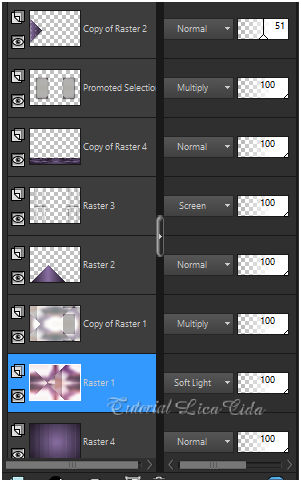
21_.
Ative a layer superior.
Edit → Copy no tube Narah_Scenery_04-14-2018
Edit → Paste As New Layer.
Image → Resize: 80% — Resize all layers desmarcado.
Posicione.
Adjust → Sharpness → Sharpen More.
Adjust → One Step Photo Fix.
Blend Mode: Hard Light — Opacity: 79%.
22_.
Edit → Copy no Ildiko_create_deco (157)
Edit → Paste As New Layer.
Posicione usando a Raster 2 como modelo, ou a gosto.
Adjust → One Step Photo Fix.
23_.
Edit → Copy no brush-arquivo
Edit → Paste As New Layer.
Posicione como no modelo, acima da layer do Perspective Tiling.
24_.
Edit → Copy no text-01-0_75eba
Edit → Paste As New Layer.
Posicione a gosto.
Blend Mode: Luminance (L).
25_.
Edit → Copy no Ildiko_Desings_Created@Deco (2)
Edit → Paste As New Layer.
Posicione a gosto.
Blend Mode: Luminance (L).
26_.
Image → Add Borders: 1 px, Symmetric marcado — Color: #ffffff.
Image → Add Borders: 10 px, Symmetric marcado — Color: #8a6fa3.
Image → Add Borders: 1 px, Symmetric marcado — Color: #ffffff.
Selections → Select All.
Image → Add Borders: 30 px, Symmetric marcado — Color: #241d2b.
Selections → Invert.
Plugin Carolaine and Sensibility → CS-DLines: 40 / 5 (veja o print do item 7).
Selections → Select None.
27_.
Edit → Copy no tube 5104-luzcristina
Edit → Paste As New Layer.
Posicione.
Image → Add Borders: 1 px, Symmetric marcado — Color: #ffffff.
Opcional: Plugin AAA Filters → Custom — Landscape.
Image → Resize: Width: 1000 px.
Aplique a marca-d'água.
Assine e salve.
Espero que gostem.
Obrigada!
Aparecida / LicaCida, janeiro de 2019.
Rio de Janeiro - Brasil.

VOLTAR
Copyright ©2026 - Web Design - Naise Minas
|


