|

Profile by Braeon Art
TRADUÇÕES

MATERIAL

Seleção: Sellicalapa1 --
Salvar na pasta Selections do PSP.
Mask: Narah_mask_Abstract53
Paisagem: Lapa _RJ_Acervo Riotur
Tubes: kikirou1410_samba
kikirou1381_Profile_by_braeonArt
graphsabine_design42
Marca-d'água.
Efeitos do PSP.
Versão usada: PSP X3.
Revisado no PSP X5.
PLUGINS
Plugin Nik Software → Color Efex Pro 3.0 → Cross Balance
Plugin FM Tile Tools → Saturation Emboss
Plugin MuRa's Meister → Perspective Tiling
Plugin Adjust → Variations
Plugin Alien Skin Eye Candy 5: Impact → Perspective Shadow
Plugin BorderMania → Flat Solid
TUTORIAL

|
Esta seta marca sua linha
Clique e arraste para movê-la
|
|
1_.
Abra uma nova imagem transparente de 800 x 600 px.
Pinte com a cor #564133.
2_.
Selections → Select All.
Edit → Copy no tube kikirou1410_samba
Edit → Paste Into Selection.
Selections → Select None.
3_.
Effects → Image Effects → Seamless Tiling: Default.
4_.
Adjust → Blur → Radial Blur.
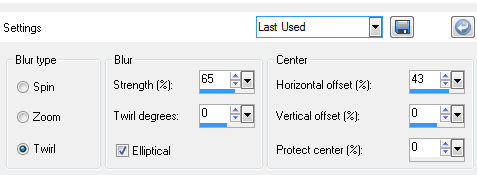
5_.
Layers → Duplicate.
Image → Mirror.
Blend Mode: Screen.
Layers → Merge → Merge Down.
Layers → Duplicate.
Blend Mode: Hard Light.
Layers → Merge → Merge Down.
6_.
Adjust → Add/Remove Noise → Add Noise: Uniform e Monochrome marcados — Noise: 12.

7_.
Layers → New Raster Layer.
Selections → Select All.
Edit → Copy na paisagem Lapa _RJ_Acervo Riotur
Edit → Paste Into Selection.
Selections → Select None.
Blend Mode: Overlay.
8_.
Plugin FM Tile Tools → Saturation Emboss: Default.
Repita.
9_.
Plugin Nik Software → Color Efex Pro 3.0 → Cross Balance.
Repita.

10_.
Adjust → Brightness and Contrast → Brightness/Contrast.

11_.
Layers → New Raster Layer.
Pinte com a cor #cb6744.
12_.
Layers → New Mask Layer → From Image: Narah_mask_Abstract53.
Layers → Merge → Merge Group.
13_.
Effects → 3D Effects → Drop Shadow: 2 / 2 / 50 / 7,00 — Color: #000000.
14_.
Layers → Duplicate.
Blend Mode: Hard Light.
15_.
Plugin MuRa's Meister → Perspective Tiling.
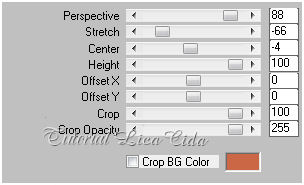
Com a ferramenta Pick Tool, mova o efeito até a marca de 400 px.
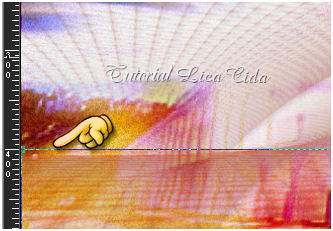
16_.
Layers → Duplicate.
Layers → Merge → Merge Down.
Aplique novamente.
17_.
Layers → New Raster Layer.
Selections → Load/Save Selection → Load Selection From Disk → Sellicalapa1.
18_.
Edit → Copy no tube graphsabine_design42
Edit → Paste Into Selection.
Selections → Select None.
Blend Mode: Hard Light — Opacity: 68%.
Use a gosto.
19_.
Plugin Adjust → Variations: Original / Lighter.

20_.
Plugin Alien Skin Eye Candy 5: Impact → Perspective Shadow — Settings: Drop Shadow, Lowest.
21_.
Layers → New Raster Layer.
Pinte com a cor #cb6744.
Blend Mode: Overlay — Opacity: 62%.
22_.
Edit → Copy no tube kikirou1381_Profile_by_braeonArt
Edit → Paste As New Layer.
Image → Resize: 90% — Resize all layers desmarcado.
23_.
Plugin Alien Skin Eye Candy 5: Impact → Perspective Shadow — Settings: Drop Shadow, Lowest.
LAYERS

Layers → Merge → Merge Visible.
24_.
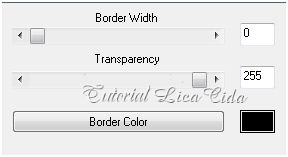
Plugin BorderMania → Flat Solid.
25_.
Image → Add Borders: 20 px, Symmetric marcado — Color: #564133.
Plugin BorderMania → Flat Solid: 0 / 255 — Color: #000000.
26_.
Image → Add Borders: 20 px, Symmetric marcado — Color: #cb6744.
Plugin BorderMania → Flat Solid: 0 / 255 — Color: #000000.
27_.
Image → Add Borders: 20 px, Symmetric marcado — Color: #ffffff.
Plugin BorderMania → Flat Solid: 0 / 255 — Color: #000000.
28_.
Selections → Select All.
Effects → 3D Effects → Cutout.
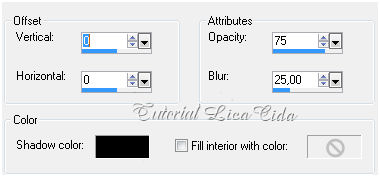
29_.
Selections → Modify → Contract: 84.
30_.
Selections → Modify → Select Selection Borders: Both sides e Anti-alias marcados — Border width: 1.
Layers → New Raster Layer.
Pinte com a cor #cb6744.
31_.
Selections → Select All.
Selections → Modify → Contract: 86.
Selections → Invert.
32_.
Selections → Promote Selection to Layer.
Blend Mode: Multiply.
Selections → Select None.
Layers → Merge → Merge All (Flatten).
Aplique a marca-d'água.
Assine e salve como JPG.
Aparecida / LicaCida, agosto de 2011.
Revisado em julho de 2013.
Rio de Janeiro - Brasil.

VOLTAR
Copyright ©2026 - Web Design - Naise Minas
|

