|
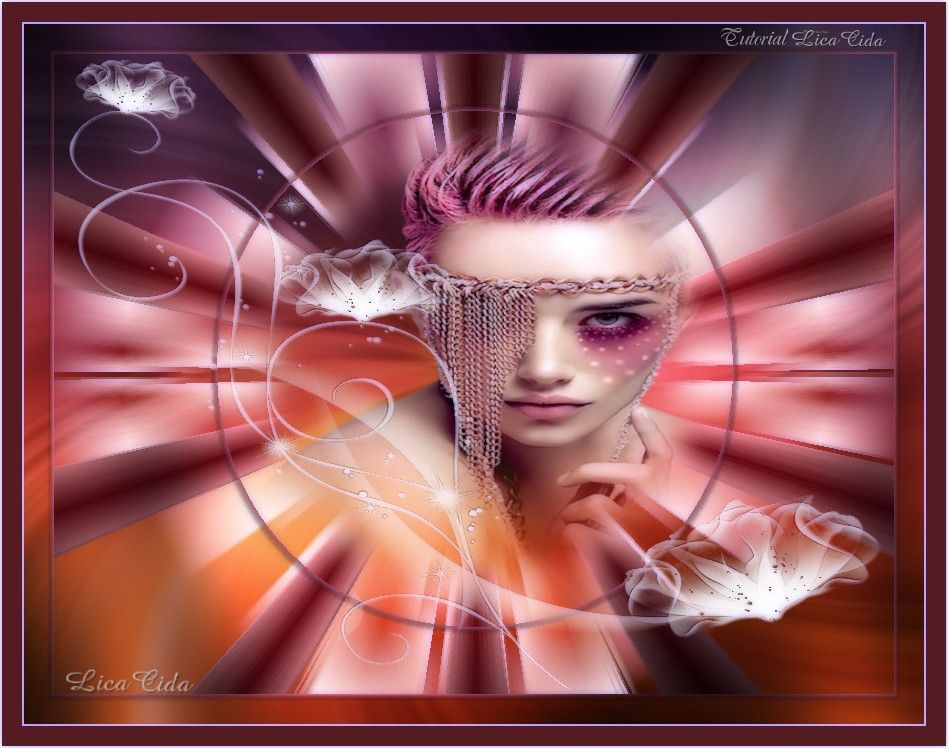
Shiny Flowers
TRADUÇÕES

MATERIAL

Tube: _k@rine_ Dreams_Lady_Jewel_2865_Mars_2014
Mask (imagem): shiny_flowers_set_6_by_lileya-d2xoras_5
Marca-d'água.
Efeitos do PSP.
Versão usada: PSP X7.
PLUGINS
Plugin Alf's Power Grads → Tubes
Plugin VM Toolbox → Zoom Blur
Plugin Graphics Plus → Cross Shadow
Plugin Nik Software → Color Efex Pro 3.0 → Bi-Color Filters
Plugin Xero → Porcelain
TUTORIAL

|
Esta seta marca sua linha
Clique e arraste para movê-la
|
|
1_.
Abra uma nova imagem transparente de 900 x 700 px.
Pinte com o gradiente formado pelas cores Foreground: #2b0f1a e Background: #a7537c (retiradas do tube).
Configure: Style: Sunburst — Repeats: 0 — Invert marcado — Center Point: H: 50 / V: 50 — Focal Point: H: 50 / V: 50.

2_.
Plugin Alf's Power Grads → Tubes.
Controle o Red, o Green e o Blue até aproximar das cores que usou.

Selecione com a ferramenta Magic Wand. Configure:

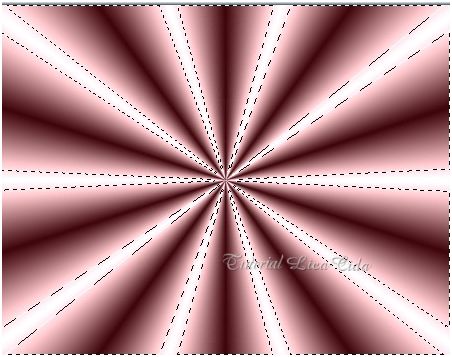
Tecle Delete.
Selections → Select None.
Selecione como no print (mesmas configurações da ferramenta Magic Wand).

Selections → Promote Selection to Layer.
3_.
Effects → 3D Effects → Inner Bevel.

Selections → Select None.
4_.
Ative a Raster 1.
Effects → Distortion Effects → Pinch — Strength: 100.
Effects → Geometric Effects → Circle — Transparent.
Image → Resize: 90% — Resize all layers desmarcado.
5_.
Plugin VM Toolbox → Zoom Blur → Default.
6_.
Ative a layer Promoted Selection.
Selections → Select All.
Selections → Modify → Contract: 30 px.
Selections → Invert.
Tecle Delete.
Selections → Invert.
7_.
Effects → 3D Effects → Chisel — Size: 7 — Transparent marcado — Color a gosto.
Selections → Select None.
Repita o plugin do item 5.
8_.
Ative a ferramenta Selection Tool. Configure:

Formado o círculo, tecle Delete (nas duas layers).

9_.
Ative a layer Promoted Selection.
Layers → New Raster Layer.
Edit → Copy no tube _k@rine_ Dreams_Lady_Jewel_2865_Mars_2014
Edit → Paste Into Selection.
10_.
Repita o item 7 (Effects → 3D Effects → Chisel).
Mantenha selecionado.
11_.
Volte à layer Promoted Selection.
Selections → Select All.
Selections → Modify → Contract: 30 px.
Selections → Invert.
Delete o efeito das duas layers.
Selections → Invert.
12_.
Repita o item 7 (Effects → 3D Effects → Chisel).
Selections → Select None.
13_.
Layers → New Raster Layer.
Layers → Arrange → Send to Bottom.
Pinte com o mesmo gradiente formado no item 1.
14_.
Selections → Select All.
Edit → Paste Into Selection (o tube deverá estar na memória).
Selections → Select None.
Effects → Image Effects → Seamless Tiling → Default.
Adjust → Blur → Radial Blur.

Layers → Duplicate.
Image → Mirror.
Image → Flip.
15_.
Layers → New Raster Layer.
Layers → Arrange → Bring to Top.
Pinte com a cor #ffffff.
Layers → New Mask Layer → From Image: shiny_flowers_set_6_by_lileya-d2xoras_5.

Layers → Merge → Merge Group.
Effects → Edge Effects → Enhance.
16_.
Layers → New Raster Layer.
Layers → Arrange → Send to Bottom.
Use no Foreground a cor #242a0e e no Background a cor #73872d (cores opostas).
Ao escolher a cor, clique em Accented: aparecerão a cor principal e a cor oposta (veja o print).

Configure: Style: Sunburst — Repeats: 0 — Invert marcado — Center Point: H: 50 / V: 50 — Focal Point: H: 50 / V: 50.
Pinte a layer.

17_.
Ative a Raster 3.
Plugin Nik Software → Color Efex Pro 3.0 → Bi-Color Filters — Color Set: Cool/Warm 2.
Na layer duplicada: Plugin Graphics Plus → Cross Shadow.
Altere os Blend Modes e a Opacity das layers.

18_.
Image → Add Borders: 2 px, Symmetric marcado — Color: #ffffff.
Image → Add Borders: 20 px, Symmetric marcado — Color: #561c23 (escura).
19_.
Plugin Xero → Porcelain → Default.
Image → Add Borders: 2 px, Symmetric marcado — Color: #ffffff.
Aplique a marca-d'água.
Assine e salve.
Espero que gostem.
Aparecida / LicaCida, março de 2015.
Rio de Janeiro - Brasil.


VOLTAR
Copyright ©2026 - Web Design - Naise Minas
|


