|
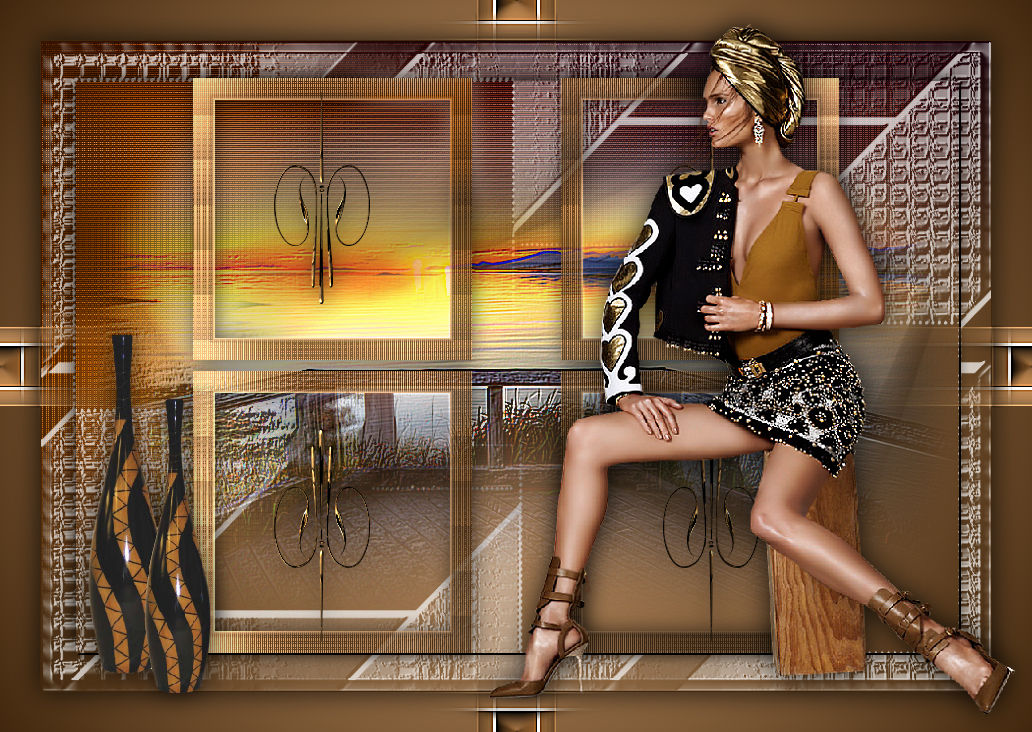
Sovereign
TRADUÇÕES

MATERIAL

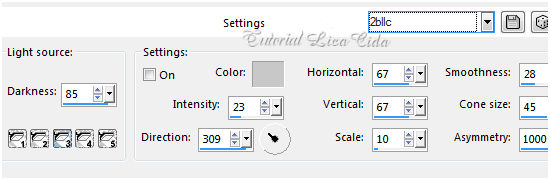
Preset: Illumination → Lights → Preset_Lights_2bllc --
Salvar na pasta Presets do PSP.
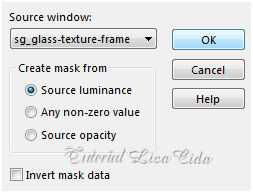
Mask: sg_glass-texture-frame
Tubes: Tocha24017
calguismist01082012
aclis_vases_01_10_07_2012
Deco: B - 043
Marca-d'água.
Efeitos do PSP.
Versão usada: PSP X8.
PLUGINS
Plugin FFG → M
Plugin Galaxy
Plugin Nik Software → Color Efex Pro 3.0 → Bi-Color User Defined
Plugin DC Layer → SideMerge
Plugin AAA Frames
TUTORIAL
|
Esta seta marca sua linha
Clique e arraste para movê-la
|
|
Cores usadas: #41270d — #e5b07d — #ffffff.

Configure: Foreground: #41270d — Background: #e5b07d.
1_.
Abra uma nova imagem transparente de 950 x 650 px.
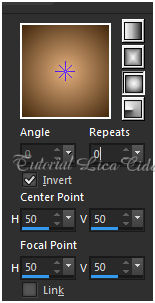
Pinte com o gradiente formado pelas cores escolhidas acima (retiradas do misted).
Configure: Style: Rectangular — Angle: 0 — Repeats: 2 — Invert marcado — Center Point: H: 50 / V: 50 — Focal Point: H: 50 / V: 50.
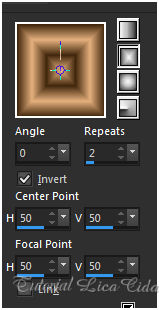
Plugin FFG → M.
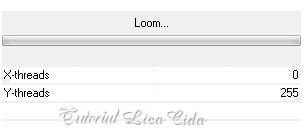
2_.
Layers → New Raster Layer.
Pinte com a cor #ffffff.
Layers → Load/Save Mask → Load Mask From Disk: sg_glass-texture-frame.
Effects → User Defined Filter → Emboss_3.
Layers → Merge → Merge Group.
3_.
Ative a ferramenta Selection Tool (tecla S) → Custom Selection.
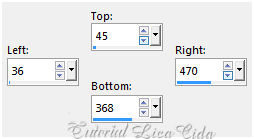
Ative a Raster 1.
Selections → Promote Selection to Layer.
Effects → Texture Effects → Blinds — Color: #000000.
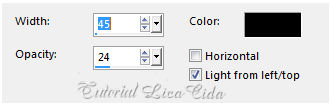
Selections → Select None.
Plugin Galaxy.
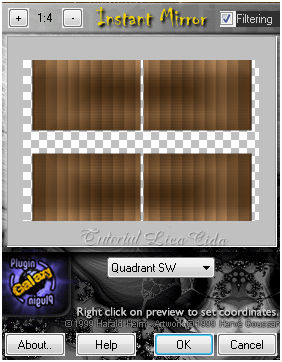
Layers → Arrange → Bring to Top.
Image → Free Rotate.
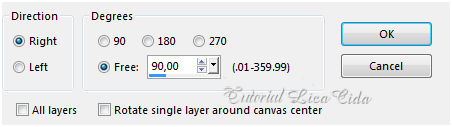
Selections → Select All.
Selections → Modify → Contract: 152 px.
Selections → Invert.
Tecle Delete.
Selections → Select None.
Com a ferramenta Magic Wand (Default), selecione a parte externa do efeito.
Selections → Invert.
Selections → Modify → Contract: 22 px.
Tecle Delete.
Layers → New Raster Layer.
Edit → Copy no tube calguismist01082012
Edit → Paste Into Selection.
Adjust → Sharpness → Sharpen More.
Effects → 3D Effects → Chisel — Color: Background.
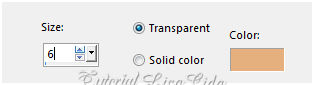
Layers → Merge → Merge Down.
Selections → Select None.
Effects → 3D Effects → Drop Shadow: 1 / 1 / 75 / 30,00 — Color: #000000.
Effects → Illumination Effects → Lights → Preset_Lights_2bllc.
4_.
Ative a ferramenta Selection Tool (tecla S) → Custom Selection.
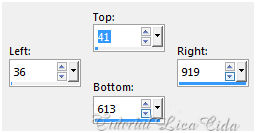
Layers → New Raster Layer.
Edit → Paste Into Selection (o tube calguismist01082012 deverá estar na memória).
Adjust → Sharpness → Sharpen More.
Effects → 3D Effects → Drop Shadow: 1 / 1 / 75 / 30,00 — Color: #000000.
Repita: Effects → Illumination Effects → Lights → Preset_Lights_2bllc.
Layers → Arrange → Move Down.
Selections → Select None.
Effects → User Defined Filter → Emboss_6.
5_.
Edit → Copy no deco B - 043
Edit → Paste As New Layer.
Effects → Image Effects → Offset: H: -194 / V: 155 — Custom e Transparent marcados.
Layers → Arrange → Bring to Top.
Effects → 3D Effects → Inner Bevel.
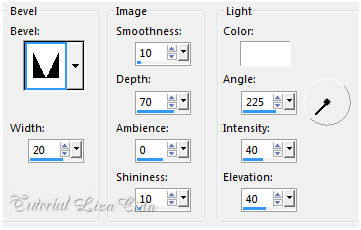
Plugin Galaxy (repita os mesmos valores usados anteriormente).
Effects → 3D Effects → Drop Shadow: 1 / 1 / 75 / 30,00 — Color: #000000.
Repita: Effects → Illumination Effects → Lights → Preset_Lights_2bllc.
6_.
Ative a cor do Foreground e escolha um tom bem mais claro (usei #f9ecdf).
Use a ferramenta Change To Target.
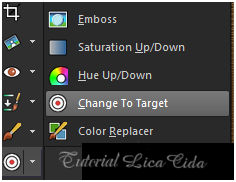
Configure:

Pincele na Raster 1 (nas outras layers, opcional).
Ainda na Raster 1:
Plugin Nik Software → Color Efex Pro 3.0 → Bi-Color User Defined.
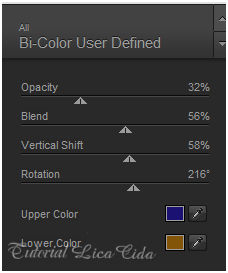
Em seguida: Plugin DC Layer → SideMerge.
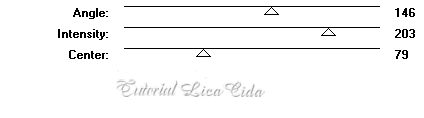
7_.
Layers → New Raster Layer.
Layers → Arrange → Send to Bottom.
Pinte com o gradiente formado pelas cores acima.
Configure: Style: Sunburst — Repeats: 0 — Invert marcado — Center Point: H: 50 / V: 50 — Focal Point: H: 50 / V: 50.
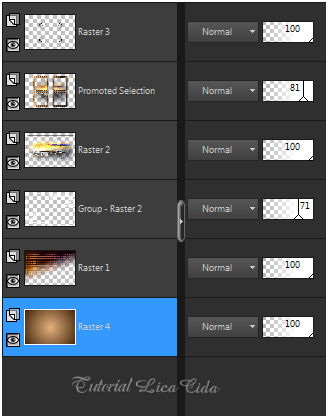
LAYERS
Altere os Blend Modes e a Opacity das layers.
8_.
Image → Add Borders: 1 px, Symmetric marcado — Color: #41270d (Foreground).
Image → Add Borders: 40 px, Symmetric marcado — Color: #ffffff.
Selecione a borda.
Pinte com o gradiente formado.
9_.
Selections → Promote Selection to Layer.
Selections → Invert.
Effects → 3D Effects → Drop Shadow: 1 / 1 / 75 / 30,00 — Color: #000000.
Adjust → One Step Photo Fix.
Plugin AAA Frames.
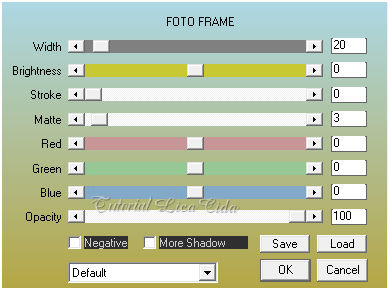
Effects → Image Effects → Seamless Tiling — Default.
Adjust → Sharpness → Sharpen More.
10_.
Edit → Copy no tube Tocha24017
Edit → Paste As New Layer.
Posicione e redimensione a gosto.
11_.
Edit → Copy no tube aclis_vases_01_10_07_2012
Edit → Paste As New Layer.
Posicione.
Aplique a marca-d'água.
Assine e salve.
Espero que gostem.
Aparecida / LicaCida, junho de 2017.
Rio de Janeiro - Brasil.


VOLTAR
Copyright ©2026 - Web Design - Naise Minas
|

