|
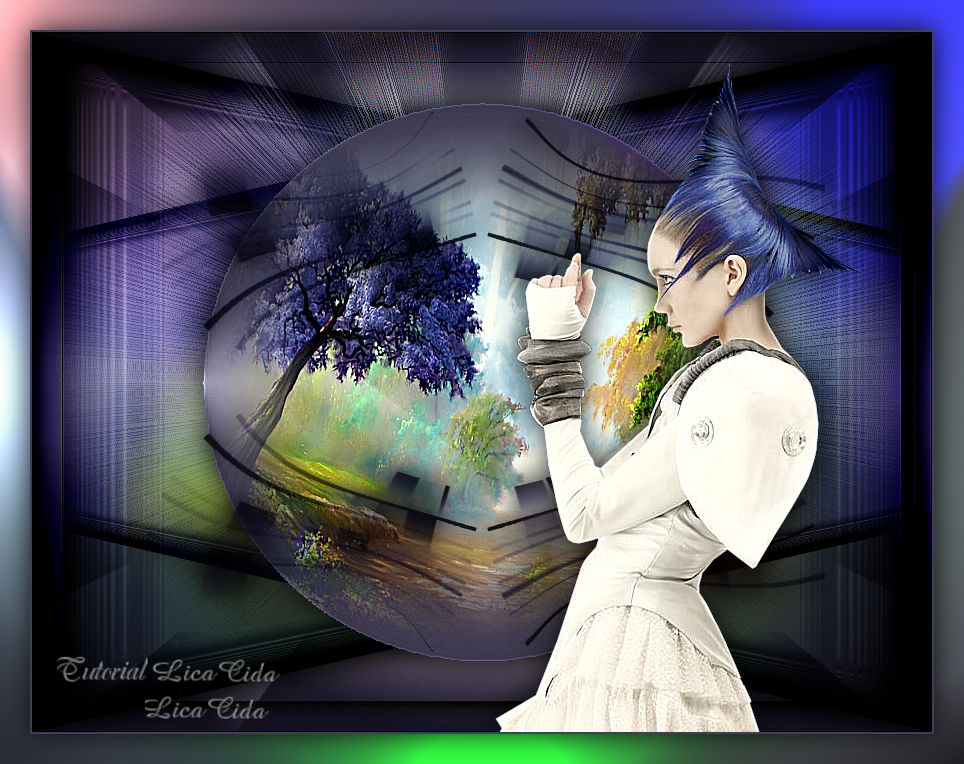
Strange Hair
TRADUÇÕES

MATERIAL

Back: Riet_342_161117mail_back1
Seleção: sel3952_aliciar --
Salvar na pasta Selections do PSP.
Preset: Illumination → Lights → Preset_Lights_monique (mp) --
Salvar na pasta Presets do PSP.
Tubes: Yoka-StrangeHair-6418
CAL-2649-041018
Deco: decodesafiolc
Marca-d'água.
Efeitos do PSP.
Versão usada: PSP X8.
PLUGINS
Plugin Toadies → Weaver
Plugin MuRa's Meister → Pole Transform
Plugin Flaming Pear → Flexify 2
Plugin Flaming Pear → Silver
Plugin VM Toolbox → Zoom Blur
Plugin AAA Frames → Foto Frame
Plugin AAA Filters → Custom
TUTORIAL

|
Esta seta marca sua linha
Clique e arraste para movê-la
|
|
1_.
Abra uma nova imagem transparente de 900 x 700 px.
Selections → Select All.
Edit → Copy no Riet_342_161117mail_back1
Edit → Paste Into Selection.
Selections → Select None.
2_.
Selections → Load/Save Selection → Load Selection From Disk → sel3952_aliciar.
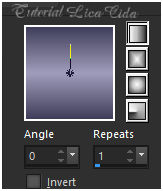
Configure: Foreground: #403e5a — Background: #a09dbc.


3_.
Layers → New Raster Layer.
Pinte a seleção com o gradiente formado pelas cores acima.
Configure: Style: Linear — Angle: 0 — Repeats: 1 — Invert desmarcado.
Selections → Select None.
Objects → Align → Left.
Layers → Duplicate.
Image → Mirror → Mirror Horizontal.
Layers → Merge → Merge Down.
4_.
Plugin Toadies → Weaver — Default (59 / 48 / 222).
Layers → Duplicate.
Blend Mode: Multiply.
Layers → Merge → Merge Down.
5_.
Plugin MuRa's Meister → Pole Transform.

Layers → Duplicate.
Image → Mirror → Mirror Vertical.
Blend Mode: Multiply.
Layers → Merge → Merge Down.
6_.
Plugin Flaming Pear → Flexify 2.

Layers → Duplicate.
Blend Mode: Multiply.
Layers → Merge → Merge Down.
Effects → 3D Effects → Drop Shadow: 0 / 0 / 80 / 40,00 — Color: #000000.
7_.
Layers → New Raster Layer.
Layers → Arrange → Send to Bottom.
Pinte com o mesmo gradiente formado no item 3.
Mude o Blend Mode da Raster 1 para Overlay.
Continue na Raster 3.
Selections → Select All.
Selections → Modify → Contract: 100 px.
Selections → Invert.
Selections → Promote Selection to Layer.
8_.
Com a seleção ainda ativa:
Plugin VM Toolbox → Zoom Blur.

Blend Mode: Multiply.
Selections → Select None.
Layers → Arrange → Move Up.
9_.
Ative a Raster 1.
Plugin Flaming Pear → Silver — Color 1: Foreground — Color 2: Background.

10_.
Effects → Geometric Effects → Perspective - Horizontal.

Adjust → Sharpness → Sharpen More.
Layers → Duplicate.
Image → Mirror → Mirror Horizontal.
Layers → Merge → Merge Down.
Effects → 3D Effects → Drop Shadow: 0 / 0 / 80 / 40,00 — Color: #000000.
11_.
Ative novamente a Raster 3.
Selections → Select All.
Edit → Copy no misted CAL-2649-041018
Edit → Paste Into Selection.
Selections → Select None.
Adjust → Sharpness → Sharpen More.
12_.
Adjust → Blur → Gaussian Blur — Radius: 24,00.
Layers → Duplicate.
13_.
Effects → Geometric Effects → Circle.

Layers → Arrange → Move Up.
Image → Resize: 80% — Resize all layers desmarcado.
Com a ferramenta Magic Wand (Default), clique na parte externa do círculo.
Selections → Invert.
Edit → Paste Into Selection (o misted CAL-2649-041018 deverá estar na memória).
Selections → Select None.
Adjust → Sharpness → Sharpen More.
Effects → 3D Effects → Drop Shadow: 0 / 0 / 80 / 40,00 — Color: #000000.
14_.
Ative novamente a Raster 3.
Plugin AAA Frames → Foto Frame.

Plugin AAA Filters → Custom — Landscape (Default).
Aplique o plugin também na Copy of Raster 3.
15_.
Ative a Raster 1.
Effects → Illumination Effects → Lights → Preset_Lights_monique.

16_.
Edit → Copy no decodesafiolc
Edit → Paste As New Layer.
Layers → Arrange → Move Down.
Altere os Blend Modes e a Opacity das layers.

17_.
Ative a layer superior (Raster 2).
Edit → Copy no tube Yoka-StrangeHair-6418
Edit → Paste As New Layer.
Adjust → Sharpness → Sharpen More.
Effects → 3D Effects → Drop Shadow: 0 / 0 / 80 / 40,00 — Color: #000000.
Image → Add Borders: 2 px, Symmetric marcado — Color: #403e5a (cor do Foreground).
Image → Add Borders: 30 px, Symmetric marcado — Color: #a09dbc (cor do Background).
Selecione a borda.
18_.
Repita o item 15: Effects → Illumination Effects → Lights → Preset_Lights_monique.
Selections → Invert.
Effects → 3D Effects → Drop Shadow: 0 / 0 / 80 / 40,00 — Color: #000000.
Selections → Select None.
Aplique a marca-d'água.
Assine e salve.
Espero que gostem.
Aparecida / LicaCida, abril de 2018.
Rio de Janeiro - Brasil.


VOLTAR
Copyright ©2026 - Web Design - Naise Minas
|


