|
Susanne
Com carinho!
TRADUÇÕES

MATERIAL

Preset: Preset_Lights_intuition --
Salvar na pasta Presets do PSP.
Tubes: Beauty_in_fur_CibiBijoux
328_paysage_p3_animabelle
Jarre_raisins_CibiBijoux
Mask: maskfield
Marca-d'água.
Efeitos do PSP.
Versão usada: PSP X8.
PLUGINS
Plugin Mehdi → Sorting Tiles
Plugin L en K's → Mayra
Plugin Transparency → Eliminate Black
Plugin Filters Unlimited 2 → &<Bkg Designer sf10 I> → 4 Way Average
Plugin VM Natural
Plugin MuRa's Meister → Perspective Tiling
Plugin Alien Skin Eye Candy 5: Impact → Glass
Plugin Toadies → What Are You?
Plugin Nik Software → Color Efex Pro 3.0 → Glamour Glow
Plugin Filters Unlimited 2 → Special Effects 1 → Aged Film
TUTORIAL
|
Esta seta marca sua linha
Clique e arraste para movê-la
|
|
Configure: Foreground: #1a130e

Background: #9c7154

1_.
Abra uma nova imagem transparente de 1000 x 700 px.
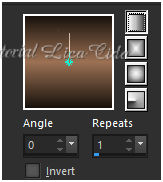
Pinte com o gradiente formado pelas cores acima, retiradas do tube principal.
Configure: Style: Linear — Angle: 0 — Repeats: 1 — Invert desmarcado.
2_.
Effects → Texture Effects → Blinds — Color: #000000.
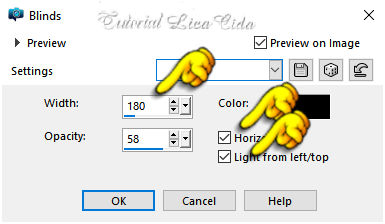
3_.
Effects → Texture Effects → Blinds — Color: #000000.
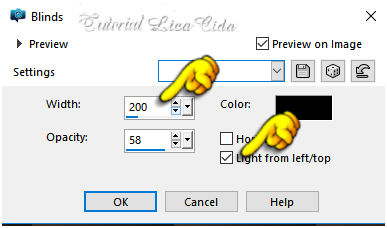
4_.
Plugin Mehdi → Sorting Tiles.
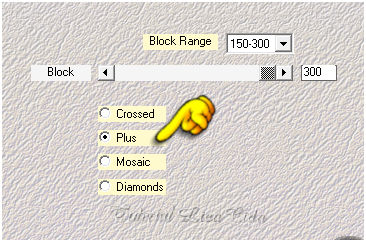
Effects → Edge Effects → Enhance More.
5_.
Ative a ferramenta Selection Tool (tecla S) → Custom Selection.
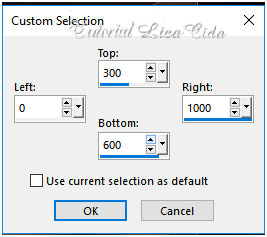
6_.
Plugin L en K's → Mayra: Default (0 / 149 / 76 / 2).
Selections → Promote Selection to Layer.
7_.
Plugin Transparency → Eliminate Black.
8_.
Layers → New Raster Layer.
Edit → Copy no misted 328_paysage_p3_animabelle (Raster 2)
Edit → Paste Into Selection.
Copie o misted (formado na Raster 2) e retire a visibilidade dessa layer (Raster 2).
9_.
Layers → New Raster Layer.
Selections → Select All.
Edit → Copy no misted 328_paysage_p3_animabelle (Raster 2)
Edit → Paste Into Selection.
Selections → Select None.
Delete a Raster 2.
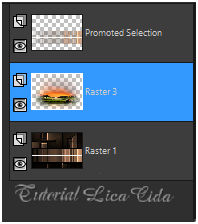
Volte à Raster 3.
Layers → Arrange → Move Down.
LAYERS
10_.
Ative a Raster 1.
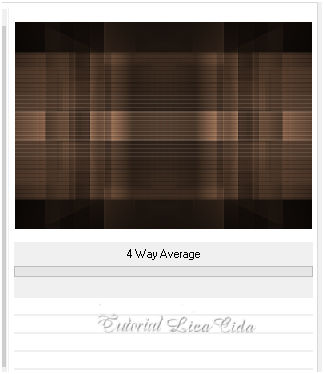
Plugin Filters Unlimited 2 → &<Bkg Designer sf10 I> → 4 Way Average.
11_.
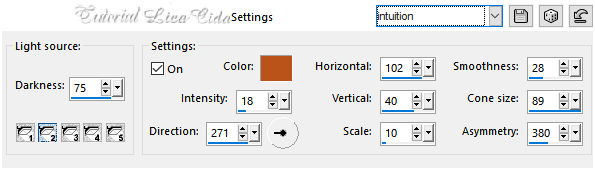
Effects → Illumination Effects → Lights → Preset_Lights_intuition.
Layers → Duplicate.
12_.
Plugin VM Natural.
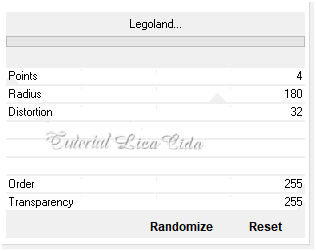
Effects → Image Effects → Seamless Tiling.
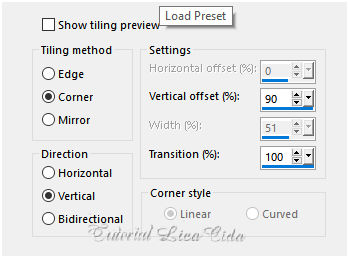
13_.
Plugin MuRa's Meister → Perspective Tiling.
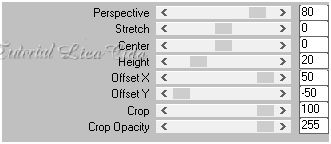
Com a ferramenta Magic Wand — Feather: 70, clique na parte transparente.
Tecle Delete seis ou sete vezes, para suavizar bem o efeito.
Selections → Select None.
14_.
Layers → New Raster Layer.
Selections → Select All.
Edit → Copy na maskfield
Edit → Paste Into Selection.
Selections → Select None.
Blend Mode: Screen — Opacity: 44%.
Image → Mirror → Mirror Vertical.
15_.
Ative a Raster 1.
Ative a ferramenta Selection Tool (tecla S) → Custom Selection.
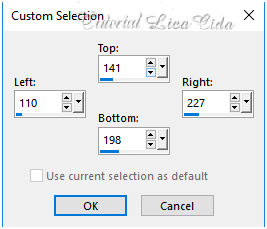
Selections → Promote Selection to Layer.
16_.
Plugin Alien Skin Eye Candy 5: Impact → Glass — Settings: Clear.
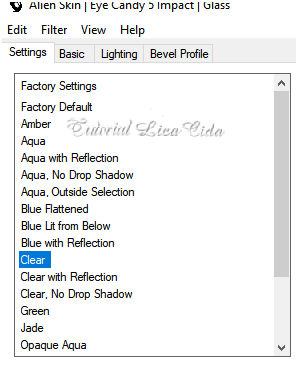
Basic: use as configurações do print e marque Outside Selection.
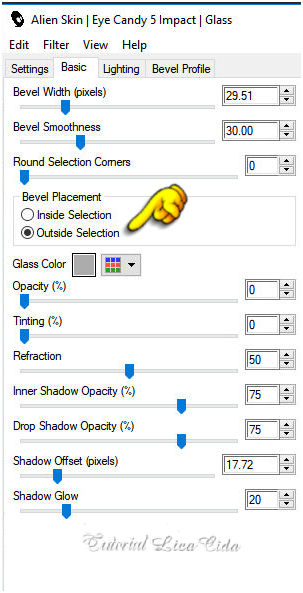
Repita o Basic: use as configurações do print e marque Inside Selection.
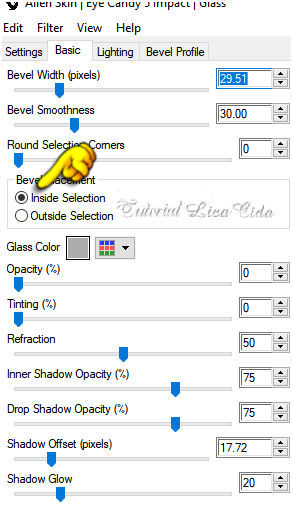
Selections → Select None.
Layers → Arrange → Bring to Top.
Layers → Duplicate.
Image → Resize: 80% — Resize all layers desmarcado.
Layers → Merge → Merge Down.
Layers → Duplicate.
Image → Mirror → Mirror Horizontal.
Effects → Image Effects → Offset.
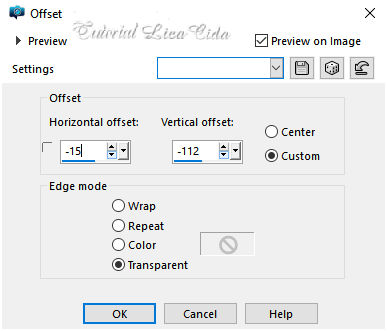
Layers → Merge → Merge Down.
17_.
Ative a ferramenta Selection Tool (tecla S) → Custom Selection.
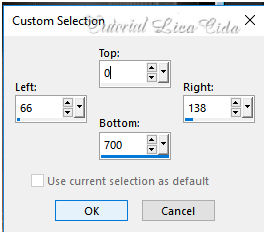
Selections → Modify → Select Selection Borders.
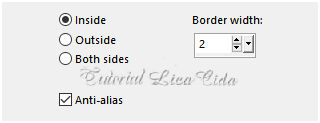
Layers → New Raster Layer.
Pinte com a cor #ffffff.
Selections → Select None.
Com a ferramenta Magic Wand (Default), selecione a parte interna do retângulo.
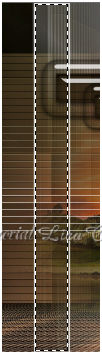
Ferramenta Flood Fill — Opacity: 40%: pinte com a mesma cor #ffffff.
Selections → Select None.
18_.
Plugin Toadies → What Are You?: Default (20 / 20).
Layers → Duplicate.
Image → Mirror → Mirror Horizontal.
Layers → Merge → Merge Down.
Volte a Opacity do Flood Fill para 100%.
Altere os Blend Modes e a Opacity das layers.
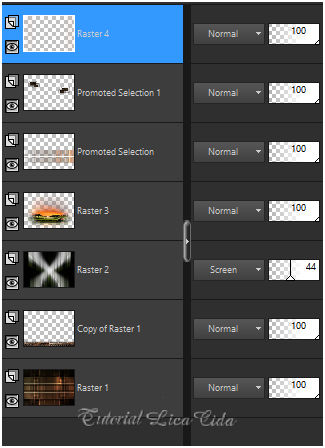
19_.
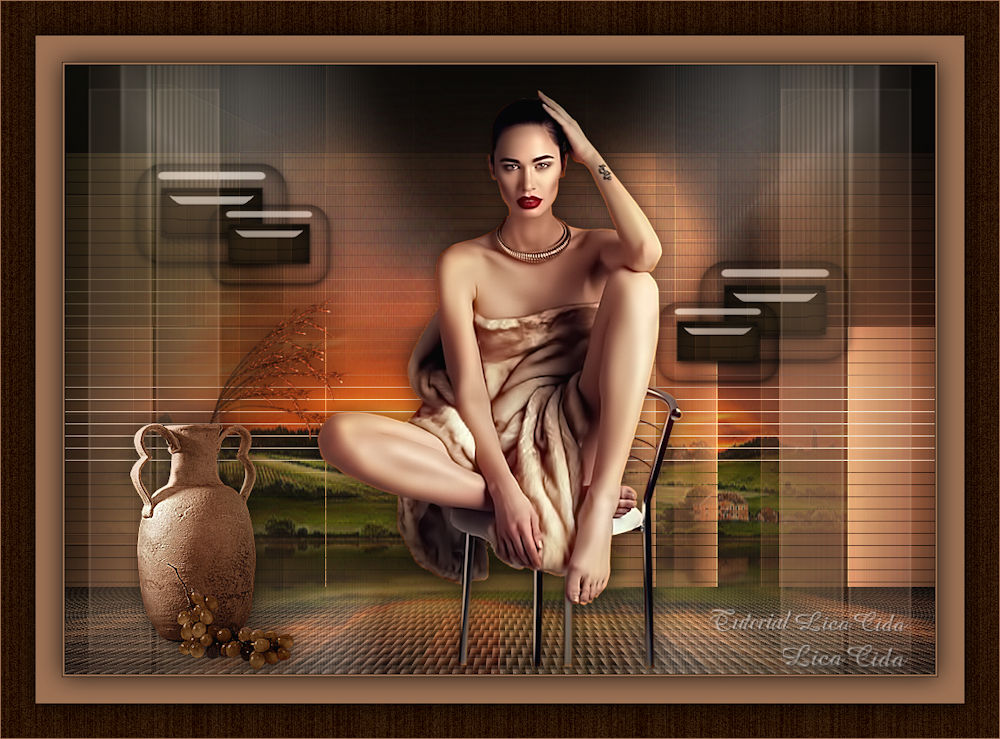
Edit → Copy no tube Beauty_in_fur_CibiBijoux
Edit → Paste As New Layer.
Image → Resize: 90% — Resize all layers desmarcado.
20_.
Edit → Copy no tube Jarre_raisins_CibiBijoux
Edit → Paste As New Layer.
Image → Resize: 70% — Resize all layers desmarcado.
Posicione.
Layers → Merge → Merge Visible.
21_.
Plugin Nik Software → Color Efex Pro 3.0 → Glamour Glow.
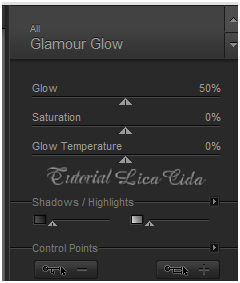
22_.
Image → Add Borders: 1 px, Symmetric marcado — Color: #1a130e (Foreground).
Image → Add Borders: 2 px, Symmetric marcado — Color: #9c7154 (Background).
Image → Add Borders: 1 px, Symmetric marcado — Color: #1a130e (Foreground).
Selections → Select All.
23_.
Image → Add Borders: 30 px, Symmetric marcado — Color: #9c7154 (Background).
Effects → 3D Effects → Drop Shadow: 0 / 0 / 80 / 40,00 — Color: #000000.
Selections → Select All.
24_.
Image → Add Borders: 40 px, Symmetric marcado — Color: #1a130e (Foreground).
Selections → Invert.
25_.
Plugin Filters Unlimited 2 → Special Effects 1 → Aged Film.
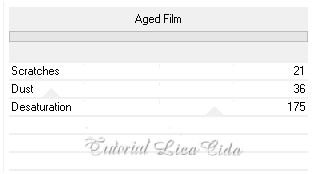
Selections → Invert.
Effects → 3D Effects → Drop Shadow: 0 / 0 / 80 / 40,00 — Color: #000000.
Selections → Select None.
Image → Resize: Width: 1000 px.
Aplique a marca-d'água.
Assine e salve como JPG.
Espero que gostem.
Obrigada!
Aparecida / LicaCida, março de 2019.
Rio de Janeiro - Brasil.

VOLTAR
Copyright ©2026 - Web Design - Naise Minas
|


