|
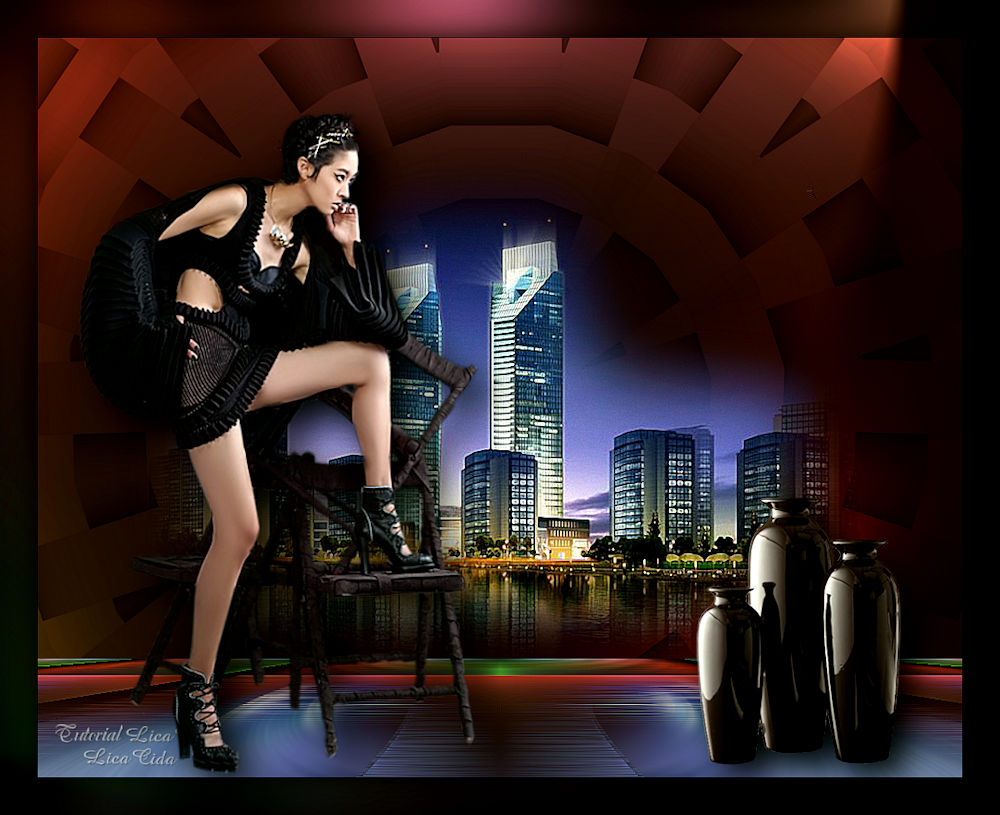
Tempo
TRADUÇÕES

MATERIAL

Seleção: tempolc --
Salvar na pasta Selections do PSP.
Preset: Illumination → Lights → Preset_Lights_lc15 --
Salvar na pasta Presets do PSP.
Gradiente: Shadow Monsters --
Salvar na pasta Gradients do PSP.
Tubes: 2809 - woman - LB TUBES
Paysage misted jewel 036
SuizaBella Vaso 7
Marca-d'água.
Efeitos do PSP.
Versão usada: PSP X9.
PLUGINS
Plugin dsb flux → Blast
Plugin MuRa's Meister → Perspective Tiling
Plugin Alien Skin Eye Candy 5: Impact → Perspective Shadow
Plugin Graphics Plus → Cross Shadow
Plugin AAA Filters → Custom
TUTORIAL
|
Esta seta marca sua linha
Clique e arraste para movê-la
|
|
1_.
Abra uma nova imagem de 1000 x 700 px.
Pinte com o gradiente Shadow Monsters (anexado ao material).
Configure: Style: Linear — Angle: 0 — Repeats: 0 — Invert desmarcado.
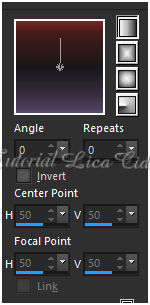
Adjust → Blur → Gaussian Blur — Radius: 50,00.
2_.
Selections → Select All.
Edit → Copy no Paysage misted jewel 036
Edit → Paste Into Selection.
Selections → Select None.
Adjust → Blur → Radial Blur.
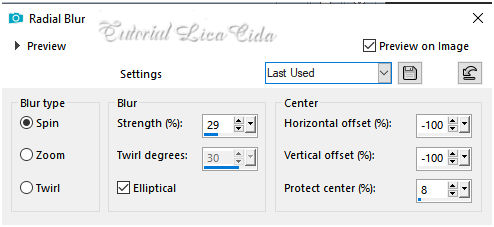
Layers → Duplicate.
3_.
Ative a ferramenta Warp Brush.
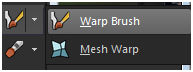
Modo Expand, com as configurações:

Centralize a ferramenta e expanda.
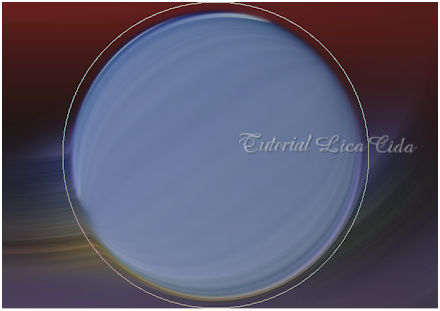
4_.
Selections → Load/Save Selection → Load Selection From Disk → tempolc.
Caso a seleção não fique do tamanho do seu expand, use Selections → Edit Selection para acertar.
Pressione a tecla Delete.
5_.
Selections → Modify → Select Selection Borders: Inside — Border width: 6 — Anti-alias marcado.
Layers → New Raster Layer.
Pinte com o gradiente formado no item 1.
6_.
Effects → 3D Effects → Inner Bevel.
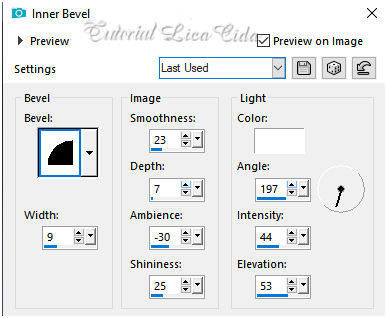
Selections → Select None.
Layers → Merge → Merge Down.
7_.
Plugin dsb flux → Blast.
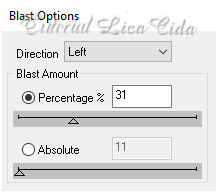
Adjust → Sharpness → Sharpen More.
8_.
Image → Canvas Size.
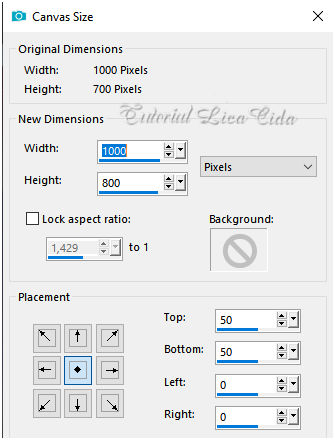
9_.
Edit → Copy Special → Copy Merged.
Edit → Paste As New Layer.
10_.
Na Raster 2:
Plugin MuRa's Meister → Perspective Tiling: 80 / 0 / 0 / 16 / 50 / -50 / 100 / 255.
Com a ferramenta Magic Wand (Feather: 70), clique na parte transparente e pressione a tecla Delete quantas vezes forem necessárias para suavizar o efeito. É importante que o círculo apareça inteiro.
Selections → Select None.
11_.
Edit → Copy no Paysage misted jewel 036
Edit → Paste As New Layer.
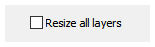
Image → Resize: 80% — Resize all layers desmarcado.
Adjust → Sharpness → Sharpen More.
12_.
Ative a Copy of Raster 1.
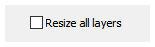
Image → Resize: 80% — Resize all layers desmarcado.
Plugin Alien Skin Eye Candy 5: Impact → Perspective Shadow — Blurry.
Aplique o plugin também na Raster 1. Use um Drop Shadow a gosto (opcional).
OBSERVAÇÃO
Este item (12) serve apenas para compor o tutorial.
13_.
Layers → New Raster Layer.
Layers → Arrange → Send to Bottom.
Pinte com o gradiente formado no item 1 (Raster 4).
14_.
Effects → Texture Effects → Weave.
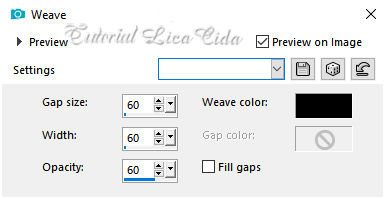
15_.
Effects → Reflection Effects → Kaleidoscope.
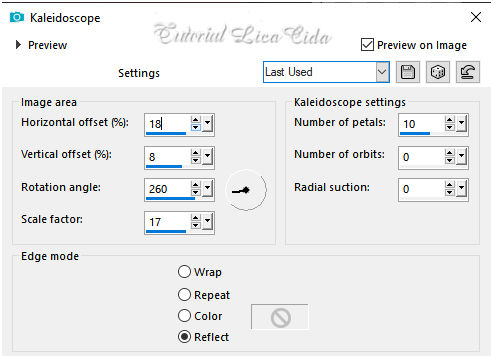
16_.
Effects → Reflection Effects → Rotating Mirror.
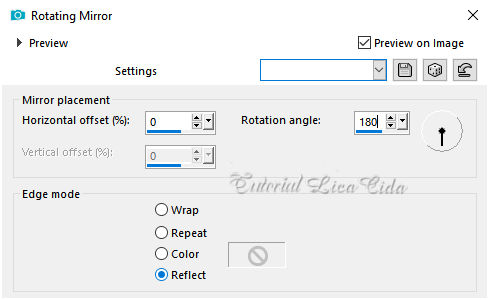
17_.
Effects → Illumination Effects → Lights → Preset_Lights_lc15.
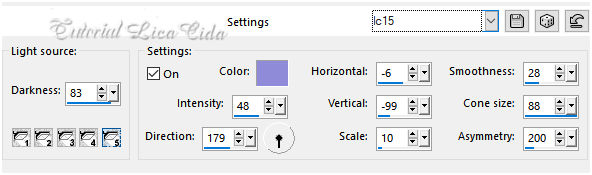
18_.
Ative a Raster 1.
Repita o item 17.
Repita o Plugin dsb flux → Blast (print do item 7).
Adjust → Sharpness → Sharpen More.
Adjust → One Step Photo Fix.
19_.
Plugin MuRa's Meister → Perspective Tiling: 80 / 0 / 0 / 16 / 50 / -50 / 100 / 255.
Effects → Reflection Effects → Rotating Mirror (repita na Raster 2).
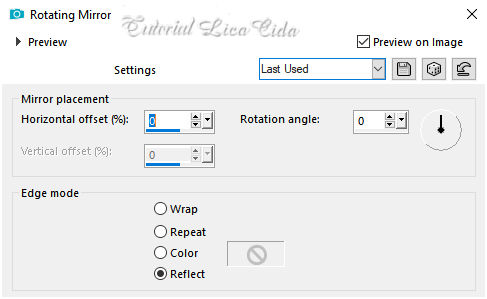
Adjust → Sharpness → Sharpen More.
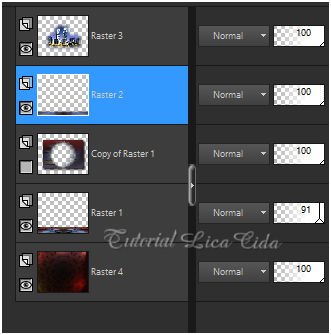
Opacity da Raster 1: entre 90% e 85%.
Retire a visibilidade da layer Copy of Raster 1.
Altere os Blend Modes e a Opacity das layers (use a gosto).
20_.
Ative a layer superior (Raster 3).
Edit → Copy no tube 2809 - woman - LB TUBES
Edit → Paste As New Layer.
Image → Mirror → Mirror Horizontal.
Adjust → Sharpness → Sharpen More.
Redimensione e posicione a gosto.
21_.
Edit → Copy no tube SuizaBella Vaso 7
Edit → Paste As New Layer.
Redimensione e posicione a gosto.
Plugin Alien Skin Eye Candy 5: Impact → Perspective Shadow — Blurry (aplique nos tubes).
Image → Add Borders: 1 px, Symmetric marcado — Color: #000000.
Edit → Copy.
Image → Add Borders: 40 px, Symmetric marcado — Color: #ffffff.
Selecione a borda.
Edit → Paste Into Selection.
Adjust → Blur → Gaussian Blur — Radius: 50,00.
Effects → Illumination Effects → Lights → Preset_Lights_lc15 (print do item 17).
Plugin Graphics Plus → Cross Shadow — Default.
Selections → Invert.
Effects → 3D Effects → Drop Shadow: 0 / 0 / 80 / 40,00 — Color: #000000.
Selections → Select None.
Image → Resize: Width 1000 px.
Opcional: Plugin AAA Filters → Custom — Landscape (Default).
Aplique a marca-d'água.
Assine e salve.
Espero que gostem.
Aparecida / LicaCida, julho de 2020.
Rio de Janeiro - Brasil.

VOLTAR
Copyright ©2026 - Web Design - Naise Minas
|


