|
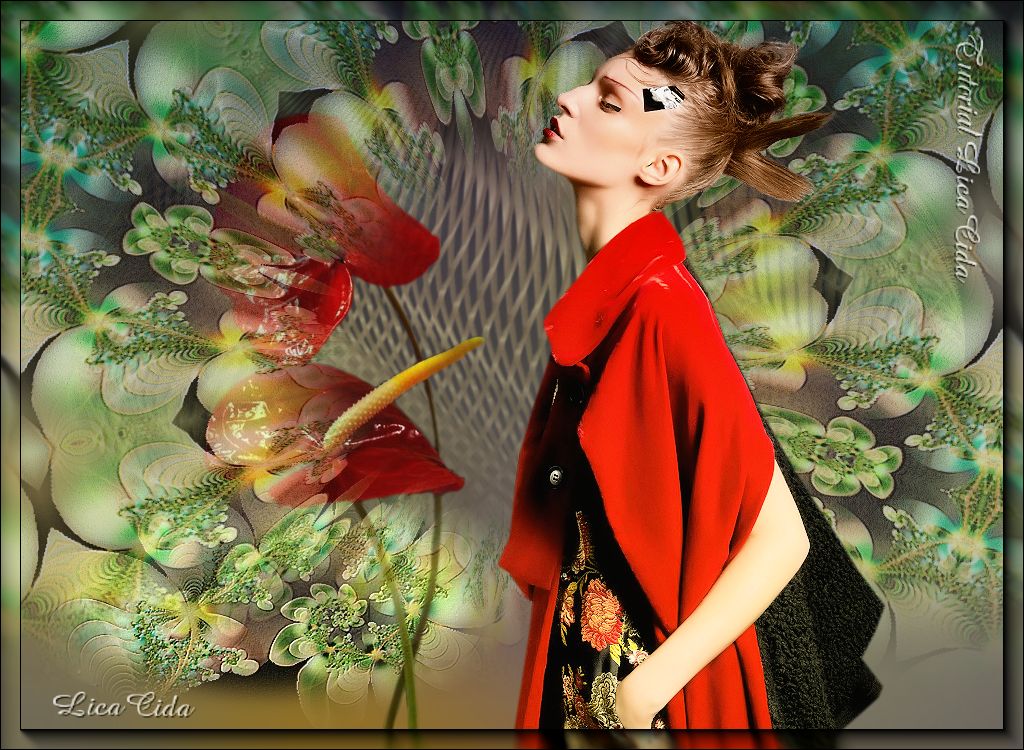
Tristesse
TRADUÇÕES

MATERIAL

Fractal: BC-Misted-fractal_KM
Tubes: tube_nanhoelzle_exclusivo_1117
flowers_48_bycrealine
Mask: !!!!.mask
Pattern: gold (22)
Back: coloridorb
cor usada back fractal
Marca-d'água.
Efeitos do PSP.
Versão usada: PSP X5.
PLUGINS
Plugin FM Tile Tools → Blend Emboss
Plugin Flaming Pear → Flexify 2
Plugin MuRa's Meister → Copies
Plugin Nik Software → Color Efex Pro 3.0
Plugin Xero → Porcelain
TUTORIAL
|
Esta seta marca sua linha
Clique e arraste para movê-la
|
|
1_.
Abra uma nova imagem transparente de 1024 x 700 px.
2_.
Selections → Select All.
Edit → Copy no BC-Misted-fractal_KM
Edit → Paste Into Selection.
Selections → Select None.
Effects → Image Effects → Seamless Tiling: Default.
Adjust → Add/Remove Noise → JPEG Artifact Removal — Maximum: 100.
Plugin FM Tile Tools → Blend Emboss.
3_.
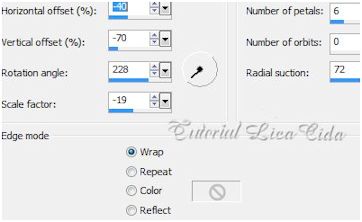
Effects → Reflection Effects → Kaleidoscope.
4_.
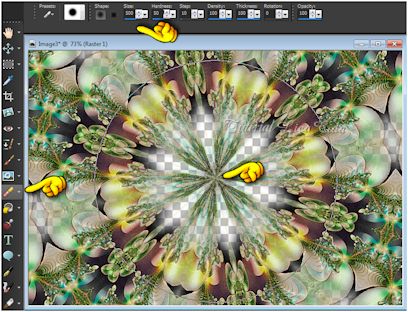
Com a ferramenta Eraser (borracha), centralize o efeito e apague (clique uma vez).
Size: 500 (demais valores Default): 50 / 10 / 100 / 100 / 0 / 100.
5_.
Com a ferramenta Selection Tool → Circle (demais valores, veja o print), faça um contorno onde apagou.
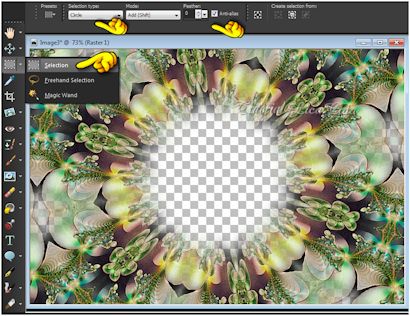
Selections → Edit Selection.
6_.
Ative a ferramenta Pick Tool (Mode: Scale) e use-a para aumentar ou diminuir o círculo formado.
Ajuste sobre o efeito como mostra o print.
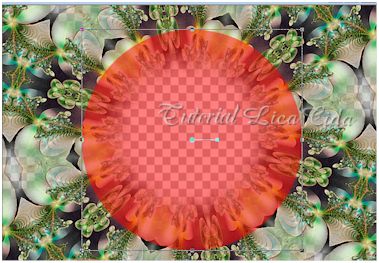
Selections → Edit Selection.
7_.
Selections → Modify → Select Selection Borders.
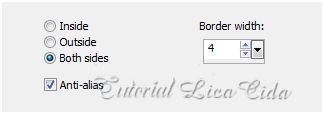
Layers → New Raster Layer.
Pinte com a pattern gold (22).
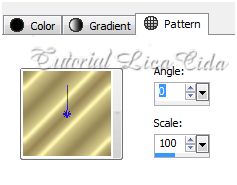
Effects → 3D Effects → Inner Bevel.
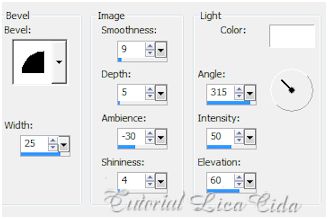
Selections → Select None.
8_.
Plugin Flaming Pear → Flexify 2.
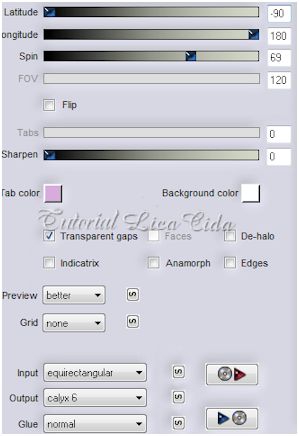
Layers → Duplicate.
Image → Mirror.
Layers → Merge → Merge Down.
9_.
Plugin MuRa's Meister → Copies → *Duplicate.
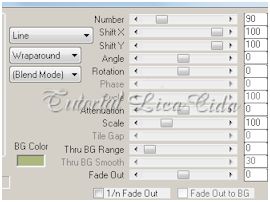
10_.
Effects → Geometric Effects → Spherize — Strength: 100 — Ellipse marcado.
11_.
Effects → Geometric Effects → Circle — Transparent marcado.
Layers → Arrange → Move Down.
OBSERVAÇÃO
Esse efeito ficará menor ou maior de acordo com o tamanho do círculo formado no item 6. Não fará nenhuma alteração.
Effects → 3D Effects → Drop Shadow: 10 / -10 / 70 / 20,00 — Color: #000000.
12_.
Aplique a mask !!!!.mask nas duas layers (aplique duas vezes em cada layer).
Layers → Merge → Merge Group.
13_.
Image → Canvas Size: 1024 x 750 — Bottom: 50.
14_.
Layers → New Raster Layer.
Layers → Arrange → Send to Bottom.
Pinte com uma cor que combine com seu trabalho. Usei o back do BC-Misted-fractal_KM, que segue anexado (cor usada back fractal).
15_.
Layers → New Raster Layer.
Selections → Select All.
Edit → Copy no coloridorb
Edit → Paste Into Selection.
Selections → Select None.
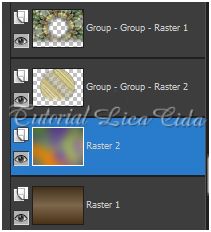
16_.
Ative a layer superior, Group-Group-Raster 1.
Plugin Nik Software → Color Efex Pro 3.0 → Bi-Color Filters — Color Set: Moss 3. Use a gosto.
Plugin Xero → Porcelain → Default.
17_.
Ative a Group-Group-Raster 2.
Repita o Drop Shadow e o Plugin Xero → Porcelain.
Edit → Copy no tube flowers_48_bycrealine
Edit → Paste As New Layer.
Effects → Image Effects → Offset: -180 / -180.
18_.
Edit → Copy no BC-Misted-fractal_KM
Edit → Paste As New Layer.
Image → Resize: 80% — Resize all layers desmarcado.
Adjust → Add/Remove Noise → JPEG Artifact Removal — Maximum: 100.
Plugin FM Tile Tools → Blend Emboss.
Image → Flip.
Effects → Image Effects → Offset: -280 / -230.
Layers → Arrange → Move Down.
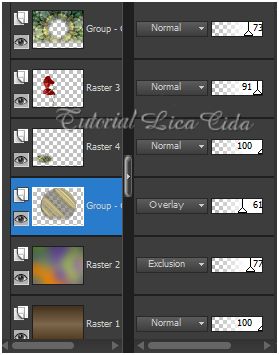
LAYERS
Altere os Blend Modes e a Opacity das layers de acordo com as cores usadas.
19_.
Edit → Copy no tube tube_nanhoelzle_exclusivo_1117
Edit → Paste As New Layer.
Posicione.
Aplique a marca-d'água.
Assine e salve.
Formate e decore seu top a gosto.
Espero que gostem.
Aparecida / LicaCida, maio de 2013.
Rio de Janeiro - Brasil.

VOLTAR
Copyright ©2026 - Web Design - Naise Minas
|

