|

Victória
TRADUÇÕES

MATERIAL

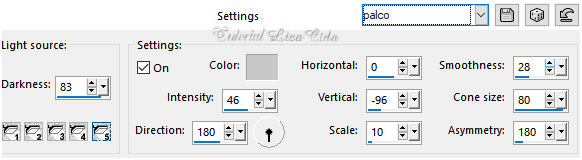
Preset: Illumination → Lights → Preset_Lights_palco --
Salvar na pasta Presets do PSP.
Tube: 4721-luzcristina
Decos: ildiko_deco_2016_18
Ildiko_create_deco (126)
ildiko_deco_2016_16
Marca-d'água.
Efeitos do PSP.
Versão usada: PSP X8.
PLUGINS
Plugin Artistic → Rough Pastels
Plugin UnPlugged Shapes → 45 Degree Rectangle
Plugin dsb flux → Linear Transmission
Plugin MuRa's Seamless → Emboss at Alpha
Plugin Toadies → Motion Trail
Plugin AAA Frames → Foto Frame
Plugin AAA Filters → Custom
TUTORIAL
|
Esta seta marca sua linha
Clique e arraste para movê-la
|
|
Configure: Foreground: #292d19 — Background: #b1bb83.
1_.
Abra uma nova imagem transparente de 900 x 700 px.
Pinte com o gradiente formado pelas cores acima.
Configure: Style: Sunburst — Repeats: 0 — Invert marcado — Center Point: H: 50 / V: 50 — Focal Point: H: 50 / V: 50.

Selections → Select All.
Edit → Copy no tube 4721-luzcristina
Edit → Paste Into Selection.
Selections → Select None.
Adjust → Blur → Gaussian Blur — Radius: 32,00.
Plugin Artistic → Rough Pastels.

Plugin UnPlugged Shapes → 45 Degree Rectangle.

2_.
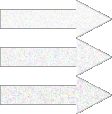
Com a ferramenta Magic Wand (Default), selecione o efeito formado.
Selections → Promote Selection to Layer.
Selections → Select None.
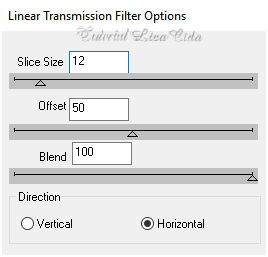
Plugin dsb flux → Linear Transmission.
Layers → Duplicate.
Image → Mirror → Mirror Horizontal.
Layers → Merge → Merge Down.
Effects → 3D Effects → Drop Shadow: -10 / -10 / 50 / 5,00 — Color: #000000.
Plugin MuRa's Seamless → Emboss at Alpha — Default.
3_.
Com a ferramenta Selection Tool, selecione como no print (a segunda listra do efeito, Bottom).

Selections → Promote Selection to Layer.
Selections → Select None.
Plugin Toadies → Motion Trail — Default (135 / 134 / 146).
Repita o Motion Trail.
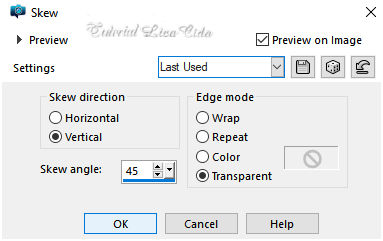
Effects → Geometric Effects → Skew.
Layers → Duplicate.
Image → Mirror → Mirror Horizontal.
Layers → Merge → Merge Down.
Layers → Duplicate.
Image → Mirror → Mirror Vertical.
Layers → Merge → Merge Down.
Effects → 3D Effects → Drop Shadow: -10 / -10 / 50 / 5,00 — Color: #000000.
Effects → 3D Effects → Drop Shadow: 10 / 10 / 50 / 5,00 — Color: #000000.
4_.
Ative a Raster 1.
Effects → Illumination Effects → Lights → Preset_Lights_palco.
Altere os Blend Modes e a Opacity das layers.

Layers → Merge → Merge Visible.
5_.
Image → Canvas Size.

6_.
Layers → New Raster Layer.
Pinte com o gradiente formado no item 1.
Plugin Artistic → Rough Pastels.

Layers → Arrange → Send to Bottom.
7_.
Ative a layer Merged.
Com a ferramenta Magic Wand (Default), selecione as laterais.
Selections → Invert.
Selections → Modify → Select Selection Borders.

8_.
Layers → New Raster Layer.
Pinte com a cor #ffffff.
Selections → Select None.
9_.
Image → Add Borders: 2 px, Symmetric marcado — Color: #ffffff.
Plugin AAA Frames → Foto Frame.

Opcional: Plugin AAA Filters → Custom — Landscape (Default).
10_.
Edit → Copy no ildiko_deco_2016_18
Edit → Paste As New Layer.
Blend Mode: Overlay.
Adjust → One Step Photo Fix.
11_.
Edit → Copy no Ildiko_create_deco (126)
Edit → Paste As New Layer.
Posicione como no modelo.
Blend Mode: Luminance (L).
12_.
Edit → Copy no ildiko_deco_2016_16
Edit → Paste As New Layer.
Posicione sobre o deco anterior.
Blend Mode: Luminance (L).
Plugin MuRa's Seamless → Emboss at Alpha — Default.
13_.
Edit → Copy no tube 4721-luzcristina
Edit → Paste As New Layer.
Image → Resize: 90% — Resize all layers desmarcado.
Posicione um pouco à direita (do back).
Aplique a marca-d'água.
Assine e salve.
Espero que gostem.
Aparecida / LicaCida, janeiro de 2018.
Rio de Janeiro - Brasil.


VOLTAR
Copyright ©2026 - Web Design - Naise Minas
|


