|

Wish You Were Here
DEDICATÓRIA
Regina querida, dedico a você pelo seu aniversário, com carinho!
TRADUÇÕES

MATERIAL

Tubes: tube946_mulher_mara_pontes
calguismisted13022015 (paisagem)
Back: backlc
Brush: designal brushes 3_12
Deco: pixelcorners04-st-mel
Marca-d'água.
Efeitos do PSP.
Versão usada: PSP X7, podendo ser usado em outras versões.
PLUGINS
Plugin FFG → B → Button Deluxe
Plugin FFG → B → Vibes
Plugin Galaxy → Instant Mirror
Plugin VanDerLee → UnPlugged-X → Defocus
Plugin Nik Software → Color Efex Pro 3.0 → Bi-Color Filters
TUTORIAL

|
Esta seta marca sua linha
Clique e arraste para movê-la
|
|
1_.
Abra uma nova imagem transparente de 800 x 550 px.
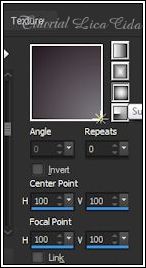
Pinte com o gradiente formado pelas cores #817f84 e #25181f.
Configure: Style: Sunburst — Repeats: 0 — Invert desmarcado — Center Point: H: 100 / V: 100 — Focal Point: H: 100 / V: 100.
2_.
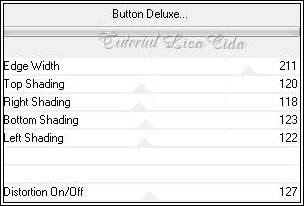
Plugin FFG → B → Button Deluxe.
3_.
Plugin Galaxy → Instant Mirror.

4_.
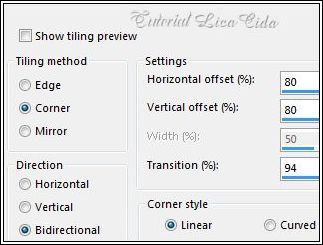
Effects → Image Effects → Seamless Tiling — Shutter diagonal.
5_.
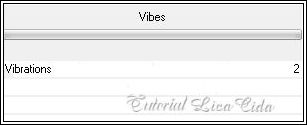
Plugin FFG → B → Vibes.
Layers → Duplicate.
6_.
Effects → Texture Effects → Weave.
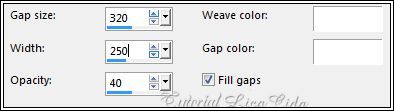
7_.
Effects → Image Effects → Seamless Tiling — Side by side.
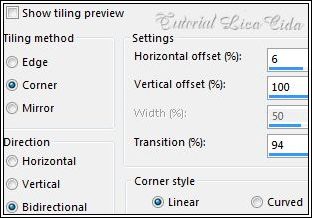
Repita os itens 4 e 5 (veja os prints):
Effects → Image Effects → Seamless Tiling — Shutter diagonal.
Plugin FFG → B → Vibes.
8_.
Tecle a letra S e ative a Custom Selection.
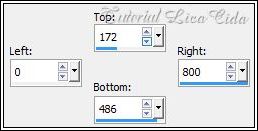
Selections → Promote Selection to Layer.
9_.
Effects → 3D Effects → Drop Shadow: 7 / 0 / 50 / 15,00 — Color: #000000.
Selections → Select None.
Repita o item 4 (veja o print): Effects → Image Effects → Seamless Tiling — Shutter diagonal.
10_.
View → Rulers (ative a régua).
Com a ferramenta Pick Tool (Default), traga o efeito até 410 px.
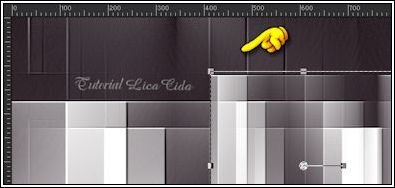
Desative a régua.
Image → Flip.
11_.
Effects → Geometric Effects → Skew.

Effects → Reflection Effects → Rotating Mirror → Default.
12_.
Plugin VanDerLee → UnPlugged-X → Defocus — Defocus: 6 (restante Default).
13_.
Tecle a letra S e ative a Custom Selection.
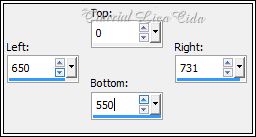
Layers → New Raster Layer.
Pinte com a cor #ffffff.
Selections → Select None.
Repita: Plugin VanDerLee → UnPlugged-X → Defocus — Defocus: 6 (restante Default).
Repita: Plugin FFG → B → Vibes (print do item 5).
Layers → Duplicate.
Image → Resize: 80% — Resize all layers desmarcado.
Layers → Duplicate.
Image → Resize: 80% — Resize all layers desmarcado.
Layers → Merge → Merge Down (duas vezes).
14_.
Image → Rotate Left.
Effects → Distortion Effects → Wind.
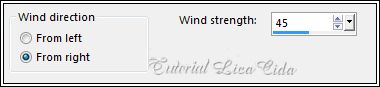
Image → Rotate Right.
15_.
Image → Rotate Right.
Effects → Distortion Effects → Wind.
Image → Rotate Left.
16_.
Edit → Copy no brush designal brushes 3_12
Edit → Paste As New Layer.
Image → Mirror.
Image → Flip.
Posicione a gosto.
17_.
Tecle a letra S e ative a Custom Selection.
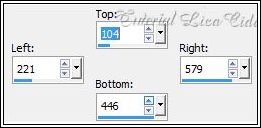
Layers → New Raster Layer.
Pinte com a cor #ffffff.
Effects → 3D Effects → Chisel — Color: #25181f (cor usada no Background).
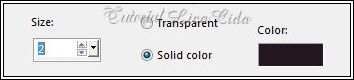
18_.
Selections → Modify → Contract: 16 px.
Pinte com a cor #25181f (cor usada no Background).
Selections → Modify → Contract: 2 px.
Tecle Delete.
Pinte com uma cor que combine com seu tube paisagem (usei #1c2e41). Mantenha selecionado.
19_.
Edit → Copy no tube calguismisted13022015
Edit → Paste As New Layer.
Redimensione o necessário.
Selections → Invert.
Tecle Delete.
Selections → Select None.
Layers → Merge → Merge Down.
O trabalho até aqui:
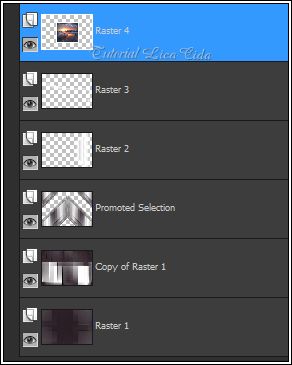
20_.
Layers → New Raster Layer.
Layers → Arrange → Send to Bottom.
Selections → Select All.
Edit → Copy no backlc
Edit → Paste Into Selection.
Selections → Select None.
Ou use um gradiente: Style: Sunburst — Repeats: 0 — Invert marcado — Center Point: H: 50 / V: 50 — Focal Point: H: 50 / V: 50 — cores a gosto.
21_.
Ative a Raster 1.
Plugin Nik Software → Color Efex Pro 3.0 → Bi-Color Filters — Color Set: Cool/Warm 1.
22_.
Ative a Raster 2.
Layers → Arrange → Move Down.
Altere os Blend Modes e a Opacity das layers.
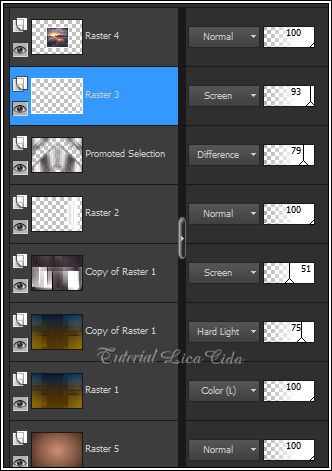
23_.
Edit → Copy no tube tube946_mulher_mara_pontes
Edit → Paste As New Layer.
Redimensione e posicione a gosto.
24_.
Edit → Copy no deco pixelcorners04-st-mel
Edit → Paste As New Layer.
Use a gosto.
Blend Mode: Luminance (L).
25_.
Image → Add Borders: 1 px, Symmetric marcado — Color: #25181f (cor usada no Background).
Image → Add Borders: 20 px, Symmetric marcado — Color: #ffffff.
Image → Add Borders: 5 px, Symmetric marcado — Color: #1c2e41 (usada no fundo da paisagem).
Image → Add Borders: 1 px, Symmetric marcado — Color: #ffffff.
Image → Add Borders: 5 px, Symmetric marcado — Color: #476e8f (tom mais claro usado no fundo da paisagem).
Image → Add Borders: 40 px, Symmetric marcado — Color: #ffffff.
Image → Add Borders: 1 px, Symmetric marcado — Color: #25181f (cor usada no Background).
Aplique a marca-d'água.
Assine e salve.
Espero que gostem.
Aparecida / LicaCida, fevereiro de 2015.
Rio de Janeiro - Brasil.

VOLTAR
Copyright ©2026 - Web Design - Naise Minas
|


