|
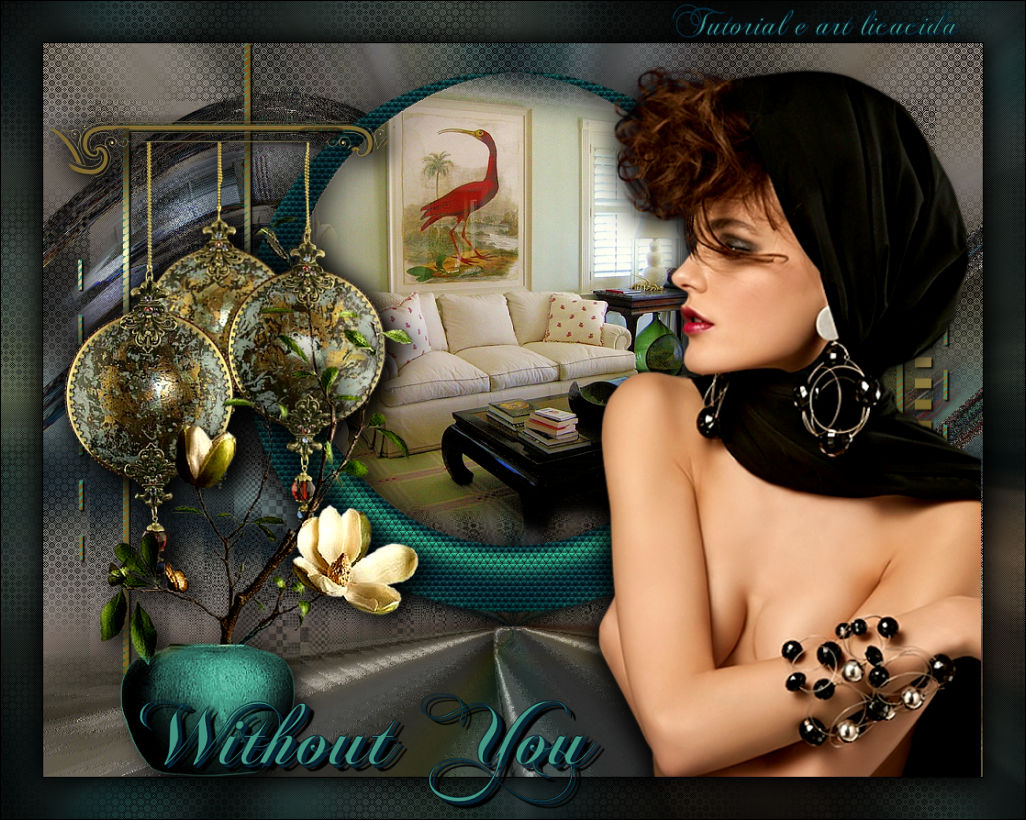
Without You
TRADUÇÕES

MATERIAL

Tubes: Callitubes-2387mulheres
Callitubes-57misted
Callitubes-251flores
Decor: Callitubes-296decor
decowithoutyou1_bylc
pisowithoutyou__bylc
Gradiente: Corel_06_017 (Metal brass) --
Salvar na pasta Gradients do PSP.
Mask: NarahsMasks_1739
Título: titulo Without You_ by lc
Marca-d'água.
Efeitos do PSP.
PLUGINS
Plugin Mehdi → Wavy Lab 1.1
Plugin Kiwi's Oelfilter → Zig-Zack
Plugin MuRa's Meister → Pole Transform
Plugin AAA Filters → Custom
Plugin L en K's → Palmyre
Plugin Graphics Plus → Cross Shadow
TUTORIAL
|
Esta seta marca sua linha
Clique e arraste para movê-la
|
|
Configure: Foreground: #032436 — Background: #429782.
1_.
Abra uma nova imagem transparente de 1024 x 800 px.
2_.
Plugin Mehdi → Wavy Lab 1.1.
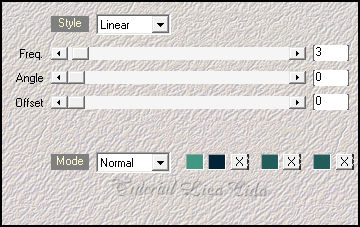
Layers → Duplicate.
3_.
Effects → Geometric Effects → Perspective - Vertical: -70 — Transparent.
4_.
Ative a régua.
Com a ferramenta Pick Tool, Mode: Scale, puxe o ponto de cima para baixo até a marca 600 da régua.
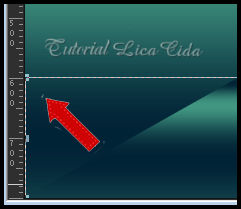
Desative a régua.
5_.
Plugin MuRa's Meister → Pole Transform (114).
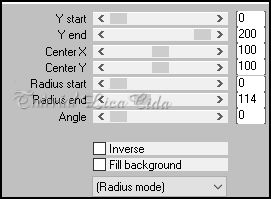
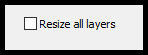
Image → Resize: 80% — Resize all layers desmarcado.
6_.
Com a ferramenta Pick Tool: Position X: 217 — Position Y: 30.
Tecle M para desativar a ferramenta.
7_.
Com a ferramenta Magic Wand, Tolerance e Feather: 0, selecione o círculo formado.
8_.
Ative a layer Raster 1.
Edit → Copy no Callitubes-57misted
Edit → Paste As New Layer.
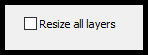
Image → Resize: 80% — Resize all layers desmarcado.
Posicione o misted usando a ferramenta Move Tool.
Selections → Invert.
Tecle Delete.
Selections → Select None.
Adjust → Sharpness → Sharpen.
9_.
Plugin AAA Filters → Custom — Landscape: Default (opcional).
10_.
Na layer do círculo formado (topo):
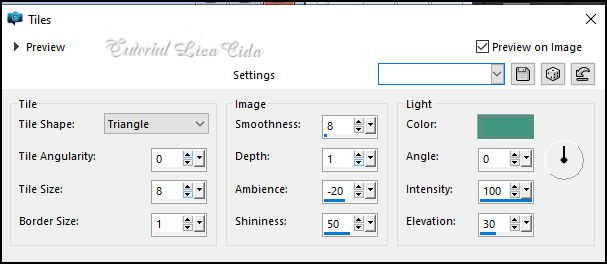
Effects → Texture Effects → Tiles (cor do Background).
Effects → 3D Effects → Drop Shadow: 0 / 0 / 100 / 70,00 — Color: #000000.
Layers → Merge → Merge Down.
Retire a visibilidade da layer.
11_.
Ative a layer Raster 1.
Layers → New Raster Layer.
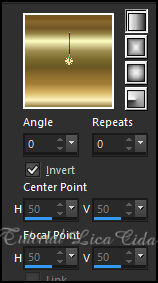
Pinte com o gradiente Corel_06_017 (anexado ao material).
Configure: Style: Linear — Angle: 0 — Repeats: 0 — Invert marcado.
12_.
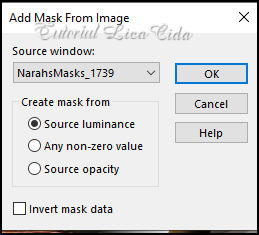
Layers → New Mask Layer → From Image: NarahsMasks_1739.
Effects → Edge Effects → Enhance.
Layers → Merge → Merge Group.
13_.
Plugin Kiwi's Oelfilter → Zig-Zack: Default (2 / 2 / 128 / 128).

Effects → 3D Effects → Drop Shadow: 2 / 2 / 100 / 2,00 — Color: #000000.
14_.
Edit → Copy no decowithoutyou1_bylc
Edit → Paste As New Layer.
15_.
Com a ferramenta Pick Tool: Position X: 267 — Position Y: 127.
Tecle M para desativar a ferramenta.
Layers → Arrange → Move Down.
Effects → 3D Effects → Drop Shadow: 2 / 2 / 100 / 2,00 — Color: #000000.
16_.
Ative a layer Raster 1.
Selections → Select All.
Edit → Copy no Callitubes-57misted
Edit → Paste Into Selection.
Selections → Select None.
17_.
Effects → Image Effects → Seamless Tiling: Default.
18_.
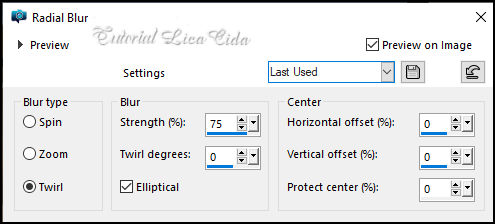
Adjust → Blur → Radial Blur.
19_.
Plugin L en K's → Palmyre: Default (255 / 7).
20_.
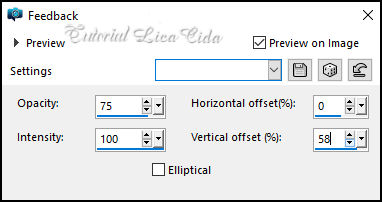
Effects → Reflection Effects → Feedback.
21_.
Edit → Repeat: Feedback (mesmos valores).
Layers → Duplicate.
22_.
Effects → Geometric Effects → Perspective - Horizontal: 95 — Transparent.
Image → Mirror → Mirror Horizontal.
23_.
Edit → Repeat: Effects → Geometric Effects → Perspective - Horizontal: 95 — Transparent.
Layers → Duplicate.
24_.
Effects → Image Effects → Offset: H: 0 / V: 180 — Custom e Transparent marcados.
Layers → Merge → Merge Down.
25_.
Com a ferramenta Magic Wand, Tolerance e Feather: 0, selecione o centro das barras.
26_.
Edit → Copy no Callitubes-57misted
Edit → Paste Into Selection.
Selections → Select None.
Adjust → Sharpness → Sharpen More.
27_.
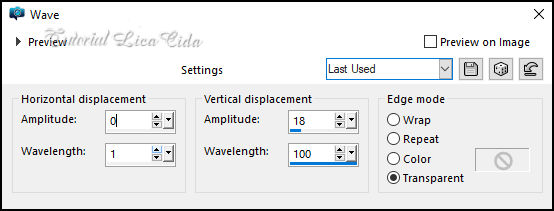
Effects → Distortion Effects → Wave.
Blend Mode: Difference.
28_.
Ative a layer do topo e ative novamente a visibilidade dela.
LAYERS
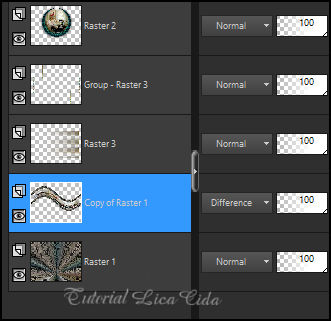
Edit → Copy no pisowithoutyou__bylc
Edit → Paste As New Layer.
Objects → Align → Bottom.
Blend Mode: Luminance (L).
Com a ferramenta Eraser, Size: 80, apague a sombra da mask (Group - Raster 3).
29_.
Na layer do topo (Raster 4):
Edit → Copy no tube Callitubes-2387mulheres
Edit → Paste As New Layer.
Posicione a gosto. Drop Shadow à sua escolha.
30_.
Edit → Copy no Callitubes-296decor
Edit → Paste As New Layer.
Posicione a gosto. Drop Shadow à sua escolha.
31_.
Edit → Copy no Callitubes-251flores
Edit → Paste As New Layer.
Posicione a gosto. Drop Shadow à sua escolha.
32_.
Edit → Copy no titulo Without You_ by lc
Edit → Paste As New Layer.
Posicione a gosto.
BORDAS
Image → Add Borders: 1 px, Symmetric marcado — Color: #000000.
Selections → Select All.
Image → Add Borders: 15 px, Symmetric marcado — Color: Foreground.
Image → Add Borders: 15 px, Symmetric marcado — Color: Background.
Image → Add Borders: 15 px, Symmetric marcado — Color: Foreground.
Selections → Invert.
Adjust → Blur → Radial Blur (item 18).
Plugin L en K's → Palmyre: Default (255 / 7).
Plugin Graphics Plus → Cross Shadow → Default.
Selections → Invert.
Effects → 3D Effects → Drop Shadow: 0 / 0 / 80 / 40,00 — Color: #000000.
Selections → Select None.
Image → Add Borders: 1 px, Symmetric marcado — Color: #000000.
Aplique a marca-d'água.
Assine e salve.
Image → Resize: Width 1024 px.
Espero que apreciem.
Aparecida / LicaCida, setembro de 2022.
Rio de Janeiro - Brasil.

VOLTAR
Copyright ©2026 - Web Design - Naise Minas
|


