|
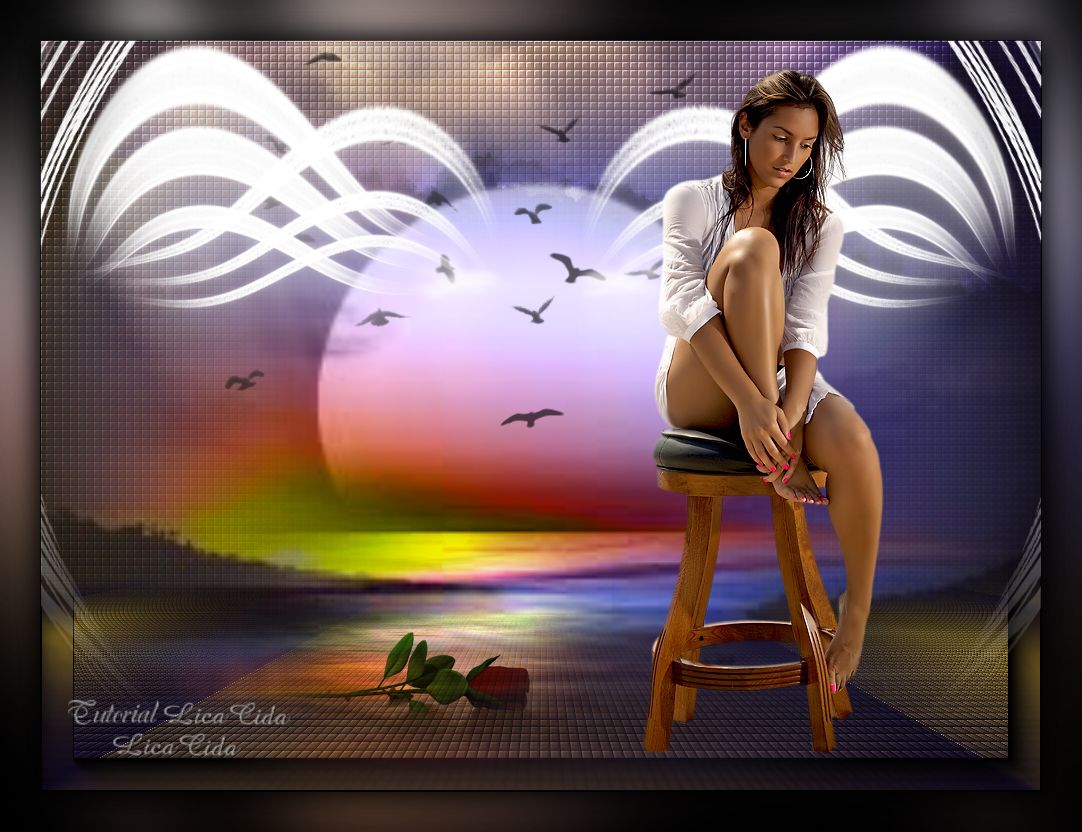
Wonderful
DEDICATÓRIA
Carmelita, dedico o tutorial com carinho!
TRADUÇÕES

MATERIAL

Scripts: circulo
nuvensmara10 --
Salvar na pasta Scripts-Restricted do PSP.
Tubes: Grisi_Woman_795
-Mist corinne.vicaire - mer 07.03.11 - 01_
Imagens: imagens CAUIRPQE
imagensCAZXF4W3
Pássaros: bird_brushes_II_by_lpdragonfly_3
SS-birds-flying_21
Arquivo: arquivolc (Raster 1 e Raster 2)
Masks: 20-20
!!!!gradientedworisch
Marca-d'água.
Efeitos do PSP.
Versão usada: PSP X6.
PLUGINS
Plugin Flaming Pear → Flexify 2
Plugin MuRa's Meister → Perspective Tiling
Plugin AAA Frames → Foto Frame
Plugin FM Tile Tools → Saturation Emboss
Plugin Alien Skin Eye Candy 5: Impact → Motion Trail
TUTORIAL
|
Esta seta marca sua linha
Clique e arraste para movê-la
|
|
1_.
Abra uma nova imagem transparente de 1000 x 700 px.
2_.
Edit → Copy no arquivolc (Raster 1)
Edit → Paste As New Layer.
Layers → Merge → Merge Down.
3_.
Adjust → Hue and Saturation → Hue Map.
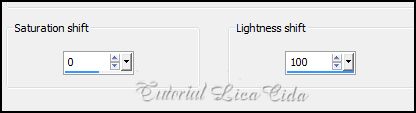
Image → Flip.
4_.
Plugin Flaming Pear → Flexify 2.
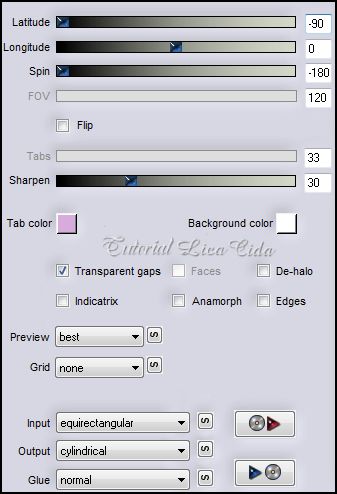
Image → Flip.
Objects → Align → Top.
5_.
Image → Canvas Size: 1000 x 750 — Bottom: 50.
6_.
Edit → Copy no arquivolc (Raster 2)
Edit → Paste As New Layer.
Objects → Align → Top.
7_.
Layers → New Raster Layer.
Layers → Arrange → Send to Bottom.
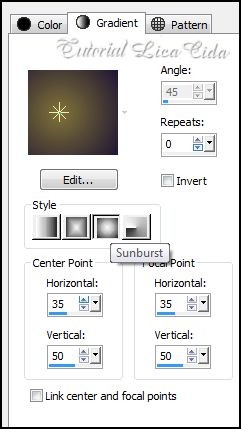
Pinte com o gradiente formado pelas cores #817339 e #1e1533.
Configure: Style: Sunburst — Repeats: 0 — Invert desmarcado — Center Point: H: 35 / V: 50 — Focal Point: H: 35 / V: 50.
8_.
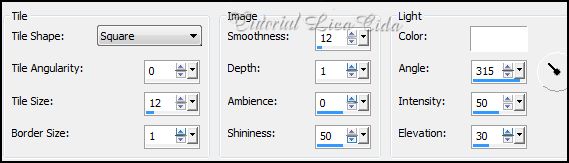
Effects → Texture Effects → Tiles.
9_.
Plugin MuRa's Meister → Perspective Tiling.
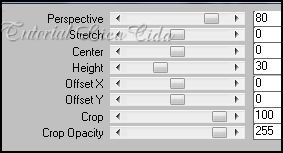
Com a ferramenta Magic Wand — Feather: 60, clique na parte transparente.
Veja a configuração:

Pressione a tecla Delete (cinco ou seis vezes).
Selections → Select None.
10_.
Plugin AAA Frames → Foto Frame: Width: 32 — demais valores Default.
11_.
Layers → New Raster Layer.
Layers → Arrange → Send to Bottom.
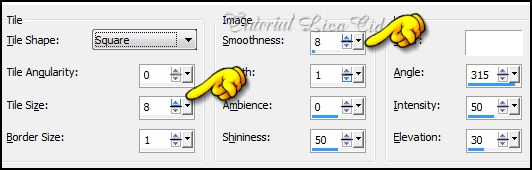
Pinte com o mesmo gradiente formado no item 7.
Repita Effects → Texture Effects → Tiles, mudando os valores.
12_.
Plugin FM Tile Tools → Saturation Emboss — Default.
Layers → Duplicate.
13_.
Layers → New Mask Layer → From Image: 20-20.
Layers → Duplicate.
Layers → Merge → Merge Group.
14_.
Layers → New Raster Layer.
Layers → Arrange → Send to Bottom.
Pinte com o mesmo gradiente formado no item 7.
Execute o script "circulo".

Procure o script "circulo".
Clique em Run Selected Script para executá-lo.
Aplique o mesmo script "circulo" na Raster 4.
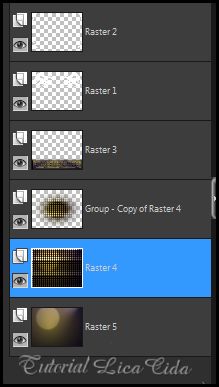
LAYERS
15_.
Ative a Raster 3.
Edit → Copy na imagens CAUIRPQE (Raster 2)
Edit → Paste As New Layer.
16_.
Effects → Distortion Effects → Punch: Strength: 50.
17_.
Edit → Copy na imagensCAZXF4W3 (Raster 2)
Edit → Paste As New Layer.
Usei duas imagens para integrar melhor o trabalho; use a gosto.
18_.
Ative a Raster 1.
Plugin Alien Skin Eye Candy 5: Impact → Motion Trail.
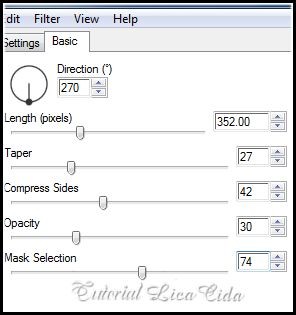
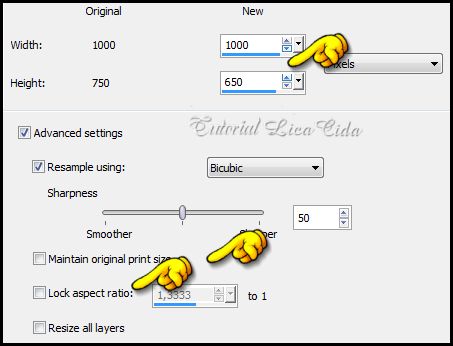
Image → Resize.
19_.
Ative a Raster 7.
Layers → New Raster Layer.
Execute o script "nuvensmara10".

Procure o script "nuvensmara10".
Clique em Run Selected Script para executá-lo.
20_.
Ative a Raster 2.
Layers → New Mask Layer → From Image: !!!!gradientedworisch.
Layers → Duplicate.
Layers → Merge → Merge Group.
21_.
Effects → Distortion Effects → Pinch: Strength: 16 (use a gosto).
Effects → 3D Effects → Drop Shadow: 0 / 0 / 80 / 40,00 — Color: #000000.
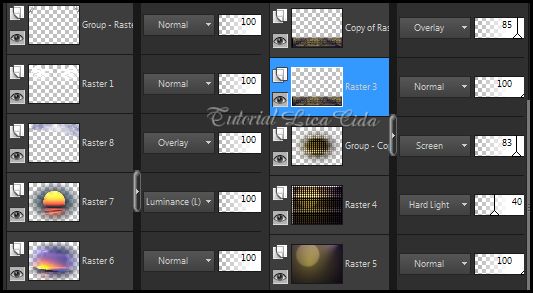
LAYERS
Altere os Blend Modes e a Opacity das layers.
22_.
Edit → Copy no tube Grisi_Woman_795
Edit → Paste As New Layer.
Posicione.
23_.
Ative a Raster 7.
Edit → Copy no tube -Mist corinne.vicaire - mer 07.03.11 - 01_ (Raster 3)
Edit → Paste As New Layer.
Posicione e decore a gosto.
24_.
Ative a Raster 8.
Edit → Copy nos pássaros (bird_brushes_II_by_lpdragonfly_3 e SS-birds-flying_21)
Edit → Paste As New Layer.
Aplique a marca-d'água.
Formate e decore seu top a gosto.
Assine e salve.
Espero que gostem.
Aparecida / LicaCida, setembro de 2014.
Rio de Janeiro - Brasil.

VOLTAR
Copyright ©2026 - Web Design - Naise Minas
|


