|

Yesterday
TRADUÇÕES

MATERIAL

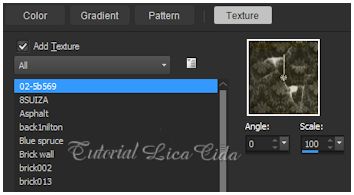
Texture: Texture _ 02-5b569 --
Salvar na pasta Textures do PSP.
Use de acordo com o seu tube.
Tube: tube2426_mulher_mara_pontes
Elemento: deco1lc
Brush: brush 24
Marca-d'água.
Efeitos do PSP.
Versão usada: PSP X7, podendo ser feito em outras versões.
PLUGINS
Plugin MuRa's Meister → Pole Transform
Plugin MuRa's Meister → Perspective Tiling
Plugin Alf's Power Grads → Abs Linear Grads
Plugin FM Tile Tools → Blend Emboss
Plugin Nik Software → Color Efex Pro 3.0 → Graduated Filters
TUTORIAL
|
Esta seta marca sua linha
Clique e arraste para movê-la
|
|
1_.
Abra uma nova imagem transparente de 950 x 650 px.
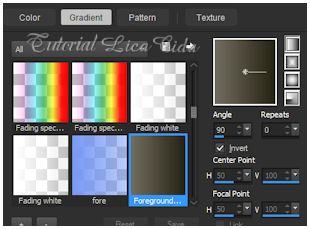
Pinte com o gradiente formado pelas cores #262314 e #716e5f, retiradas da textura.
Configure: Style: Linear — Angle: 90 — Repeats: 0 — Invert marcado.
2_.
Na mesma layer, com a ferramenta Flood Fill (baldinho), aplique a textura: dê duas ou três pinceladas.
Não esqueça de marcar Add Texture.
3_.
Ative a ferramenta Dodge Brush (primeira indicação abaixo; veja o print).
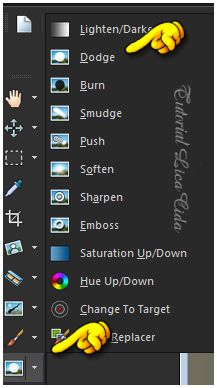
Configure:

Passe suavemente sobre a layer com o botão esquerdo do mouse. Realce a textura a gosto.
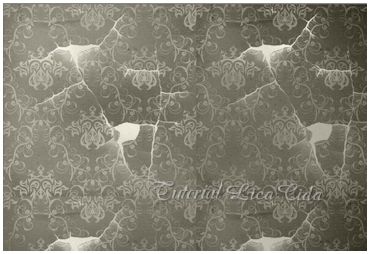
4_.
Effects → Effects Browser → Add Noise → Photo grain low.
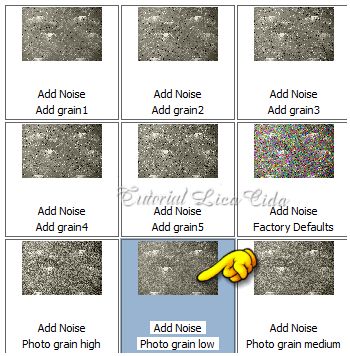
5_.
Plugin FM Tile Tools → Blend Emboss.
6_.
Selections → Select All.
Selections → Modify → Contract: 30 px.
Selections → Invert.
Selections → Promote Selection to Layer.
7_.
Effects → 3D Effects → Inner Bevel.
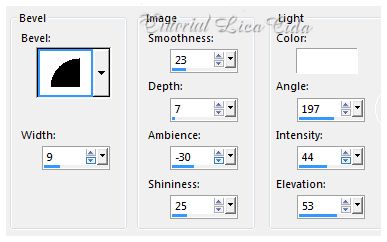
Selections → Select None.
8_.
Effects → Geometric Effects → Skew: Horizontal — Angle: 45 — Transparent.
Layers → Duplicate.
Image → Mirror → Mirror Horizontal.
Layers → Merge → Merge Down.
9_.
Plugin MuRa's Meister → Pole Transform.
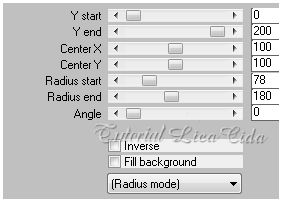
OBSERVAÇÃO
Testando, percebi que o efeito pode se alterar, ficando somente em círculos.
Image → Mirror → Mirror Vertical (Flip).
Ative a Raster 1.
Layers → Duplicate.
10_.
Plugin Alf's Power Grads → Abs Linear Grads.
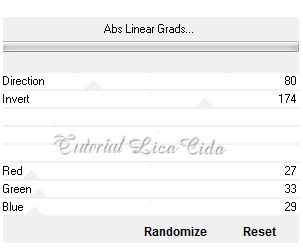
Ative a Raster 1.
Layers → Duplicate.
11_.
Plugin MuRa's Meister → Perspective Tiling — Height: 16 (restante Default).
Effects → User Defined Filter → Emboss_3.
Effects → 3D Effects → Drop Shadow: -12 / 2 / 72 / 17,00 — Color: #000000.
12_.
Edit → Copy no deco1lc
Edit → Paste As New Layer.
Objects → Align → Top.
Layers → Arrange → Bring to Top.
13_.
Edit → Copy no brush 24 (Raster 2)
Edit → Paste As New Layer.
Posicione a gosto.
Ative a Raster 1.
Layers → Duplicate.
14_.
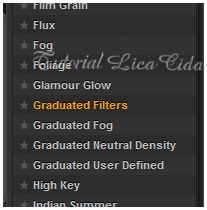
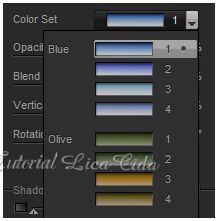
Plugin Nik Software → Color Efex Pro 3.0 → Graduated Filters — Color Set: Blue 1 (use a gosto).
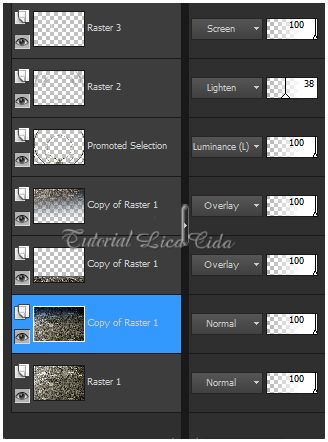
LAYERS
15_.
Edit → Copy no tube tube2426_mulher_mara_pontes
Edit → Paste As New Layer.
16_.
Image → Add Borders: 1 px, Symmetric marcado — Color: #716e5f.
Image → Add Borders: 10 px, Symmetric marcado — Color: #262314.
Image → Add Borders: 1 px, Symmetric marcado — Color: #716e5f.
17_.
Image → Add Borders: 20 px, Symmetric marcado — Color: #262314.
Image → Add Borders: 1 px, Symmetric marcado — Color: #716e5f.
18_.
Image → Add Borders: 30 px, Symmetric marcado — Color: #262314.
19_.
Selecione a borda e repita o item 4: Effects → Effects Browser → Add Noise → Photo grain low.
Selections → Invert.
Effects → 3D Effects → Drop Shadow: 0 / 0 / 80 / 40 — Color: #000000.
Selections → Select None.
20_.
Image → Add Borders: 1 px, Symmetric marcado — Color: #716e5f.
Não esqueça de desmarcar Add Texture.
Aplique a marca-d'água.
Assine e salve.
Espero que gostem.
Aparecida / LicaCida, maio de 2015.
Rio de Janeiro - Brasil.


VOLTAR
Copyright ©2026 - Web Design - Naise Minas
|

